Thursday 31 March 2011

Ginger Cake & Other Tasty Gluten Free Finds

I’m not usually one to go out and buy cakes, preferring to make them myself, but every so often it’s nice to let someone else do the work and buy something tasty for afternoon tea. Since starting my gluten free diet, this has been less of an option for me. Grated there are now quite a few gluten free products around, but none that I’ve been particularly impressed with.

However, all that changed on a recent visit to Waitrose. I was browsing down the bread isle, tormenting myself with all their gorgeous fresh breads (I know I shouldn’t but I can’t help but look) and when I’d come to the end I turned a corner and found myself in their gluten free section. Amongst the products was a ginger cake by The Village Bakery. This is a brand I instantly recognised as I used to love their rye breads. I had no idea they did gluten free things too, but seeing the name I decided to give the ginger cake a try and I have to say I was very impressed.

The cake comes in a stylish card tray which instantly made me feel like it was an artisan product I might have bought from a market stall or posh bakery. Another plus was the cake actually looked as good as the picture on the box. Cutting into it, I found it had a lovely thick sugary top crust, and was moist and fluffy underneath. I adore the flavour of ginger and so was pleased to see the slice speckled with pieces of real ginger, which added a great warming spiciness when bitten into.

I was also impressed that the cake was quite moist and didn’t crumble on touch, but was able to be cut into generous slices. It was also nice to see something a bit different to the usual gluten free cake options, which usually revolve around chocolate, under the basis that chocolate makes anything taste good (not true!) So if your short of time or need a cake for a gluten free friend then I recommend giving the ginger cake a try. It’s sold only in Waitrose as far as I can tell.

Other gluten free finds which get the thumbs up from me are:
Eat Naturals Gluten Free Toasted Muesli with Buckwheat – gorgeously crisp and crunchy with a dash of cinnamon, coconut and seeds and no oats – hurrah!

Thai Sweet n Spicy Organic Tortilla Chips with Flaxseeds – these really pack a chilli hit, but are also a little sweet and tangy. Great crunch and the flax makes you think their healthy.

Munchy Seeds – pots of mixed seeds with different flavours or coatings. These are addictive and so easy to munch on. I love the chilli ones for their spicy kick, but the sweet vanilla pumpkin seeds are amazing and so unique.

Does anyone else have any new tasty foodie finds?

Sunday 27 March 2011

The Daring Bakers March 2011: Yeasted Rhubarb & Rosewater Meringue Ring Cake

This months challenge was one of the most different and unusual styles of yeasted, sweet bread, cake, ring, baked, meringue, rolled concoctions I have ever seen, eaten and baked! It’s essentially a sweet yeasted dough that it rolled out, spread with a layer of meringue, scattered with the filling of your choice, rolled up like a swiss roll, formed into a ring, slashed and baked.

I think it’s the addition of the layer of raw meringue in the filling that makes this recipe so unique. I’ve never seen anything like it before.

The March 2011 Daring Baker’s Challenge was hosted by Ria of Ria’s Collection and Jamie of Life’s a Feast. Ria and Jamie challenged The Daring Bakers to bake a yeasted Meringue Coffee Cake. Here in the UK if we call something a ‘coffee cake’ we mean it has coffee in it, whereas in the USA it simply means it’s a cake that’s ideal to be served with a morning coffee. Sort of like our toasted tea cakes – they don’t actually contain tea. However, I decided to rename my cake to Yeasted Rhubarb & Rosewater Meringue Ring Cake which makes more sense to me – sort of.

The main elements of this challenge were to make the dough and the meringue filling/spread. We were free to add any additional flavours to these components and allowed to choose whatever other filling we liked. As you have probably guessed from the title I chose to flavour my meringue with rosewater syrup and add some finely diced rhubarb, spices and pecan nuts to the filling.

I had to play around with the dough recipe in order to make it gluten free, but I’m pleased to say that apart from being a little soft to work with, it behaved very well, even during rolling out thanks to the added xanthan gum which adds back a little elasticity that’s missing from the gluten free flours.

I have recently got really hooked on the flavour of rosewater syrup that I discovered in an asian supermarket, I love its sweet delicate fragrance and flavour. It makes everything taste so exotic, yet soothing like lavender. It seemed the perfect thing to pair with the fresh rhubarb, picked from my grandmother garden. Plus, I adore the pale pearly pink colour it turned the meringue.

Sticking with the fragrant flavours, I spiced by rhubarb with a mix of ground cinnamon, ginger and cardamom which added a subtle spiciness. At the last minute I added some pecan nuts and I’m pleased I did as they gave some crunch to the finished cake, as everything else was rather soft and squishy.

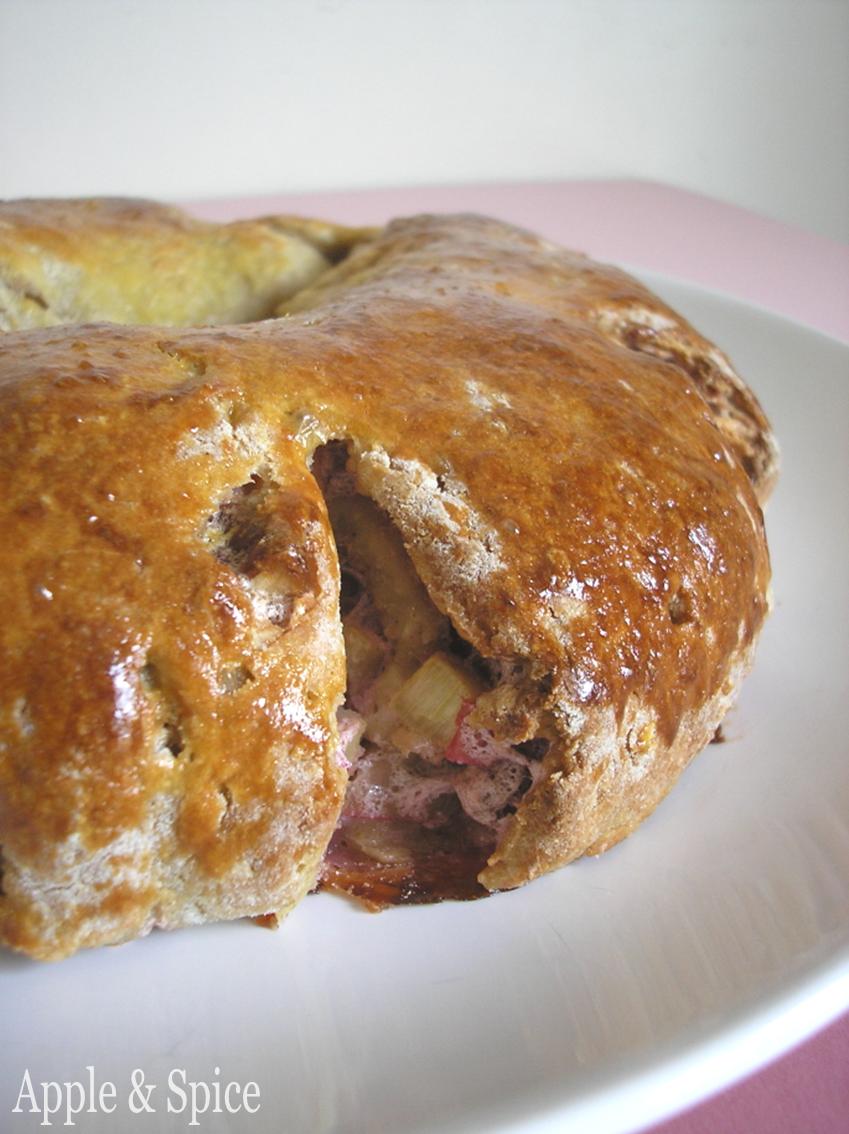
The finished cake was good and I loved all the flavours together. However I’m still a little unsure what the purpose of the meringue was. It certainly kept the insides very moist, but it wasn’t really noticeable of being meringue. I suppose it’s a way of not using copious amounts of butter to keep the filling soft and gooey. I liked the way each slice looked, studded with nuggets of pecan and squishy blobs of rhubarb.

The cake was very nice on the day it was made, a little haphazard looking, but gluten free dough never behaves in quite the same way as normal dough (that’s my excuse anyway). It was tasty with a crisp curst and a soft and tender filling. However, it doesn’t really keep well and by the second day it was tasting stale and the insides had started to turn mushy so eat it quickly!

Thanks girls for choosing such a fun and novel baking challenge. Click here to see how the traditional ring cakes should look and to see the daring bakers blogroll.

Yeasted Rhubarb & Rosewater Meringue Ring Cake (GF)
Yeasted Cake Dough
250g gluten free flour (100g buckwheat, 50g tapioca flour, 50g brown rice flour & 50g soya flour)
2 tsp xanthan gum
25g caster sugar
¼ tsp salt
1½ tsp dried yeast
90ml whole milk
30ml water
50g unsalted butter, at room temperature
1 large egg

Rosewater Meringue Filling
1 large egg white, at room temperature
1 pinch salt
1 tbsp rosewater syrup
35g caster sugar

Rhubarb Filling
50g chopped pecans
20g caster sugar
1 tsp cinnamon
½ tsp ground ginger
½ tsp ground cardamom
4 thin sticks (around 150g) rhubarb, diced into 5mm pieces

Method - Dough
In a large mixing bowl, combine 125g of the flour, the xanthan gum, sugar, salt and yeast.
In a saucepan, combine the milk, water and butter and heat over medium heat until warm and the butter is melted.
With an electric mixer on low speed, gradually add the warm liquid to the flour/yeast mixture, beating until well blended. Increase mixer speed to medium and beat 2 minutes. Add the egg and 60g more flour mix. Switch to a spatula or wooden spoon and work the flour into the dough.
Stir in just enough of the remaining flour to make a dough that holds together (I didn’t need all mine). Turn out onto a floured surface and knead the dough until smooth and soft. (It won’t be elastic like gluten dough, more like a pastry in texture).
Place the dough in a lightly oiled bowl, turning to coat all sides. Cover the bowl with plastic wrap or a kitchen towel and let rise until double in bulk, 45 – 60 minutes.

Rhubarb Filling
In a small bowl, combine the cinnamon, ginger, cardamom and sugar and mix until well combined. Add the chopped pecans and rhubarb and toss to evenly coat them in the spiced sugar. Set to one side.

Rosewater Meringue Filling
Once the dough has doubled in size, make the meringue.
In a clean mixing bowl beat the egg white (save the egg yolk for glazing later) with the salt, first on low speed for 30 seconds, then increase to high and continue beating until foamy and opaque.
Drizzle in the rosewater syrup, followed by the sugar, whisking all the time until you achieve a stiff glossy meringue.

Assembly
Line a baking tray with baking paper or a silicone mat.
On a lightly floured surface, roll out the dough into a 20 x 10inch rectangle. Spread the meringue evenly over the rectangle, leaving a ½ inch gap around the edge. Sprinkle the rhubarb sugar filling evenly over the meringue.
Now, roll up the dough in a scroll, starting from the long side. Be gentle as the dough is likely to tear. Pinch the seam closed to seal. Very carefully transfer the filled log to the baking tray and place seam side down. Bring the ends of the log around and seal the ends together, forming a ring, tucking one end into the other and pinching to seal.
Using kitchen scissors make cuts along the outside edge at 1inch/2.5cm intervals, cutting about half way through.
Cover the cake loosely with clingfilm and leave to rise again for 45minutes, until slightly puffy, they won’t double in size.
Preheat the oven to 180C.
Brush the top of the cake with the egg yolk, saved from making the meringue. Bake for 25-30 minutes until puffed and golden brown. The dough be browned and crisp underneath
Remove from the oven and use a large spatula to carefully slide the cake onto a cooling rack. Leave to cool before slicing.
These are best eaten fresh the same day. They go a little soft by day 2-3.
Makes one 10inch ring cake/sweet bread

Thursday 24 March 2011

Chocolate Cheesecake Cheese-Fake GF & DF

A few weeks back I was set a challenge – could I make a gluten and dairy free cheesecake? Ermm yikes! Gluten free wasn’t going to be a problem as you can now buy gluten free digestive style biscuits in most supermarkets, but dairy free? Take the cheese and cream out a cheesecake and you’re left with a few biscuit crumbs and some eggs.

After my initial moment of panic, I remembered the delicious cheeseless cheesecake I made a few months back using yoghurt. Yoghurt obviously still contains dairy, but I knew that dairy free soya yoghurt was now readily available and it got me wondering if this would also work baked into a cheesecake. Only one way to find out!

I used sunflower spread with the crushed gluten free biscuit crumbs to form the base for my cheesecake which worked well. Just make sure your biscuits are also dairy free, as some I found weren’t. I decided to make the cheesecake a chocolate cheesecake as pretty much everything chocolaty tastes good, and I thought it would also mask any potentially odd flavours that might arise from the soya yoghurt.

The batter for the cheesecake was a little runny, but apart from that, came together well without splitting or curdling. It baked perfectly, with a smooth, slightly glossy surface and after a dusting of cocoa powder it was unrecognisable from the real thing, at least by appearances sake.

On slicing, it cut very cleanly, too cleanly really, as there was no thick creaminess to stick the mixture to the knife, but this can’t really be viewed as a negative. It was lightly speckled with flecks of chocolate where I obviously hadn’t mixed it sufficiently, but this added to its appeal.

Now came the vital bit – the taste! It was….ok, good, but not great. It ate well and had a good chocolate flavour but it just seemed to be lacking something. After several bites I decided what it was lacking was the creamy mouthfeel, essentially the dairy that helps give a cheesecake its thick sticky creaminess in the mouth.

The flavour of the cheesecake was great while you were eating, but seemed to dissolve into nothing the minute you swallowed. There was no lingering flavour or creaminess coating your mouth. It just sort of went. The friend who’d given me the challenge loved it – so I suppose it was good considering it was gluten and dairy free, but I don’t think things should be judged ‘good considering they’re…’ I think they should taste good to everyone, gluten/dairy free or not.

So my experiment has revealed that yes it is possible to produce a gluten and dairy free cheesecake, but without further experiments I’m not sure it was worth it. Maybe it was the soya or just the complete lack of dairy? Anyone got any ideas how to improve the creaminess without adding dairy?

Chocolate Cheesecake Cheese-Fake GF & DF
Ingredients – Biscuit Base
125g gluten & dairy free digestive style biscuits
50g Pure dairy free margarine

Cheesecake
500g Alpro soya yoghurt
50g caster sugar
75g dark dairy free chocolate
20g cocoa powder
2 eggs
2 tbsp cornflour

Method
Line a 6-6.5inch round springform tin with baking parchment. Preheat the oven to 160C.
Place the biscuits into a strong plastic bag and beat it with a rolling pin until the biscuits are broken in crumbs.
Melt the margarine in a large bowl, add the biscuits crumbs and stir well to mix. Spread the buttery crumbs into the base of the tin and press down firmly to form a even layer. Place in the fridge to chill while you make the topping.
In a large bowl, mix the sugar, cornflour and cocoa powder together until well combined.
Pour in the yoghurt and beat to combine, followed by the eggs.
Melt the chocolate and whip into the yoghurt mixture.
Pour the mix over the chilled biscuit base and bake for 1hour – 1hour 10 minutes until slightly puffed and set around the edges, but still wobbly in the centre.
Remove from the oven and allow to cool in the tin for 1½ hours before chilling in the fridge for at least 4 hours.
When ready to serve, run a hot sharp knife around the rim of the tin to help release it from the sides.
Dust with a little extra cocoa powder and serve.

Tuesday 22 March 2011

Hotel Chocolat – Winners!


My Hotel Chocolat giveaway is now closed. To be fair, I’ve used a random number generator to pick the winners.

The winner of The Sleekster Egg Box Selection is comment No. 4 – Please Do Not Feed The Animals

The winner of the Caramel Road Slab and Chocolate Bunny lolly is comment No.17 – emily13
Congratulations to you both! I’ll be emailing you shortly for your address, enjoy!

Sunday 20 March 2011

The Cake Slice March 2011: Chocolate Cream Pound Cake

The posting date for The Cake Slice bakers certainly seems to roll round quickly! This month the winning cake was a Chocolate Cream Pound Cake made using double cream and butter for richness and copious amounts of cocoa powder for a deep rich chocolate flavour.

When it came to baking the cake, I wasn’t in need of a large cake so decided to only make a third of the batter – easiest way to split the 3 eggs called for in the recipe – and to bake them in 4 mini loaf tins. I bought these a while ago and hadn’t ever got round to using them, so this was the perfect excuse.

I loved the shape and size this gave my mini pound cakes. I think they look so cute, I never can resist mini sized things, plus, this way you get to eat a whole mini cake yourself without feeling greedy!

I used brown teff flour in place of the wheat flour to make it gluten free. However, I think I should have done a mix of flour or added some xanthan gum to help improve the texture of the flour as my little loaf cakes sunk in the middle – while still in the oven – so I don’t think the flours structure was strong enough to support the cake. Oh well, lesson learned.

The problem of the dip in the middle was easily solved by serving the little cakes upside down. I think this actually gave them a better shape due to being mini and meant no one was any the wiser when it came to eating them. Shhhh.

Topped off with a little drizzle of coffee glaze and the cakes were good to go. The crumb inside was very dark and rich due to all the cocoa powder. This gave them a rich chocolate flavour and a slightly fudgy, almost brownie like consistency.

They were delicious on the day they were baked, but I found them a little dry the following day, so I’m not sure I’d bake them again if I knew they wouldn’t all be eaten straight away. Overall I found this cake tasty, but nothing outstanding.

Click to see The Cake Slice blogroll

Chocolate Cream Pound Cake
(Recipe adapted from Cake Keeper Cakes by Lauren Chattman)
Ingredients
60g cocoa powder
55ml double cream
150g plain flour (I used GF brown teff flour)
¼ tsp baking soda
¼ tsp salt
100g unsalted butter, softened
335g caster sugar (I reduced this to 225g)
3 eggs
1 tsp vanilla extract

Method
Heat the oven to 160C. Grease a 9x5 inch loaf pan and dust with flour.
Sift the cocoa powder into a heatproof bowl. Place the cream in a microwavable bowl and heat for 30-60 seconds until just boiling. Pour the hot cream over the cocoa and stir and mash with a spoon to make a thick paste. Set aside to cool.
Combine the flour, baking soda and salt in a medium mixing bowl.
Combine the butter and sugar in a large bowl and cream with an electric mixer on medium-high speed until fluffy, about 3 minutes. Scrape down the sides of the bow once or twice as necessary. Beat in the cocoa powder paste until well combined (it will look grainy but this is fine).
With the mixer on medium-low speed add the eggs, one at a time, scraping down the bowl after each addition. Stir in the vanilla (the batter should now be smooth and glossy).
Turn the mixer to low speed and add the flour mixture, a third at a time, scraping down the sides after each addition. Add the last addition, mix for 30 seconds on medium speed.
Scrape the batter into the prepared pan and smooth the top with a rubber spatula. Bake the cake until it is firm to the touch and a toothpick inserted in the centre comes out clean, about 1 hour. Let the cake cool in the pan for 5 minutes. Invert it onto a wire rack and then turn it right side up on the rack to cool completely. Slice and serve.
Store uneaten cake in a cake keeper or wrap and store at room temperature for up to 3 days.
Makes one 9x5 inch loaf cake

To Make Mini’s
Use only one-third of the ingredients (easiest way to scale down the 3 eggs in the original recipe) and bake in 4 mini loaf tins that have been lined with greaseproof paper. Bake for 18-20 minutes. Allow to cool for 10 minutes before turning out to cool. Serve upside down, drizzled with the glaze of your choice.

Tuesday 15 March 2011

Egg-cellent Easter Eggs from Hotel Chocolat & A Giveaway!

Easter is just a few weeks away and this year my birthday happens to fall on Easter Sunday. So when Hotel Chocolat asked if I’d like to review one of their Easter eggs I was more than happy to accept – a yummy early Easter/birthday present combined!

They offered me their Milk Chocolate Giant Ostrich Egg – which comes with two egg-xtra thick shells of milk chocolate, studded with cookie pieces, crispies and white chocolate chunks, all accompanied by a selection of their chocolates, a rocky road and caramel slab and a cute chocolate bunny lolly. Sounds egg-tremely divine yes? Unfortunately for me, I had to turn them down as the cookie studded egg and some of the chocolates contained gluten.

After explaining why, they immediately said they would send me their chocolate mini egg selection box known as The Sleekster. 30 chocolates eggs in 10 assorted flavours in a selection of white, milk and dark chocolate – all gluten free! Ohhh yes please!

However, I think there was a bit of confusion somewhere as they first delivered me the Giant Ostrich Egg originally planned, before sending me The Sleekster egg selection!! All my family and friends were egg-ceptionally quick to volunteer their services as taste testers for the Ostrich cookie egg so rest assured, they were very much appreciated.

Everyone was amazed at how thick the shell of the ostrich egg was and commented that the crispie bits and white chocolate chunks were great at making each bite fun and different, although, some said this made it far too easy to eat! It was described as rich and milky. The chocolates were fought over with the Feuilletine Frenzy (hazelnut praline) and Macadamia Crunch (macadamia praline) being particular favourites.

From the first impression of The Sleekster egg selection I knew I was going to be in for a special treat. The box itself is dark, glossy and stylish and the dainty rows of perfect chocolate eggs inside, in varying shades of creamy white to dark mahogany brown only heightened my expectations.

Unlike some chocolates, these stunningly streaked eggs more than lived up to their attractive appearance in both quality and flavour. The chocolate is rich, smooth and creamy, and melts in the mouth, flooding your senses with intense chocolate flavour that lingers on for several minutes even after you have finished it. Pure chocolate indulgence.

The Sleekster eggs are filled with an assortment of pralines, truffles, caramels and ganaches, encased in thick white, 40-50% milk, milk caramel or 70% dark chocolate shells.

With so much choice it was hard to know where to start. I first selected the Blueberry Egg. A thick white chocolate shell filled with a blueberry infused white chocolate ganache. The blueberry ganache was amazing and so intensly flavoured, that there was no mistaking the blueberry. It was creamy and sweet, but not at all sickly.

Next I tried the Vanilla Custard Egg. This was a vanilla ganche inside a creamy milk chocolate shell. Simple flavours, but well matched. Delicious.

My surprise favourite of the range was the Caramel Egg. I’m not normally a caramel fan, often finding it too sweet, but this little egg was amazing. A 50% dark milk shell with a thick liquid caramel centre. I’m sure the caramel contained sea salt too, as it had a lingering saltiness that offset the sweetness and balanced perfectly with the darker milk chocolate. Wow. It danced with my taste buds – sweet, salty, smooth, creamy, bitter. Divine.

I’ll let you in on a secret, I’m normally a dark chocolate or nothing kind of girl. I have often treated myself to some of Hotel Chocolat’s dark chocolates in the past, but They’ve now changed my whole perspective to all chocolate types. These were some seriously good chocolates. The white chocolate is smooth and creamy rather than sweet and sickly and the milks are creamy with a rich chocolate flavour and you can actually taste the difference between the varying cocoa contents. The darker milks and 70% dark chocolate are rich intense chocolate flavour, lingering on the right side of smoky bitterness.

Now for the egg-cellent news – Hotel Chocolat have allowed me to offer one lucky person the chance to win a box of The Sleekster Egg Box Selection themselves! They’re gluten free and the range of white, milk and dark chocolates means there is bound to be something to please everyone. (Two do contain alcohol)

Plus, I’m running my own small giveaway. Seeing as I was lucky enough to also receive the Ostrich Egg I am personally going to send one other winner the Caramel Road Slab and Chocolate Bunny lolly (I’m afraid the rest of the egg got munched by the willing taste testers rather quickly!)

As it’s also my birthday over Easter, to win, simply visit Hotel Chocolat’s site and tell me which of their yummy chocolate selections would be your ideal birthday gift and leave a comment below. Open to UK residents only. Please put (UK) in brackets with your comment and some way of contacting you. Competition open until midnight Monday 21st March. The two lucky winners will be chosen at random and contacted soon after for their addresses.

Friday 11 March 2011

Chocolate, Whole Orange & Almond Cake (GF & DF)

I am a member of my local coeliac group and last weekend, they were having a meeting which included a cookery demo followed by an afternoon tea, with all the cakes and goodies being baked by group members. Anyone fond of baking is encouraged to bring something along. This results in two tables groaning under the weight of all the cakes, biscuits and tarts provided, all of which are of course gluten free. For 50p you get an empty plate which you are allowed to fill with as much food as you like. If there is one thing I am fast learning about other coeliacs it’s that they all love a good afternoon tea. Being presented with an entire tableful of gluten free treats is quite a rare experience for us coeliacs with the result that you end up feeling like a child in a sweet shop, giddy with all the choice – although that could be partly due to the sugar rush from eating too much cake! Everyone piles their plates high with a selection of the cakes with second and third helpings often being the norm.

There is never any ‘packet stuff’ with everything being baked by coeliacs for coeliacs meaning it also tastes delicious. It’s a great way to pick up some new recipes. Knowing the high standard of baking on offer, I was determined to take something equally delicious and stumbled across this recipe by Nigella which seemed to fill the bill perfectly.

It’s a chocolate cake made with ground almonds and flavoured with orange. However, this cake is a little different to your usual orange cake, as it uses the WHOLE ENTIRE ORANGE, pith, skin, pulp and all pureed in the mix.

Of course I had to make a trial version of the cake before taking it to the meeting, for quality taste testing purposes obviously. I didn’t want a whole large cake, so I scaled the recipe down and baked it in a small Bundt mould instead. You’re meant to boil the orange in a saucepan of water for a couple of hours but I’ve since discovered that a 10 minute blast in the microwave in a water bath does the same trick, great for when you’re short of time.

The cake turned out far better than I’d hoped. Using a whole orange may sound a little shocking at first but it produces a very moist, slightly dense cake with a fabulous intense orange flavour, similar to marmalade, and not the least bit bitter. Paired against the rich cocoa flavour it gives it a very indulgent decadent flavour. I loved how the slices were speckled with slivers of the orange peel, giving a hint at what’s inside. It really is unbelievably delicious.

We ate the last slice 3 days later, and it was still just as moist as on the day it was made. It only occurred to me later that it’s not only gluten free, but dairy free too! I’m pleased to say it went very well at the meeting with a few people asking for the recipe – hurrah!

Chocolate, Whole Orange & Almond Cake
(Recipe adapted from Feast by Nigella Lawson)
Ingredients
1 medium sized orange – 170-200g weight
3 large eggs
¾ tsp gluten free baking powder
¼ tsp bicarbonate of soda
100g ground almonds
125g caster sugar
25g cocoa powder

Method
Grease a 6-6½inch spring form tin and line the base with greaseproof paper OR lightly oil a small 6-7inch Bundt pan.
In a small saucepan, place the orange and cover with water. Bring to a boil then turn down to a simmer and cook for 1 hour until the orange is soft and tender.
(I’ve found that placing the orange in a microwavable bowl, covering with water and loosely covering the top with clingfilm before microwaving on high for 10 minutes, produces the same results. Great when short of time)
Remove the orange from the water, cut in half and remove any pips. Leave to cool for 15 minutes.
Preheat the oven to 180C.
Place the entire oranges (peel and all), in a food processor and whizz to a pulp. With the mixer running, add the eggs, one at a time, to help break down the orange peel.
Then add the baking powder, bicarb, almonds, sugar and cocoa powder. Whiz together until a smooth batter is formed. There will still be bits of few bits of puréed orange in the batter, which is fine.
Pour the cake mixture into the prepared tin and bake for 35-45 minutes. It should be slightly risen and springy to the touch. A skewer should come out fairly clean, with just a few sticky crumbs attached.
Allow the cake to cool completely in the tin, before releasing from the tin and serving. Gets a shiny sticky top surface the longer it’s stored. Dust with icing sugar or drizzle with a little glace icing if desired.