Tuesday 27 April 2010

Daring Bakers April 2010: Traditional Steamed Suet Pudding – Spotted Dick

The April 2010 Daring Bakers’ challenge was hosted by Esther of The Lilac Kitchen. She challenged everyone to make a traditional British pudding using, if possible, a very traditional British ingredient: suet.

Suet puddings are typically British and for many years have been a highly popular feature on many a households and restaurants menu. Unfortunately they have become less popular in recent years, but they do seem to be starting to creep back onto menus as a revival of old British classic dishes are starting to become fashionable again. Suet puddings in the UK can be sweet or savory. Savory suet puddings often involve the suet being made into a type of pastry which is used to line a pudding basin before being filled with a meaty stew and steamed, for example, the very English Steak & Kidney Pudding. A sweet version can also be made in this way, such as a Sussex Pond Pudding, which involves a whole lemon being backed inside a suet crust. However, more commonly sweet suet puddings resemble steamed sponge puddings, where the suet replaces the butter in the recipe and the puddings are steamed in a pudding basin.

Suet comes in the form of little white pellets and is similar to lard – but for Vegetarians, such as myself, there is now a vegetable fat alternative, much more appealing, particularly in a sweet pudding. Suet melts at very low temperatures meaning it easily melts into the puddings resulting in a very moist textured sponge, even more so when the pudding is traditionally steamed rather than baked. They are naturally denser than a normal sponge pudding – but we Brits are rather fond of our stodgy puddings, particularly when topped off with lashings of custard!

You must remember that suet puddings have been around for over a hundred years and in times of no central heating people often relied on foods such as this to see them through cold hard winters. Suet is also a cheap ingredient and even the sweet puddings contain no butter, eggs and very little sugar meaning they made cheap meals on which to feed your family, so before you go turning your noses up, stop and think about their history!

For this months Daring Bakers challenge we were allowed to chose between sweet or savory suet puddings and also what type of suet pudding to make. I was delighted by this and unsurprisingly decided to go the sweet suet sponge route. I knew instantly what classic traditional British suet pudding I wanted to make – Spotted Dick!

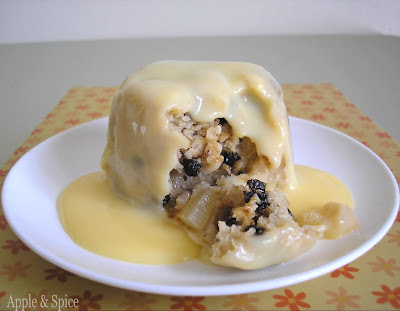
Oy! You in the corner, stop sniggering! There is nothing to smirk over – Spotted Dick has been a great British classic pudding for well over a century! It’s been around long before any sexual connotations could be related to it – it was a purer and more innocent age. For anyone who doesn’t know, Spotted Dick is a steamed suet pudding containing currants and a little spice, served hot and always religiously accompanied by lashings of custard. ‘Spotted’ refers to the currants which are studded throughout the light coloured sponge and ‘Dick’ is through to be derived from the word for dough. The first documented recording of Spotted Dick appeared in the recipe book The Modern Housewife, dating back to 1850! So you see it really is part of our heritage and something your granny and generations before her have undoubtedly been tucking into.

In the last 10 years the name Spotted Dick has come under scrutiny due to childish and immature people finding its name highly embarrassing, childishly humorous or even “impure” due to the sexual connotations the modern word has linked to the word ‘Dick.’ Rather than smile and brush the silly remarks aside, some companies have felt the need to change the name of our great British pud. From 2001 – 2009 various groups including Gloucestershire NHS Trust, Flintshire County Council, Tesco and Sainsbury’s have renamed Spotted Dick as Spotted Richard (as Dick can be short for Richard when referring to a persons name) or even demoted it completely and labeled it simply Sultana Sponge, which personally I think it outrageous!!! This is wrong on so many levels, not only does it make us appear ashamed of our heritage and loose the puddings very identity, but to call it Sultana Sponge makes it sound very drab and ordinary – plus it should contain currants not sultanas! Thankfully thousands of other people agreed that this was political correctness gone made and most puddings have now been restored to their rightful titles. We should be proud and protective of our puddings and food heritage, not bow to the occasional immature remark. Ok, rant and history lesson over – onto the actual pudding!

The puddings were incredibly quick and easy to put together. All that’s required is a bowl and a wooden spoon and in a matter of minutes your puds are ready for the steamer. The recipe I used came from an old Waitrose Food Illustrated magazine and was one of the most authentic ones I could find – most of the modern recipes I found didn’t even use suet. This recipe has been updated slightly as it also includes a little diced Bramley apple – but as this is a very traditional English ingredient I was happy to use it. The thing I liked about the recipe was how it didn’t use any butter or eggs and very little sugar – these used to be very expensive ingredients and so were used sparingly. The pudding gets most of its sweetness from the currants and uses milk to mix the pudding together. A little lemon zest and mixed spice are added for flavour but it’s a remarkably simple pudding considering it tastes so good.

I decided to make my puddings in individual pudding moulds rather than a large basin for ease of serving. They puddings are placed into a shallow pan of simmering water and left to steam for 1½ - 2hours and then they are done. Simply turn them out, douse in liberal amounts of thick custard and enjoy a taste of English history. Very moist and tender, lightly sweet with little bursts of chewy fruitiness in every bite. They are quite dense and filling, but no more than bread pudding and they should be light enough not to feel like a brick in your stomach! Always enjoy piping hot with pools of creamy custard. Apologies if anyone thinks I have been getting overly passionate about a pudding, but I think it’s important not to forget our old fashioned puddings and cooking techniques. Long live Spotted Dick I say – a delicious slice of our traditional English heritage – a pud to be proud of.

P.S. Make it next time your grandmother comes for a visit – She’ll love it! Click to see how my fellow Daring Bakers dealt with their suet puddings.

Steamed Spotted Dick with Bramley Apple
(Recipe courtesy of Waitrose)
Ingredients
175g plain flour
1 tsp baking powder
½ tsp mixed spice
75g vegetable suet
50g light brown sugar
75g currants
1 small Bramley apple
½ lemon, zest only
150ml milk

To Serve
Lashing of custard

Method
Place a large pan filled with 1 inch of water on the hob and bring to a simmer.
Meanwhile, sift the flour, baking powder and mixed spice into a bowl. Stir in the currants, suet and sugar. Peel, core and finely dice the Bramley apple. Add to the mix along with the grated zest of ½ lemon.
Pour over the milk and use a wooden spoon to mix it all into a thick lumpy batter.
Divide the mix between 6 individual pudding basins or 1 large 1.2litre basin.
Cover the top of each pudding with a layer of greaseproof paper and cover tightly with foil.
Place the puddings into the pan of simmering water, ensuring the water does not come more than half way up the sides of the basins. Cover with a lid and leave to gently simmer for 1½ hours for individual puddings, or 2½ hours for a large one.
Remove from the pan and peel off the foil and greaseproof paper (they will be moist and a little sticky to touch).
Run a knife around the edge of the puddings and invert out into a bowl.
Serve immediately with lashings of hot custard.
Makes 6 individual or 1 large Spotted Dick
Any leftover puddings can be reheated for a few seconds in the microwave the following day.

Saturday 24 April 2010

Happy Birthday To Me!

These are some coffee pecan cupcakes made in preparation of my birthday today. My family are taking me out for lunch at a Vegetarian Indian restaurant to celebrate, well I might be partly dragging them with me as they are not veggies. I love Indian food so I can’t wait to go to a restaurant where I can eat everything on the menu!

The weather is meant to be glorious today too. Hope everyone has a wonderful weekend!

Tuesday 20 April 2010

The Cake Slice April 2010: Banana Cake with Chocolate Frosting

When April’s winning cake was announced I was happy but not overly excited. Banana cake with chocolate frosting… sounds nice but pretty standard. The banana cake didn’t even have any nuts, chocolate chips or spices in it, so I was feeling rather nonplussed when I set about making this cake. All that changed when it came to tasting it though.

I didn’t want a large cake this month and so I halved the recipe and baked it in my latest baking tin purchase – do you know what one of these is?

It’s an éclair tin! Apparently you pipe the choux pastry into the tin and end up with perfectly shaped éclairs. However, me being me didn’t buy it to make éclairs – I bought it with the sole intention of using it to bake interesting shaped cakes! This month’s recipe was the perfect excuse to try it out and half the recipe filled the moulds perfectly.

The banana batter baked up lovely and springy and pleasingly golden brown. I could tell before they were even finished baking that I was on to a winner. I tasted a little of the raw mix and it was very light and creamy and obviously banana flavoured. I hate cakes that claim to be banana but have only the merest hint of banana, not so with this mix. If anything the lack of extra additions, that I was grumpy about earlier, actually let the banana shine through and be the star of the show.

I loved the shape of the cakes once they had finished baking, each one the perfect one person portion but much more interesting than a regular cupcake or loaf pan shape.

My frosting gave me a few problems. It was meant to be thick and spreadable but even after letting it cool it was still quite sticky and gooey. I tried spreading it as a middle layer inside one of the cakes but this just made it slide around and so I decided against doing a middle layer and instead used the frosting to coat the entire top and sides of the cakes. This worked well and the frosting actually set into a thick chocolate coating glaze.

In order to jazz them up a bit I melted some white chocolate and did a few arty drizzles over the top which I think makes them look much more elegant and rather like éclairs – only much more tasty in my book.

The flavour of the cake was wonderful. Very intensely banana with the sweet chocolate frosting being a perfect contrast. It wasn’t too thick or rich and provided a great outer shell to the sponge and helped keep them moist. The sponge itself was very light and springy and incredibly moist thanks to the use of buttermilk in the cake. So what started out as potentially being a bit of a plain Jane, turned into an unexpectedly delicious cake. Hurrah!

Click to see my fellow Cake Slice Bakers.
Banana Cake with Chocolate Frosting
(Recipe from Southern Cakes by Nancie McDermott)
Banana Cake
240g plain flour
1 tsp bicarbonate of soda
1 tsp baking powder
¼ tsp salt
150g butter, softened
300g caster sugar
3 eggs, lightly beaten
1 tsp vanilla extract
110ml buttermilk*
300g mashed ripe banana

Chocolate Frosting
100g butter
40g cocoa powder
85ml evaporated milk or normal milk
500g icing sugar
1 tsp vanilla extract

* If you don’t have buttermilk you can make your own by stirring 1½ teaspoons of vinegar or lemon juice into 110ml of milk and leaving for 10 minutes.

Banana Cake
Heat the oven to 180C. Grease and flour two 9 inch cake pans. Combine the flour, bicarbonate of soda, baking powder and salt in a medium bowl and stir with a fork to combine well.
In a large bowl, combine the butter and sugar and beat well, about 2 minutes. Add the eggs, one by one, and then the vanilla. Beat well for 2 to 3 minutes, scraping down the bowl occasionally until you have a smooth batter.
Using a large spoon, stir in half the flour just until it disappears into the batter. Stir in the buttermilk and then the remaining flour the same way. Quickly and gently fold in the mashed banana and then divide the batter between the 2 cake pans.
Bake at 180C for 25 to 30 minutes until the cakes are golden brown, spring back when touched lightly in the centre, and begin to pull away from the sides of the pan.
Cool for 10 minutes in the pans on wire racks. Then turn out onto the racks to cool completely.

Chocolate Frosting
Combine the butter, cocoa and evaporated milk in a medium saucepan. Place over medium heat and bring to a gentle boil. Cook, stirring often for about 5 minutes, until the cocoa dissolves into a dark shiny essence. Remove from the heat and stir in the icing sugar and vanilla. Beat with a mixer at low speed until you have a thick smooth frosting.

To Assemble
Place one layer, top side down, on a cake plate and spread about a third of frosting evenly over the top. Cover with the second layer placed top side up. Spread the rest of the frosting evenly first over the sides and then covering the top of the cake.
Makes 1 x 9inch cake. Serves 10-12

Sunday 18 April 2010

Day Trip to London Chinatown

I have been wanting to visit London’s Chinatown for several months but somehow it is just one of those things I never got around to arranging. Then this week I was contacted by an old uni friend who lives in London. She is doing a teacher training course and was on school holls for Easter and suggested we meet up. After a quick discussion we decided to go and explore the delights of London’s Chinatown – hurrah!

Hidden away down a side street in the heart of Leicester Square, you suddenly turn a corner and find yourself standing underneath a big gate archway at the top of a street lined by small Chinese shops and restaurants, all presenting a very Chinese outlook. We wandered down the street gazing at restaurant windows full of whole roasted ducks, buffets of dim sum and ornately typed menus. It wasn’t quite time for lunch so we did a bit of shopping in the two Chinese supermarkets situated opposite each other in the middle of the street. They look deceptively small from the outside but they were both crammed full of exciting and unusual vegetables, spices, jars of sauces, Chinese cookies and sweets that ranged over three floors. I couldn’t resist picking up a few intriguing items including some strips of dried candied sweet potato that look like extra long strips of dried apricot and a jar of a dark sticky looking substance that was labelled as Sweet Coconut Spread.

The dried sweet potato strips were chewy in the same way as dried mango but their flavour was distinctively that of sweet potato but with a touch of sweetness. It was such an unexpected flavour sensation but I really liked it.

Once home, I couldn’t wait to try the sweet coconut spread. It looked dark and very sticky with the aroma of coconut milk. It had the consistency of Dulce de leche caramel and as the ingredients list comprised of only coconut milk and sugar, I’m not surprised it was so similar. The flavour was wonderful. Very sweet but with a deeper flavour than standard caramel, it was more like toffee enhanced with the subtle flavour of coconut. I think it would be delicious drizzled over ice cream, yogurt or as a filling for two sandwich cookies.

By far the most exciting part of visiting Chinatown, and one of my main reasons of wanting to go there, was to visit a Chinese bakery. There are actually three Chinese bakeries hidden around Chinatown but the one that we hunted out, and seemed to have the best reviews online, was Kowloon. As we approached it the golden letters seemed to shine out to me, beckoning me to come and indulge in all its delicacies. I suggested we take a peak inside and maybe try a pastry – trying to act as though I didn’t want to go and try one of everything! I haven’t tasted a Chinese pastry since leaving Sheffield nearly a year ago and was longing to eat them again.

We took a few moments to take in the shop window before actually going in. They do savoury pork buns too, which I know some people drool over – but these are of no interest to me! It’s their coconut, red bean, sesame, peanut, sweet melon, custard, pandan and lotus buns and pastries that appealed to me! I then spent about 3 minutes agonising and drooling over all the buns and pastries before making my choices. Oh it was hard, but in the end I was very restrained…really I was…I limited myself to FIVE! I did share them all with my family too.

I got a sesame peanut pastry roll, a red bean bun (round one), a pandan roll (green roll) and two coconut custard buns (long ones) one for me and one for my mum as I have had these before and know how utterly delicious they are. Don’t they all look so delicious and exciting different to normal pastries?

Once home I couldn’t wait to taste them all. First up was the pandan roll. This was the one I was most intrigued by. I have heard talk about pandan rolls on blogs, but never seen nor tasted one for myself. I wasn’t even sure what pandan was, but according to Wikipedia pandan cake is made with “juice of Pandanus amaryllifolius leaves. The cakes are light green in tone due to the chlorophyll in the leaf juice” The roll itself was incredibly light, soft and springy in texture, quite different to sponge. It had a thin spreading of buttercream and together tasted faintly of coconut and a pleasant sweet flavour I hadn’t encountered before. Overall very tasty.

Next was the red bean bun. I have had red bean in other things before and love the sweet earthy flavour and the thick smooth texture of it. This bun didn’t disappoint and was very generously filled with the paste. I love the texture and flavour of the bread bun too, it’s similar to a brioche, yet more substantial, very buttery, soft and light.

The sesame peanut bun looked delicious but was actually very disappointing. Once cut into, the middle was quite bland and a little dry. All the nuts and sesame seeds seemed to have disappeared and it tasted like a big wedge of baked puff pastry, flaky but dull and boring.

Finally there was the coconut custard bun (often called cocktail buns too). I was so hoping this bun was as good as I remembered it and I’m delighted to say it was. Mmm, one bite of this bun and you’ll be in heaven. The dough is sweet and soft and the filling was generous, sweet, coconutty and creamy. With hints of vanilla and lots of coconut yet without being gritty, it was just divine. If you ever get the opportunity you simply must try one!

After we had lunch we travelled further afield and did a bit of retail therapy, shopping in a new shopping centre that had some really nice but very expensive shops. Some of which were so posh that we didn’t even dare to enter the doors. One of the things that shocked me the most was the discovery of a well known cupcake company having a stall right in the heart of the centre. This on its own is not shocking, in fact it’s quite exciting. The shocking part wasn’t even the prices – we were in London afer all, no the truly shocking thing was this monstrosity!

It’s (meant to be) a giant cupcake but it looks as though its been decorated by someone who was either colour blind or in a very dark room and then dropped on the floor, partially melted but decided to be sold anyway. It’s awful! I can’t believe they were trying to sell it!

So a very enjoyable and food filled day out – just the kind I like. Chinatown was actually smaller than I expected, but they certainly managed to fit a lot into the street and I’d go back to get another coconut custard bun any day!

Tuesday 13 April 2010

Spinach & Curried Pumpkin Tart

I was sorting through the freezer at the weekend and unearthed a bag of diced pumpkin I had completely forgotten was there. I had stored it away back in the autumn after buying such a colossal pumpkin that it was too big to eat all at once. I was pleased I had as it had been a few months since tasting a good pumpkin and now I had some at my fingertips.

After a short recipe hunt I settled on a recipe for roasted curried pumpkin that sounded very tasty. However I wanted to turn it into something a bit more substantial and decided to combine it with spinach and turn it into a tart. I also added an egg quiche style filling to help ‘stick’ it all together. The result was delicious.

The pastry was thin and crisp while the filling was soft and warming. The earthiness of the spinach worked so well with the tender sweetness of the pumpkin. The curry and cumin spices were lingering in the background without being too obvious or overpowering and just added to the whole warming, comforting flavour that seemed to capture the essence of golden autumn days. I loved the striking colour contrast of the dark green spinach against the golden pumpkin too.

Some of the pumpkin poked up above the eggy filling meaning it got a second gentle roasting when baked, giving even more flavour and a fun rustic appearance. I served the tart warm with a spoonful of Indian spiced carrot chutney to enhance the curry notes and which I would highly recommend. If you don’t have any pumpkin I’m sure it would work equally well with butternut squash or sweet potato.

Spinach & Curried Pumpkin Tart
(Recipe adapted from The Essential Vegetarian Cookbook)
Pastry
160g plain flour
75g cold butter
1-2 tbsp cold water

Filling
500g pumpkin or squash
100g frozen spinach (or 200g fresh)
1 onion
2 cloves of garlic
2 tsp curry powder
2 tsp cumin seeds
2 tbsp olive oil
3 eggs
100ml double cream
150ml milk
Salt & pepper

Method - Pastry
Start by making the pastry. Cut the cold butter into 2cm squares. Place the flour into a bowl, add the butter and rub the butter into the flour using the very tips of your fingers. Do this by picking the little squares of butter and some of the flour up with your fingertips, lift this just above the rim of the bowl and then rub the two gently together, letting it fall back into the bowl. Be gentle with it as overworked pastry goes tough.
When most of the butter lumps have gone you should be left with a mixture that resembles coarse breadcrumbs. Add a spoonful of cold water and work this into the pastry using a round bladed butter knife. Add a little more water if it still seems too dry to form a dough.
Once the crumbs are starting to cling together, use your hands to squash the mixture together to form a dough. No not knead it like bread dough.
Wrap it in clingfilm and place in the fridge to chill for at least 30 minutes while you prepare the filling.

Roast the Pumpkin
While your pastry is chilling in the fridge prepare the filling. Preheat the oven to 200C. Cut the pumpkin into a fairly large dice and place into a bowl. Mix the curry powder and cumin seeds into 1 tablespoon of oil and drizzle over the top of the pumpkin. Toss together so the pumpkin gets an even coating of the spiced oil.
Transfer the pumpkin to a baking tray and roast in the oven for 25 minutes until soft and lightly brown around the edges.
Once cooked, remove from the oven and set aside.

Blind bake the Pastry
Next, remove the pastry from the fridge and roll it out on a lightly floured surface until it will line a deep 8inch/20cm tart tin.
Lay a sheet of clingfilm over the top of the pastry and cover with baking beans or dried rice to prevent the pastry from puffing up when baking.
Place the pastry into the oven and bake for 15 minutes until the edges are starting to turn golden.
Remove the clingfilm and baking beans from the tart shell and return to the oven for a further 10-15 minutes to crisp up the base.
Then reduce the oven to 180C.

Assemble the Tart
Finely chop the onion and garlic. Fry until softened in the remaining tablespoon of oil, then set aside. Thaw the frozen spinach or blanch the fresh spinach until softened. Place into a clean tea towel and wring it out tightly to get rid of all the excess water or else your tart will be soggy.
Cut the skin off the pumpkin and crush the pieces gently in your fingers.
Arrange the onion and garlic over the base of the tart. Scatter the spinach and roasted crushed pumpkin over the top, packing it in well.
Lightly beat the eggs, milk, cream and a little salt and pepper together until combined, before pouring into the tart. (Some of the pumpkin and spinach will poke out above the egg mixture, but this is desired as it gives the veg a roasted top and flavour).
Bake for 35-45 minutes until the egg mixture is set and the pumpkin tops are golden and roasted.
Allow to cool for 10 minutes before removing from the tin and serving with salad and a spiced Indian style pickle or chutney (I used an Indian carrot chutney).
Serves 6 as a main course or 8-10 as a starter.
Makes 1 deep 8inch/20cm tart

Monday 5 April 2010

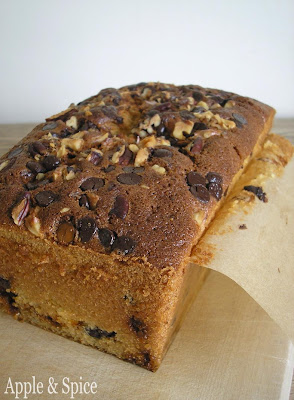
What to do with Leftover Egg Whites? Bake Nutty Cinnamon Chocolate Chip Buttermilk Cake

A bit of a long title, but it sums up this cake. Nuts, cinnamon and chocolate chips all combined into an egg white buttermilk cake. Sounds good doesn’t it, well it wasn’t just good, it was amazingly good, almost addictive, I couldn’t stop eating it! I found a version of this cake on Chef In You blog while looking for recipes to use up leftover egg whites and stumbled upon an egg white cake containing yoghurt, hazelnuts and chocolate chips and decided to try it – with a few of my own tweaks of course!

I added buttermilk to the cake which helped make it incredibly soft, tender and moist while the egg whites keep it light and fluffy. The cake part of its own would be delicious but it’s the additional dark chocolate, cinnamon chips and chopped nuts sprinkled on top and inside the cake that make it spectacular. They add little pockets of sweet spicy cinnamon, bitter chocolate or nuttiness with each bite, in perfect contrast to the smooth fluffy cake. Most of my centre sprinkles sank to nearer the bottom of the cake but this didn’t matter as I ate the cake with my fingers, selecting little bits of cake with a few sprinkle bits in each nibble. (Have you ever noticed how much more enjoyable it is to eat cake with your fingers?)

I was lucky enough to find American cinnamon chips in an American food shop a few weeks ago, but if you can’t find them then just toss some white chocolate chips around in some ground cinnamon and use those instead. I used a mix of pecans and walnuts in the sprinkle but you could use any nuts you like, or even some raisins or chopped apricots would be nice. I love how the top sprinkle became toasted and crunchy while the middle sprinkles remained soft and melty. Mmmm it was so yummy.

Next time you have a few leftover egg whites don’t even think of throwing them away or turning them into boring meringue – make this cake instead and I am sure you won’t be disappointed. It looks quite plain and simple, no elaborate decoration or frosting - but in my option it’s the best use of egg whites ever!

Nutty Cinnamon Chocolate Chip Buttermilk Cake
(Recipe adapted from Chef In You blog)
Cake
100g butter
200g caster sugar
3 egg whites
1 tsp vanilla extract
240g plain flour
1 tsp baking powder
1 tsp bicarbonate of soda
220ml buttermilk

Topping & Centre Sprinkles
50g chopped nuts – I used pecans & walnuts
50g dark chocolate chips
50g cinnamon chips

Method
Preheat the oven to 180C. Grease and line the base and sides of a 9x5 inch loaf tin.
Mix all the sprinkle ingredients together in a bowl and set aside.
Start by whisking the egg whites until they becoming opaque and fluffy, but they don’t need to hold a peak.
In a separate bowl, cream together the butter and sugar until light and fluffy. Add the egg white and vanilla and mix gently.
Sift over half the flour and fold in gently, followed by buttermilk and then the remaining flour along with the bicarbonate or soda and baking powder.
Pour half of the batter into the loaf tin and scatter over half the sprinkle mix.
Cover with the remaining batter and the rest of the sprinkle mix.
Bake for 1hour – 1hour 10 minutes until a skewer inserted in the middle comes out clean (This sounds like a long time but it needs it!)
Allow to cool for 10 minutes before turning out onto a wire rack and leaving to cool completely before slicing.
Wrap well in clingfilm to store and eat within 5 days.
Eat and enjoy