Wednesday 25 December 2013

Christmas Cake 2013: Penguins

It’s Christmas!
I hope everyone has a wonderful day. I drove back to my parents house last night and I can’t quite believe today is actually Christmas. It all seems a bit surreal, but in a very good way of course.

I wanted to share with you my decorated Christmas Cake. I always do a different design each year and this year it’s Penguins! The theme courtesy of my grandmother’s suggestion – thanks Grandma.

To make it, I covered my gingery Christmas fruit cake with a disc of marzipan and a layer of blue swirled fondant that I made by only half kneading in some blue food dye. The little igloo and penguins are all made out of fondant too. They were a little fiddly to make as their heads kept falling off.

The little penguins features I added by dipping a cocktail stick in black and orange food dye. I’m happy with the finished design though, I think it’s simple but effective.
Happy Christmas everyone!

Saturday 21 December 2013

Starry Mince Pies with Zesty Orange Pastry (& Choc Shot Giveaway Winner)

I can’t believe Christmas is mere days away; it’s probably close enough to start counting down in hours! I have been so busy recently that I am quite behind on my festive baking. Last weekend I realised with shock that I hadn’t yet eaten a mince pie this Christmas! Being coeliac means it’s not so easy to come across gluten free mince pies at social gatherings or in bakers shops and I hadn’t got round to baking my own. I decided this would definitely not do and set about rectifying this immediately.
 

To give my mince pies a bit of an extra festive touch I flavoured the gluten free pastry with some orange zest. This gave the pastry a nice golden hue and a little extra zesty freshness. I liked how I could see the orange strands speckled throughout the pastry too. I love the combination of fresh orange with the heady spices used in the sweet boozy mincemeat.

I also topped the pies with pastry stars rather than round lids, as I like to see the mincemeat poking out between the stars points. Once baked they were given a light dusting of icing sugar and they were good to enjoy – or should that be scoffed considering I ate three in one afternoon? Oh well, they say pastry is best eaten on the day of baking, and I needed to make up for lost time.
 

I used the leftover scraps of pastry to make some festive pastry shapes, which I baked and devoured while still warm straight out the oven. This is a little treat that my mum always used to allow us to do whenever she made anything with pastry. It always makes me feel nostalgic and there’s no point letting it go to waste.
 

How many mince pies have you eaten this year? Do you even like mince pies? If not, what’s your festive go to treat?
 
In case I don’t blog again before Christmas I hope you all have a wonderful fun, friend, family and food filled festive day!

Starry Mince Pies with Zesty Orange Pastry
Ingredients
200g gluten free plain flour blend
90g butter
1 egg
40g icing sugar
Zest of 1 orange
½ tsp xanthan gum
1-2 tbsp water
½ jar gluten free mincemeat (most is GF but always best to check)
2 tsp milk for brushing
2 tbsp extra icing sugar for decoration

Method
Preheat your oven to 180C and have a 12 holed muffin tin to hand.
Mix the flour, 40g icing sugar, orange zest and xanthan gum together in a bowl.
Cut the butter into cubes, add to the flour and rub together using the tips fo your fingers, lifting the flour and butter up above the bowl and letting it fall back in as you squish the two together. Continue until the butter is broken down and coated in flour, it should look like chunky breadcrumbs.
Beat the egg, add to the bowl along with 1 tbsp water. Mix in using the tip of a round bladed butter knife. Once mostly incorporated using your hands to bring the mixture together to form a dough. Add a tiny bit more water if it seems too dry, but you don’t want a wet dough.
Knead the dough gently for 1 minute to ensure everything is well combined.
Roll out the pastry between two large sheets of clingfilm until 3-4mm thick.
Use a fluted cutter to cut out rounds to fit the wells of your muffin or tart tin. Gather up the off-cuts and re-roll them before cutting out 12 stars to act as pasty lids.
Fill the pastry shells with 1 heaped teaspoon of mincemeat and top each with a pastry star. Brush the tops with a little milk.
Bake in the oven for 18-22 minutes until lightly golden and firm to the touch.
Allow to cool in the tin for 5 minutes before lifting out and transferring to a wire rack to cool.
Dust with icing sugar and enjoy while still warm.
Makes 12 mince pies
 
Note: Re-roll any leftover pastry scraps and cut out some festive shapes. Place on a baking tray and bake for 12-18 minutes (depending on size). Once baked, dust with icing sugar and enjoy while still hot.


Choc Shot Giveaway Winner
I’m also delighted to announce that the winner of the Choc Shot giveaway is… comment Number 5 – The Caked Crusader!
Her comment was picked by a random number generator. Congratulations Caked Crusader. I’ll be contacting you shortly for your address.

Saturday 14 December 2013

Choc Shot: A Review & A Giveaway

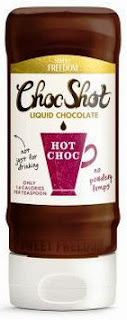
Choc Shot is a new liquid chocolate product developed by Sweet Freedom. They are well known for their ‘Sweet Freedom syrup’ products, which are made with natural fruit extracts giving them a lower GI compared to other sugar/syrup products. When they contacted me to ask if I would be interested in trying their new chocolate version I was more than happy to accept.

The product is described as liquid chocolate, but it’s more like a thick chocolate sauce. It comes in a handy squeezy bottle and is quite thick, yet soft and wonderfully dark and glossy. As the product is described as liquid chocolate and had a hot chocolate image on the front of the bottle, this seemed a good place to start the taste testing.

I heated some milk and stirred it into about 2 teaspoons of the Choc Shot sauce. This produced a wonderfully dark milky drink that smelt rich and inviting. I took a sip and found it was sweet but not in a sickly way, and the rich cocoa flavour really came through. It reminded me of a traditional hot chocolate made with cocoa, rather than the sugary, milk powder, slightly fake hot chocolates you often encounter these days. It was very comforting, a nice reward after putting up my Christmas tree.
 

Next I tried using the Choc Shot on some toast, in a chocolate spread style. It’s quite thick when you squeeze it out of the bottle, but on the warm toast it soon melted into a dark glossy spread. I found eating it this way was too intense. It was too sweet to use in such concentrated quantities and it reminded me of chocolate fudge sundae sauce, nice but not something you would normally spread on your toast.
 

Finally I tried it on some rice pudding. This worked well as even though it was still quite concentrated, the milky creaminess of the pudding helped tone it down and it was a delicious treat.
 

I think it would be fantastic drizzled over pancakes or ice cream but I most enjoyed it as hot chocolate. Having the sauce ready in the squeezy bottle meant it was super quick to make and very convenient. I love how its gluten free, suitable for vegans and low GI, meaning you don’t get a sugar rush/crash from eating it. Even though it’s sweet, the rich dark cocoa balances this out nicely and makes it taste indulgent without tasting cheap or sickly.

Oh and if you needed even more of an excuse to indulge, it has 85% less fat and only around 15kcal per teaspoon. The perfect rationale for hot chocolates all round this Christmas!
 
Now the Giveaway!
The lovely people at Sweet Freedom have agreed to send a bottle of Choc Shot to one lucky person. All you have to do if leave a comment below telling me how you would most like to try using the Choc Shot. Please make sure to leave a way for me to contact you should you win. The competition runs until 12 noon on Friday 20th December. Open to UK residents only, only one entry per person. The winner will be chosen at random from the list of entries. Good Luck!

Sunday 1 December 2013

The New Moor Market, Sheffield

Last weekend was the grand opening of the much anticipated Indoor Moor Market in Sheffield. This 18 million pound project takes the place of the old famous Castle Market which, after 54 years of trading, had become a bit rundown. Despite that, I used to love popping into the Castle Market in my lunch hour and picking up a bit of fruit and veg for dinner, where else could you get 8 nectarines for £1. I’m going to miss doing this, but agree the building itself had certainly seen better days.

Yesterday I decided to go and investigate the new Moor Market, placed down the far end of the Moor (what a surprise) to see the improvements for myself. As you get closer a large glass fronted building comes into view, with a sweeping curved wooden entrance that reminded my strongly of Sheffield’s Winter Gardens entrance. I liked that this was in keeping with the current architecture designs within the city.
 
The building was certainly impressive from the outside and stretched quite a long way down, making it seem very large, and yet it didn’t look out of place. Just very sleek.

Once inside it opens up into a very high roofed space, dotted with a wide variety of stalls arranged rather haphazardly in diagonal lines. I wasn’t too sure what the large yellow pipes were for, or why they had drawn your attention to them by painting them yellow. I suppose they were meant to be part of the architecture, but they reminded my strongly of those tunnel slides you used to get at swimming pools.
 

The stalls themselves were a wide variety of new and past traders from Castle Market. Wandering around I encountered shoes, fruit & veg, butchers, bakers, a nail salon and a book store. There were also some new highlights for me – all foodie things of course – were:

Make or Bake: A cake decorating shop – something previously missing from Sheffield to my knowledge.
 

CakeLicious: A fancy pastry counter serving delicious looking French tarts and desserts. I loved the choux swans, but my eyes were drawn to the caramel and pear mousse dessert. Sadly nothing gluten free, but it was nice to look.
 

The big thing I was/am most excited about is near the main entrance where they have made a little square for pop-up producers. The idea is each week 2-3 local businesses can have the stall to show their wares, then the following week it will be someone new. I think this is a brilliant idea as not only will it give local producers a chance to make us aware of who they are and what they make, but it will keep people coming back to see what that weeks special pop-up stand is. When I visited yesterday there was a Brazilian stall (I think) selling flavoured honeys and little pastries and #Brownies, who I have vaguely heard of.
 
Their stall looked so tempting with a delicious array of brownies and layers cakes. I had a chat to the friendly guy manning the stall who said their brownies were flourless but he couldn’t call them gluten free as they did use flour in other cakes and bakes. The brownies all sounded amazing, chili & lime, snickers, Turkish delight and cherry & bourbon.

Set across one wall was a little café area with a variety of tables and 5 or 6 little serving stations selling teas, coffee, cakes and a similar assortment of jacket potatoes etc. It would have been nice to see a deli or something selling gourmet salads, something a bit different/more interesting and healthy than the usual café food, but its only week one after opening so one may turn up.

My only criticism of the market is that the stalls didn’t seem to be arranged in any sort of order, it was more luck than planning what you stumbled across next. Some of stalls were down quite narrow lanes, which meant it got a bit crowded with so many people milling around, not that it being popular is a bad thing.

Overall I think the new market is very impressive and with the new addition of a few different stalls and the local producers pop up section it should persuade more people to visit. If this encourages more people to start buying local produce and supporting local businesses then I’m all for it!

Sunday 24 November 2013

Christmas Pudding for Stir Up Sunday!

Today is Stir Up Sunday – the official day to stir together a delicious mix of dried fruits and spices to make your Christmas pudding. Every year the last Sunday in November, the last Sunday before the start of advent, is the official day to make your xmas pud. It is a tradition that has been going on for decades, possibly centuries, and one I hope continues for many more to come. I love the thought that today people all over the country are today making a pudding for their friends and relatives to eat and enjoy on Christmas day. It’s the kind of unity and homely food based tradition that I love.

Christmas pudding is not too dissimilar to Christmas cake. Your soak your fruits in alcohol before using them, like a Christmas cake, but then combine this mix into a spiced breadcrumb and suet batter. I always made my own breadcrumbs from crumbling up some gluten free bread and use frozen grated butter in place of the suet (which is usually coated in wheat flour). This fruity, spicy mixture is placed into a pudding basin and part boiled, part steamed for several hours to create a densely fruited, rich, spicy and incredibly moist fruit pudding. It has all the flavours of Christmas cake only in a squishier, softer and more intense form. The pudding mix doesn’t look all that appetising before it’s steamed, but it transforms into a lovely dark and sticky pudding after its steaming session. You get the added bonus of it filling the house with a fabulous rich and spicy Christmas scent as it happily simmers away.
 

Like Christmas Cake, the pudding is kept for several weeks to allow the flavour to mature and develop. Then on Christmas day the pudding is heated, doused in Brandy and set alight! The lights are quickly turned down and people ‘ohhh’ and ‘arrrrh’ as wispy blue flames dance around the pudding creating a spectacular end to the Christmas meal. There can’t be many foods that people look forward to intentionally setting on fire! The only other one I can think of is Baked Alaska and that’s more of a gentle torching rather than dousing it in a flammable liquid and setting it alight! However, the actual flames last mere seconds, so no harm comes to the pudding itself, its too moist to get scorched or burnt.

The pudding requires 5 hours of boiling/steaming, but don’t let that put you off. As long as you check the water level a couple of times during cooking, it can be left to its own devises. It’s quite relaxing pottering around the house and listening to it gently simmering, filling the kitchen with the warm spicy note of Christmas. I always like to line the base of the pan I steam it in with some paper. This protects the pudding from the direct base heat of the pan and stops it making too much noise from the pudding basin hitting the side of the pan as it simmers. It’s a great way to make use of some of the tedious junk mail and unwanted catalogues that always get pushed through the letterbox at this time of year.
 
This year I decided to place a thin slice of orange at the base of my pudding, which I hope will give a pretty top when turn out. I’d only got the one orange and when I came to slice it I found it was rather a unique orange in that the inner segments formed more of a random mosaic pattern than the usual triangular segments! While not quite the effect I was after, I think it will certainly look pretty on the pudding so I used it anyway. I’ll let you know how it turns out! Right now it’s wrapped up tight and awaiting its final steam on Christmas day.

Gluten Free Christmas Pudding
Ingredients
230g raisins
125g sultanas
50g glace cherries (check they are GF)
Zest of 1 lemon
Zest of 1 orange
100ml Brandy (I used Amaretto)
20g chopped pecans
50g grated frozen butter
30g gluten free brown breadcrumbs (crumbled from 1 slice of GF bread)
50g gluten free plain flour
90g dark soft brown sugar
½ tsp mixed spice
½ tsp cinnamon
¼ tsp ground ginger
¼ tsp ground star anise (or clove)
½ tsp salt
2 eggs, lightly beaten

Method
The day before (or up to 3 days before), chop the cherries in half and place into a bowl along with the rest of the dried fruits. Grate the orange and lemon zest over the top and pour in the Brandy. Give everything a good stir, cover the bowl with clingfilm and set aside for 24 hours (or up to 3 days) to allow the fruits to plump up and absorb some of the Brandy.
The next day, place all the remaining ingredients into a large bowl. Add the soaked fruits, scraping in any leftover juices. Mix together lightly with a wooden spoon or spatula until everything is evenly combined.
Place a small disc of parchment paper in the base of a 1½ pint pudding basin. Place a thinly sliced disc of orange in the base (optional).
Fill the basin with the pudding mix, pressing down lightly. Place another disc of parchment on top and cover the top of the basin with a sheet of foil that you have folded a pleat into the middle of, to allow the pudding to rise during steaming.
Tie a long strip of string around the top rim of the pudding and then secure it over the top of the basin from one side to the other to form a string handle. (This will help you retrieve the pudding from the pan later without burning yourself).
Lay sheets of newspaper (or junk mail) in the base of a large saucepan. (This protects the base of the pudding from the direct heat from the stove and stops it rattling around inside your pan.) Place the pudding on the papers before filling the pan with boiling water from the kettle, until it reaches halfway up the side of the pudding basin.
Bring the water to a boil, then reduce to the merest of simmers, cover with the lid and leave to simmer gently for 5 hours. It should be barely bubbling.
Every 2 hours lift the lid of the pan to check the water level. Add more boiling water if it’s looking low.
Once the 5 hours is up, lift the pudding out of the pan with the help of the string handle. Place on a cooling rack, remove the foil and leave until cool. Leave it in the basin and with the parchment disc still on top. Once cooled, wrap the whole pudding, basin and all, tightly in clingfilm and store in a cool dark place until required, the longer the better.
On Christmas Day, steam the pudding again for 2 hours to heat through thoroughly. Turn out onto a serving plate that has a rim. Carefully warm a ladleful of Brandy, then set light to it with a match or lighter and quickly pour it over the pudding to flambé. Serve with Brandy butter, Brandy cream or custard once the flames have extinguished.
Makes 1 pudding, to serve 6 – 10 people

Sunday 17 November 2013

The Red Deer, Sheffield Review

The Red Deer is located just off West Street in Sheffield City Centre. My boyfriend A and I were trying to think of somewhere new to try for dinner and a quick internet hunt revealed the Red Deer as a good place to try.

The pub is quite traditional and olde-worlde inside, a wooden bar, little stools nestled around wooden tables and a range of local ales. Instead of feeling dated, this gave it a relaxed and cozy atmosphere.

The menu consists of a range of classics – fish & chips, sausage & mash and burgers, but with a few more modern dishes thrown in – sweetcorn fritters and crab linguine. Their menu mentioned gluten free bread, so I was sure they would have some awareness of coeliac disease. I talked through the menu with the bar staff who checked with the chef what could be made gluten free. I was thrilled to discover that their chips/fries were gluten free as they had their own separate fryer! I knew instantly I wanted some, as it’d been months since I’d had proper chips. The lighter bite options included nachos topped with a bean chili, which always used to be a favourite of mine. Sadly the nacho chips themselves weren’t GF, but they were more than happy for me to have the bean chili with chips instead of nachos.

While we waited for the food I noticed they had a stack of board games set to one side, which people could help themselves too if they wished. Indeed, a group of students behind us were enjoying a heated game of Risk, stopping only for beer refills and extra chips. I thought this was a lovely idea.

When our food arrived I was delighted to see that they had layered the chips with the bean chili, cheese and spicy jalapenos just as if they were nachos. I was expecting chips, on one side and chili on the other but this was much better. It also came with all the usual accompaniments of sour cream, salsa and guacamole. I was one happy girl and the chips were lovely. I admit not a patricianly healthy meal, but for a treat it was delicious. I mentioned to the staff when he came to collect they plates that they should offer chip nachos on their menu, and he said the chef had said the same!
 

My boyfriend A had chosen a burger, topped with a large field mushroom. He too was pleased with his freshly cooked chips and bowl of chunky coleslaw. He was also highly impressed with the bun the burger in; it was a slightly toasted good quality white roll, rather than the usual pappy sugary burger bun.
 

We stayed chatting for over 2 hours and at the end of the night we agreed we’d be making many a return visit. The food, like the surroundings, is simple and rustic but simple things done well are always highly enjoyable.
(Apologies for the quality of the photos, it was dark and they were taken on my phone)

And Now For Something Completely Different
* It’s Stir Up Sunday – Christmas Pudding making day on Sunday 24th November, so get preparing! Here is a link to my GF ChristmasPudding that I make every year.
* Also, don’t forget to feed your Christmas cake with a bit of booze and tuck it away again for another fortnight.

Sunday 10 November 2013

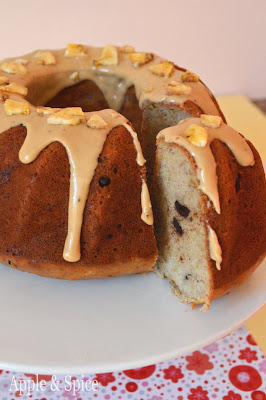
Banoffee but not as you know it! Banana & Coffee Bundt Cake

Did you know that 15th November is National Bundt Cake day? One of my fellow bloggers Mary of The Food Librarian is posting a different Bundt cake recipe every day in the run up to 15th. It’s an amazing (not to mention delicious) feat to undertake and she has done similarevents in previous years. Seeing so many Bundt’s got me wanting to bake my own and join in the baking fun and so I give you my Banoffee Bundt Cake!
 

Banoffee is instantly associated with banana and toffee, but I have often wondered ‘why does it have to be toffee?’ Banana and coffee combined would also be Banoffee, although I admit slightly less conventional. Some people may not like the sound of banana and coffee together, but let me assure you it works. Bananas are naturally very sweet and although often associated with other sweet toffees and caramels, they go equally well with darker, more bitter flavours – who doesn’t love bananas and dark bitter chocolate together? Well coffee works just the same!
 

This recipe is jam-packed full of banana, 4 whole large bananas in fact. It also contains no butter but instead relies on a little oil and Greek yoghurt, not to mention all that banana, for moistness. This also means it would be very easy to make this cake dairy free if needed, by simply using a non dairy yoghurt (check your dark chocolate is dairy free too, most good ones are).
 

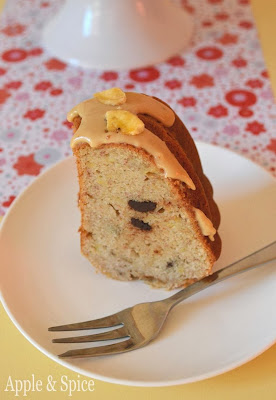
The cake has quite a close texture, dense but not stodgy or heavy, more like a pound cake. It’s moist and tender from all the banana and not overly sweet, as there is not too much added sugar, the main sweetness coming from the bananas themselves. I wanted the banana flavour to really shine and so resisted my urge to pile in the spices and instead used only a little vanilla and some dark chocolate chips, which I always adore in banana cake.

The coffee element is present as a coffee glaze, which adds both sweetness and then a slight smoky bitter coffee note which works surprisingly well with the sweet banana and gooey dark chocolate chips. It makes it just that little bit more sophisticated and adds a note of interest.
 

There is something homely and comforting about banana cake, I ate one slice and promptly went and cut myself another. As this recipe quite low in fat I didn’t feel too guilty. Feed it to your friends and see if they can work out what the Banoffee twist is! I plan to submit this post to Mary for her Bundt cake round-up. Will you be baking a Bundt cake for National Bundt Cake day? What would be your chosen flavour?

(Banoffee) Banana & Coffee Bundt Cake
Ingredients
400g (3-4 large) overripe bananas, peeled weight
2 eggs
70ml vegetable oil
125g soft brown sugar
80g dark chocolate chips
90g thick Greek yoghurt
1 tsp vanilla
240g white rice flour
40g potato starch
20g tapioca starch
1 tsp baking powder
½ tsp bicarbonate of soda

Coffee Glaze
1 tsp instant coffee
1-2 tbsp water
150g icing sugar
Banana chips to decorate

Method
Preheat the oven to 180C. Oil a 9-10inch wide Bundt tin and set aside.
Mash the bananas with a fork until very soft and mushy.
In a clean bowl, whisk together the eggs, oil and sugar until combined and starting to go slightly paler and bubbly, about 1 minute.
Stir in the banana mush, yoghurt, vanilla and chocolate chips.
Sift the baking powder, bicarbonate of soda, rice, potato and tapioca flour over the batter and fold together using a spatula until a sloppy but thick cake mix is formed.
Pour the cake mixture into the tin and bake for 45-50 minutes until well-risen, golden brown and cracked along the top. Test the middle is cooked using a skewer, but be careful not to hit a chocolate chip.
Leave to cool in the tin for 20 minutes before turning out on to a wire rack to cool completely.

Coffee Glaze
Dissolve the instant coffee in 1 tbsp water. Add the icing sugar and mix together well until a thick, yet pourable icing is created. Add a few more drops of water if necessary to create the desired consistency. It should be spreadable without being runny.
Drizzle the icing over the top of the inverted, cooled cake, letting it slowly drizzle down the sides of the cake.
Decorate with a few crushed banana chips if desired.
Eat and enjoy.

Sunday 3 November 2013

Gluten Free Ginger Christmas Fruit Cake

It’s that time of year again, time to bake the Christmas cake!! I’ve always baked my own Christmas cake, even in my pre-coeliac days. There is something magical and special about preparing the fruits, soaking them in booze and then baking them into a dark spicy cake that is so traditional and ritualistic that I always look forward to it. Plus as the cake bakes you get the most divine aroma of warm fruits, black treacle and spices wafting through the kitchen that it instantly makes me feel all warm and cozy. Knowing that you are preparing food for your family to share and enjoy, and the love and time that goes into making it make it all the more special.

Each year I try and give the cake a bit of a different twist. Last year I replaced the brandy with rum and use some ground cardamom in the spices, this year I decided to give it a warming twist of ginger. I stirred a generous amount of crystallised ginger into the fruit mix and upped the ground ginger in the cakes spice mix. I also used satsuma zest and juice in place of my standard orange and replaced sultanas with dates. Ginger itself adds a peppery warming heat, which I felt would work well in a Christmas cake. I can’t wait to taste it on Christmas day and find out if it comes through.

I left my fruits soaking for a whole week, preparing them one weekend and baking the cake the next. During this time they soaked up the booze and fruit juice and became wonderfully plump and glossy. The zest, fruits and brandy created quite a heady aroma that I was half tempted to forgo the cake and eat spoonfuls of the fruit mix on its own but I managed to resist.

My cake is now snugly tucked away and awaiting its first feed of brandy in a few days time. Nearer Christmas I have the fun challenge of decorating it. I was stuck for ideas this year, but my grandmother has suggested a penguin which I think it a lovely idea. I’ve not planned a design yet, you’ll have to wait until nearer the time to find out if I managed it.

Do you bake your own Christmas cake? Are there any special family traditions you MUST do around this time of year to get into the festive feeling?

Gluten Free Ginger Christmas Fruit Cake
Ingredients – Soaking Mix
170g raisins
100g dates
65g dried apricots
50g crystallised ginger
50g dried cranberries
Zest of 1 lemon
Zest of 1 satsuma (or ½ orange)
50ml brandy
40ml satsuma or orange juice

Ingredients – Cake Mix
140g gluten free plain flour
15g tapioca starch
20g ground almonds
120g dark soft brown sugar
120g unsalted butter
1½ tsp ground ginger
1 tsp mixed spice
1 tsp ground cinnamon
40g black treacle
2 eggs
(pre soaked fruit mix – above)

Feeding
30ml brandy once baked & additional for feeding

Soak the Fruit
Place the raisins and cranberries into a bowl. Chop the dates and apricots into pieces the same size as the cranberries and slice the crystallised ginger into small cubes.
Grate over the zest of the lemon and Satsuma. Squeeze the juice from the satsuma and add to the brandy. Pour the liquid over the fruits and stir to coat.
Cover the bowl with cling film and leave the fruit to soak for at least 24hours and up to 1 week, in a cool place to allow the fruit to plump up and absorb the brandy and fruit juice. I left mine for 5 days and stirred it twice in this time.

Bake the Cake
Lightly grease a 6.5inch/15-16cm deep round spring form tin. Line the base and sides with greaseproof paper, letting the paper rise about 1 inch above the rim of the tin. Preheat the oven to 140C or 120C fan.
Weigh all the cake ingredients, expect the pre soaked fruit, into a bowl and mix with a hand mixer until well combined.
Add the pre soaked fruit, including any remaining juices and fold together using a spatula.
Spread the mix into the tin, pressing down gently. Create a small dip in the middle of the cake to allow the mixture to rise into a flat, level surface on baking.
Bake in the oven for 2hours 10minutes until browned and quite firm to the touch. Allow to cool in the tin for 20 minutes before pricking the surface of the cake and drizzling over 30ml more brandy. Cover the cake and leave to cool in the tin before unmolding. Leave the greaseproof paper round the cake and wrap it tightly in clingfilm. The longer the cake has to mature the more developed in flavour it will be.
Every 1-2 weeks carefully remove the clingfilm from the cake and drizzle over a little more brandy. This is known as ‘feeding the cake’ and will ensure a richer and moister flavour and texture to the cake. (This is non essential though)
Makes 1 x 6.5ch cake

When Ready to Decorate
Ingredients - Decoration
500g fondant icing
250g marzipan
2 tsp brandy
Food dye to decorate
Ribbon

Trimming and Decorating the Cake
When ready to decorate, peel away the greaseproof paper and carefully level the surface of a cake using a bread knife. Fill in any tiny holes with fruit taken from the off cuts of cake.
Place the cake on a 7-8inch cake board that has a few dobs of royal icing on it, to keep the cake in place.
Roll out the marzipan and use the base of the tin to cut out a large circle. Brush the top of the cake with a little brandy and smooth the marzipan over the top of the cake.
Roll out the fondant icing so that it is 2 inches bigger in diameter than the base of the cake. Brush the cake with brandy before covering with the fondant. Smooth the edges and top with your hands or cake smoother if you have one. Cut off the excess fondant from around the base.
Gather up the off cuts of fondant and dye as appropriate for decorations. Decorate the cake as desired and secure a ribbon around the bottom edge of the cake.
(I don’t have any photos of my finished cake yet, as its still in the ‘feeding’ stage)

Sunday 27 October 2013

Pumpkin Macaroni Cheese

After making the pumpkin doughnuts last week I had some pumpkin puree leftover. I ate a bit of it spread on toast (delicious with a pinch of cinnamon) but decided to use the rest to make something warm and comforting for dinner. What could be more warm and comforting than macaroni cheese? Only this macaroni cheese was given an extra autumnal twist from the earthy sweet pumpkin puree.

The sauce became a lovely golden orange colour when I added the pumpkin puree and produced an enticing roasted veg aroma. I grated in some freshly grated nutmeg which seemed to enhance the sweet nuttiness of the pumpkin. The puree itself somehow transformed the sauce from being delicious to something spectacular. It was so rich, creamy and velvety smooth that it tasted as though it had been made with cream, amazing considering the base was mainly vegetable puree.

Some people may be wondering what those little green speckles are in the macaroni cheese… they’re peas. I know adding peas to macaroni cheese is highly unconventional, but I love peas and think having a little freshness and pop from the peas, in contrast to the rich and creamy sauce is a welcome change, plus its colourful too. I’ve just thought, what with the sauce being pumpkin based and the addition of the peas, this macaroni cheese could almost be classed as healthy – not something you usually hear associated with macaroni cheese!

To serve, I spooned the pasta into deep bowls, topped with more cheese and gave them a quick bake in the oven. This created a golden and crisp top which I think is one of the best bits. It also adds another texture against the creamy stodgy (in a good way) sauce and pasta combo. The textures from crisp golden top, thick and creamy sauce and a little pop from the peas is delicious combination. The pumpkin had a wonderful flavour making the whole dish feel warming, autumnal and very comforting. This is perfect meal to enjoy curled up on the sofa as the rain lashes the windows outside.

Pumpkin Macaroni Cheese
Ingredients
20g butter
1 tbsp cornflour
130g pumpkin puree
300ml milk
2 handfuls grated cheddar cheese
100g frozen peas
Salt & pepper
Freshly grated nutmeg
Gluten free macaroni pasta for 2 people
Method
Preheat the oven to 200C
Cook some gluten free macaroni, enough for 2 people, in boiling water until it is al-dente.
Meanwhile, add the butter to a large saucepan and heat until melted. Add the cornflour and whisk until smooth and a paste is starting to form. Add the pumpkin puree and mix to combine.
Slowly whisk in the milk and allow to come to a simmer, stirring occasionally. It should start to thicken into a thick and creamy sauce.
Add a generous grating of fresh nutmeg and some salt and pepper.
Once the sauce is thickened and creamy, stir in the frozen peas and three-quarters of the grated cheese. Stir until combined. Season with salt and pepper to taste.
Add the drained gluten free pasta to the sauce and stir to coat.
Spoon into two deep bowls or one larger dish and scatter over the remaining cheese and a little extra nutmeg.
Bake in the oven for 15-20 minutes until lightly golden and crisp on top.
Eat and enjoy.