Saturday 27 September 2008

Daring Bakers September Challenge: Lavash Crackers

I was excited when I saw this months challenge was for Lavash Crackers as I had about them and seen them around on a few blogs but never tried making them myself. They are thin crispy little crackers often topped with seeds or spices and make a great accompaniment to dips. We were given free rein over the toppings we used and were also told to create a dip of our choosing to accompany our crackers. As an extra twist the dip also had to gluten free and vegan friendly.

We were given the option to make gluten free crackers too, but I decided to stick with the wheaty version. I also used 75% white flour and 25% wholemeal for some added extra fibre. I was initially surprised that the crackers included yeast, but this makes sense as it allowed the dough to become nice and subtle and roll out thinly without tearing.

As the dough had to be rolled out very thinly, I had enough to split the dough in half and made two different sheets of crackers. I started with a seeded one which involved sesame seeds, pumpkin seeds, sunflower seeds and lots thyme which I always think gives a wonderful flavour to savoury foods.
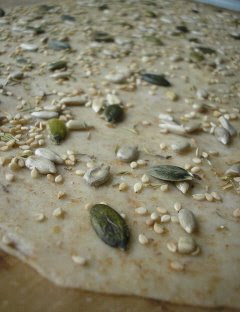
On the second cracker sheet I went for spices – cumin seeds, curry powder and smoked paprika which gave the crackers a dusty red hue with just a tingling of heat.
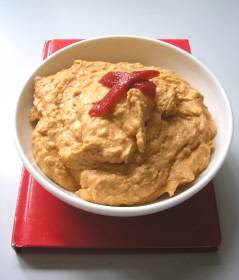
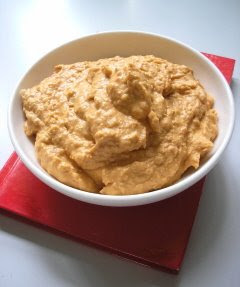
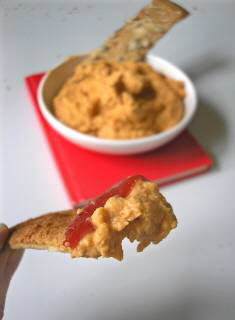
For my dip I initially thought of making a salsa but then I hit upon the idea of making red pepper houmous as I had some tahini and roasted red peppers sitting in the fridge clamoring to be used. I love the orangey-red colour the houmous turned and it tasted wonderful, nutty and sweet and was very dip-able with both varieties of cracker and can be made in a matter of moments in the food processor.
I really enjoyed making and munching these crackers and will definitely be making them again as nibbles for when I next have friends round. Be sure to check out the blogroll to see other bakers Lavash Crackers. And our hosts, Natalie from Gluten A Go Go and Shel from Musings From the Fishbowl.

Lavash Crackers
Recipe from The Bread Bakers Apprentice by Peter Reinhart
Ingredients
190g strong white bread flour (I used 150g white and 40g wholemeal)
½ tsp salt
½ tsp instant yeast
1 tbsp caster sugar
1 tbsp vegetable oil
75-110ml warm water
Seeds, herbs or spices of your choice

Method
In a bowl, stir together the flour, yeast, salt, sugar, oil and just enough water to bring everything together into a ball.
Sprinkle a work surface with flour and kneed the dough for 10 minutes until it become smooth and elastic when stretched.
Place the dough in a lightly oiled bowl and cover with clingfilm.
Allow to rest at room temperature for 90 minutes, until double in size.
Preheat the oven to 180C
Cut the dough in half and lightly oil a work surface with oil and roll out each dough half until almost wafer thin.
Transfer the dough onto a sheet of greaseproof paper on a baking tray and lightly brush the surface with water to help the toppings stick.
Scatter over the toppings of your choice and mark the dough into long bars using a sharp knife, but do not cut all the way through. Allow to rest for 5 minutes.
Bake for 15 minutes until the crackers and crisp and a deep golden brown.
Remove from the oven, transfer to a wire wrack to cool before breaking the cracker sheet into bars along the pre-scored edges.
Repeat with the remaining half of the dough.
Serve with a variety of dips and store any leftovers in an airtight container.

Red Pepper Houmous
Ingredients

1 x 400g tin chickpeas
1 roasted and skinned from a jar
Juice of ½ lemon
2 tbsp tahini paste
½ tsp salt
Ground pepper
2 tbsp olive oil
1 clove garlic

Method
Place all the ingredients into a food processor and blitz together until smooth.
Store covered in the fridge until required.
Eat with 4 days.

Friday 26 September 2008

Banoffee Pie

I made this dessert a few weeks back for a family BBQ. It was very quick and easy to make, mainly because it was more a matter of putting components together rather than baking, especially as I cheated slightly with the toffee sauce. I used Dulce de Leche rather than make my own, which saved time.

I did make my own pastry and used a third of the recipe given here for cinnamon hazelnut pastry as I thought these flavours would go well with the toffee and bananas. After the pastry had blind baked it was simply a matter of adding the toffee sauce, some sliced bananas, fluffy mounds of whipped cream and a light shaving of chocolate to finish the dish. You could speed up the process even more by using ready made pastry or even just a crushed biscuit base.

Banoffee Pie
Ingredients
400-500g shortcrust pastry
400g Dulce de Leche
200ml double cream
1 tsp vanilla essence
2 large ripe bananas
20g dark chocolate

Method
Roll out the pastry and line a 9inch/22cm fluted tart tin with it. Then place in the fridge to firm up for 15-20 minutes.
Preheat your oven to 200C.
Prick the base of the pastry and blind bake (with baking beans or a bag of rice) for 12 minutes before removing the baking beans and baking for 10 minutes more until crisp and golden in colour.
Remove from the oven and allow to cool.
Spread a thin layer of the toffee sauce over the base of the tart.
Slice the bananas into thick rounds and arrange over the toffee sauce.
Spread the remaining toffee sauce over the bananas until they are well covered.
Add the vanilla to the cream and whip until soft peaks forms. Spread over the filling and decorate the top with a little grated dark chocolate.
Refrigerate until required.


If you want to make your own toffee sauce, here’s how:
Ingredients
115g butter
115g light brown sugar
400g sweetened condensed milk
Method
Place all the ingredients into a pan and heat gently, stirring until all the sugar has dissolved and the ingredients well incorporated.
Turn up the heat and bring the mixture to the boil, stirring constantly until it changes to a deep caramel colour.
Remove from the heat and leave to cool before using.
DO NOT touch the caramel it will be extremely hot!

Monday 22 September 2008

Coconut Choc Chip Biscotti

I wanted to post some cookies to a friend and decided that biscotti would be the most likely to arrive intact and still tasting fresh thanks to their long shelf life. As I was had a rummage through the cupboards for some chocolate chips and my eyes settled on a bag of desiccated coconut and I knew I had to try adding that into the mix too. I was a little unsure if the coconut would make them too crumbly but the dough came together without any problems.

They went into the oven formed into little logs but they grew and spread while baking into wide fingers which I was at first alarmed with but this actually made them turn out a perfect biscotti shape when sliced.

The biscotti were very light and quite crumbly due to the coconut strands, but this meant they were perfect for munching on without having to dip them first. The little dots of dark chocolate worked perfectly with the toasty coconut flavour. I wrapped the best biscotti into bags, labeled them and sent them on their merry way and I’m pleased to say the recipient informs me they survived intact and still perfectly crisp. So if you want to post someone some cookies, biscotti would make an excellent choice; they adapt so well to different flavour combinations so you can create a biscotti to suit the recipients tastes.

Coconut Choc Chip Biscotti
Ingredients
280g plain flour
60g desiccated coconut
50g dark chocolate chips
150g caster sugar
2 tsp baking powder
2 eggs
100g unsalted butter
1 tsp vanilla extract

Method
Preheat the oven to 180C and line a baking tray with greaseproof paper.
Melt the butter and set to one side.
Place the flour, coconut, sugar and baking powder into a large bowl.
Lightly whisk the eggs and vanilla into the butter and pour over the flour mixture.
Beat together until well combined.
Add the chocolate chips and mix once more until they are evenly distributed.
Cut the dough into two and, with floured hands, shape each one into a long log shape about 2inches/5cm wide. Place on the baking tray, leaving a good 3inches/7.5cm gap between them.
Bake for 20-25 minutes until they are golden in colour and spread.
Remove them from the oven, leave to cool and firm up for 10 minutes before transferring to a wire wrack. Spray the tops of the biscotti with water to make slicing easier and leave for 5 minutes more.
Then slice the biscotti log into 1cm slices and lay them back onto the baking tray.
Bake for 15-20 more until crisp and golden in colour.
Transfer the biscotti to a wire wrack to cool and repeat with the remaining log.
If stored in an airtight container they will keep for 2 weeks.
Makes 35-40 biscotti

Monday 15 September 2008

Special Spiced Carrot Cake with Ginger Cream Cheese Icing

It was my Grandmothers birthday a few weeks ago and I had promised to bake her a cake. Like me, her favourite cake is carrot cake, however I have made her carrot cakes in the past and wanted to do something a bit different this year. I trawled through my many books looking for inspiration and although I found some delicious sounding cakes they didn’t seem to match up to the spicy fruity nuttiness of a carrot cake. I was getting quite frustrated and decided to go ahead and bake my usual carrot cake when I hit upon the idea of changing a few of the recipes supporting ingredients and baking a special spiced carrot cake.

I switched the walnuts for pistachios, the raisins with dried cranberries, added some ground ginger along with some finely chopped stem ginger for extra flavour. I also added the rind from an orange as I think orange works brilliantly with cranberry and ginger flavours. Feeling much more content I baked away and the cake seemed to be celebrating too as it rose so tall and proud that it was reaching up above the rim of the cake tin and filled my whole kitchen with a warm spicy aroma. After it had cooled, I sliced it in half and was pleased to see the cranberries and the pastel green pistachios scattered within. I filled and covered it with a generous layer of ginger cream cheese icing, scattered over a few chopped toasted hazelnuts and decorated it with some sugar flowers I made. (Thanks for the flower mould Gigi) I know blue flowers are not very realistic but I think they look pretty.

My grandma was thrilled with the cake and I loved how the alternative ingredients gave it a different flavour and appearance while still maintaining its carrot cake status. It was wonderfully moist and full of warming spicy flavour. I was particularly fond of the cranberry and stem ginger additions, which provided little nuggets of flavour hidden amongst the spicy crumbs.

Special Spiced Carrot Cake
For the cake
250ml vegetable oil
250g light soft brown sugar
3 eggs
300 - 350g (3-4) grated carrots
50g shelled pistachios
50g dried cranberries
1 orange – rind only
375g self raising flour
1 tsp bicarbonate of soda
2 tsp mixed spice
½ tsp cinnamon
2 tsp ground ginger
40g stem ginger in syrup

Method
Grease and line the base of a 20cm 8inch springform cake tin. Preheat the oven 180C.
Place the oil, sugar and eggs into a bowl and beat with an electric mixer until thick and creamy.
Peel and roughly grate the carrots, chop the stem ginger into small pieces and finely grate the rind off the orange. Fold the pistachios, dried cranberries, stem ginger, orange rind and grated carrot into the cake batter.
Sift over the flour, mixed spice, cinnamon, ginger and bicarbonate of soda and fold into the mixture using a spatula, turning the bowl as you go until no flour streaks remain, but do not overwork. (The moisture from the carrots will help slacken the mixture).
Spread the batter evenly into the cake tin and bake for 45 minutes, then cover loosely with foil and bake for a further 30 minutes until a skewer inserted into the centre of the cake comes out clean.
Allow to cool for 15 minutes before un-moulding and cooling on a wire wrack. Once cool, cut the cake in half and fill and cover with the ginger cream cheese icing.

For the ginger cream cheese icing
60g butter
160g cream cheese
500g icing sugar
1 tsp ground ginger
1 tbsp ginger syrup from stem ginger jar
50g chopped toasted hazelnuts

Method
Using an electric mixer, beat the butter and cream cheese together in a bowl until smooth.
Beat in the ginger and ginger syrup. Gradually sieve and beat in the icing sugar into the cream cheese in batches until it’s all combined.
Place in the fridge for 30 minutes to firm up if a little soft, before using to fill and spread thickly over the cake.
Scatter the chopped nuts over the surface of the cake and in a rim around the bottom edge to conceal any drips of icing.
Will keep for up to 5 days if stored in the fridge.

Saturday 6 September 2008

Grape Jam / Jelly

My grandmother has a friend who is very self sufficient and grows most of her own fruit and veg. Think Tom and Barbara from the old TV series The Good Life and you get the idea. She has just had a large harvest of black grapes, more than she could use herself and so gave some away to family and friends. I love how my bunch came with some leaves still attached and even a few wisps of cobweb from the spiders who like to live amongst the vines – you can’t get more natural than that!

The grapes themselves had crisp skins, were plump and very juicy. They had a good flavour, although it was a little sharp. The grapes also contained small seeds which after being used to seedless grapes from the supermarket, were a bit of a surprise. Due to this I decided to turn my bunch of grapes into grape jam/jelly. I say jam/jelly because here in the UK we call our fruit spreads jams, although I know in America they known as jellys. Now I would normally stick to calling it a jam but as the fruit in question is grape I feel I should also call it jelly because as far as I know we (in the UK) do not make any jam using grapes but I know it is a very popular fruit jelly in America. Keeping up so far?

I have never tasted grape jam/jelly before and was excited about trying it out with some peanut butter in another much loved America classic, the peanut butter and jelly sandwich. I am happy to report that it is a delicious combination.

I loved how vibrant and glossy the resulting jam/jelly turned out, the colour of a light red wine. My jam/jelly turned out softly set, suitable for easy spreading or pouring over yoghurt, but if you want more of a thick spread then I suggest using equal quantities of sugar to fruit.

I made little labels for the jars and gave one away to the friend who provided the grapes and I was rewarded with another bunch. I think I have read of an Italian grape tart somewhere, so that might be next on the list.

Grape Jam / Jelly
Ingredients
850g black grapes
650g caster sugar
1 lemon
1 tbsp water

Method
Cut the grapes in half and remove any seeds if necessary.
Place the grapes into a large saucepan with the juice of the lemon and the tablespoon of water.
Heat gently with the lid on for 10 minutes until the juices have been released from the grapes and they are turning soft.
Add the sugar and stir until all the granules have dissolved. Then replace the lid, leaving it slightly off to allow steam to escape.
Allow to simmer for 40-50 minutes until slightly reduced and syrupy.
Meanwhile, wash and dry 4 jam jars in hot soapy water and then place them in a cold oven and turn it on to 160C and heat for 15 minutes to sterilise the jars.
Test the jam for setting by placing a small spoonful of the jam onto a saucer and place in the fridge for 5 minutes until cool. Then run a finger through the middle of jam and if it is ready it will ripple on either side. If it ripples, remove the jam from the heat, if its too runny, then continue heating for a further 10 minutes before repeating the test.
Remove the jars from the oven and immediately ladle the jam into the jars. Be careful the jam will be extremely hot! Screw the lids on using rubber gloves (the jar will be too hot to hold).
Leave the jars to cool before storing in a cool dark place. Refrigerate once opened.
Makes 4 x 425g jars.

Wednesday 3 September 2008

The Cake Slice

I have some exciting news today. My good friend Gigi of Gigi Cakes had the brilliant idea to set up a new baking group, which involves choosing a book and then baking a new recipe from it each month for a year. The idea came from us always buying new cookery books and then never getting round to baking more than one or two of the recipes. This way we are guaranteed to get through at least 12. I am also thrilled that she asked me to be her c0-host.

We have called the group 'The Cake Slice' rather fitting don't you think? For more info and a sneak preview at one of the cakes on offer visit Gigi's blog.