

This torte was this
years alternative dessert offering for those (strange) people who don’t like
Christmas pudding. The non Christmas pudding eaters of the family are devout
chocoholics and so any dessert must involve copious amounts of chocolate and
this dessert doesn’t disappoint.
I wanted to create
something with a bit of wow factor, to fit in with the Christmas celebrations
and decided a joconde imprime torte would be the way to do it. It sounds a bit
daunting, but it’s actually quite a simple yet very effective technique. You
pipe a design onto your parchment using a special cake batter and freeze it
before putting a swiss roll batter of a different colour over the top of the
frozen cake batter and baking it. Freezing the design stops the two batters
mixing together before you bake it. Then when you turn it out, you have a
perfectly piped design on the underside of the sponge. Clever!


This joconde sponge
is very flexible and it is used to line the sides and base of a ring mould
which you can then fill with whatever takes your fancy. I decided to use a rich
dark chocolate mousse with a layer of fresh cranberry compote for a festive
flavour.

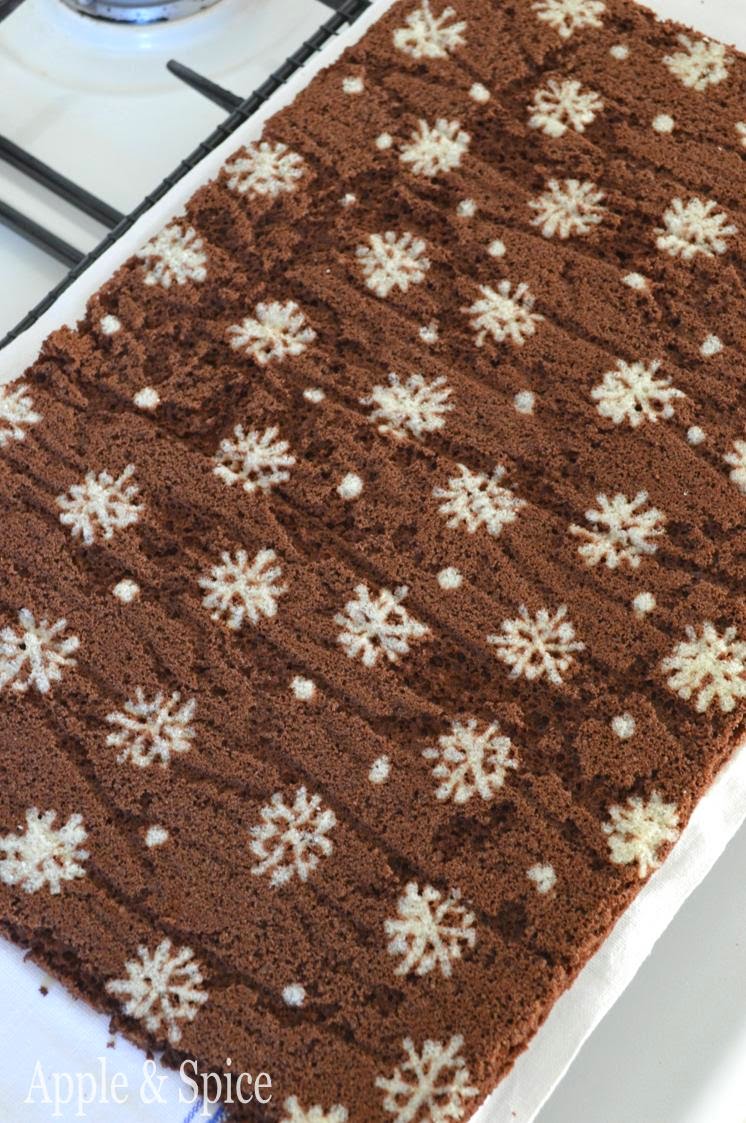
My joncode sponge
was decorated with a piped snowflake design to make it extra Christmassy. I
think it worked well although I was annoyed my silicone paper crinkled slightly
in the oven after being transferred from the freezer, so the finished underside
of my sponge was a little crinkled in places. I’ll make sure to use one of
those stiff silicone mats next time. The effect was still good though.
I topped the torte
with a hot water ganache which gave a lovely glossy finish. The finished torte was
divine. Moist, light sponge filled with an airy, creamy, rich dark chocolate
mousse with a hidden layer of the tart and tangy cranberry sauce. The fudgy chocolate
glaze added an extra chocolaty hit. It tasted amazing! It was completely
indulgent and intensely chocolaty but not in the least heavy or stodgy, perfect
after a big Christmas meal.

All my family loved
it and there were actually arguments over the leftovers the following day. I’ll
be making this again for sure! It takes a little bit of time to make, as there
are quite a few processes and the mousse has to chill in the fridge overnight,
but don’t let that put you off. You could just make a plain joconde sponge and
not bother with the design and then use a shop bought cranberry sauce to make
things simpler.

I’ve already been
asked to make it again for New Year! Tell me, what festive pud did you serve
for the non Christmas pudding eaters of the family?

Oh and for people
who wondered what my Christmas pudding looks like when its steamed and served –
here’s a photo. Moist fruity boozy loveliness.
Snowflake Joconde Imprime Torte filled with Dark Chocolate
Mousse & Cranberry Compote, topped with Chocolate Glaze

White Snowflake
Sponge Paste
35g unsalted butter
35g icing sugar
1 egg white
40g rice flour
Chocolate Joconde
Sponge
2 egg whites
15g caster
sugar
60g ground
almonds
60g icing
sugar
2 eggs
20g cocoa
powder
20g unsalted butter,
melted
Cranberry Filling
200g fresh
cranberries
2 tbsp caster sugar
Juice of 1
clementine
Chocolate Mousse
200g dark chocolate
120ml water
3 eggs, separated
40g caster sugar
150ml double cream
Chocolate Glaze
50g dark chocolate
2 tsp cocoa powder
2 tsp caster sugar
100ml hot water
To decorate
20g white chocolate

Method
Print out your chosen design for your sponge on a couple of
A4 sheets of paper. Cut them so they line the base of a 33x25cm (13x10inch) swiss
roll tin. Cut out a piece of silicone paper to line the base and sides of the
tin and lay it over the top of the design.
For the white decorative paste, cream softened butter and
icing sugar together until light and fluffy. Gradually add the egg white,
beating continuously. Fold in the flour until combined. Spoon the mixture into
a piping bag fitted with a small tube nozzle. Pipe out your design onto the
silicone paper, tracing over the printed out design beneath.
Transfer the silicone paper to a flat baking tray and place in
the freezer for 10 minutes to freeze the design solid. Meanwhile, preheat the
oven to 220C and make the chocolate joconde sponge.
For the chocolate joconde sponge, whisk the egg whites in a clean
bowl to stiff peaks stage. Add the caster sugar, one teaspoon at a time,
whisking between each addition to make a glossy meringue. Set aside.
Add the ground almonds, icing sugar and eggs into a new clean
bowl. Whisk together for 3-5 minutes, or until doubled in volume, a stand mixer
is useful here, but not essential. Sift over the cocoa powder and fold it in
gently. Add one-third of the whisked egg whites and fold in to lighten the
mixture. Add the rest of the egg whites and fold in more gently until just
incorporated. Melt the butter, and pour it down the inside side of the bowl and
fold in, until incorporated.
Remove the silicone sheet with the decorative paste from the
freezer and place into the base of the swiss roll tin.
Tip the joconde sponge mixture over the top and gently
spread into an even thin layer. Bake for 7 minutes, or until slightly risen and
lightly springy to the touch.
Place a sheet of baking parchment over a cooling rack and
turn the cake out onto it. Carefully peel off the silicone paper from the base
of the cake, revealing the piped design. Lay the paper back on top of the
sponge and leave to cool completely.
To make the cranberry compote, place all the ingredients
into a pan and heat gently. The cranberries will start to pop and released
their juice. Simmer for 10 minutes until the cranberries have broken down and
thickened into a thick compote. You should be able to drag a spatula along the
base of the pan without any excess liquid flooding the space. This happens
quite quickly. It will taste very sharp at this stage, but you need this to cut
through the rich chocolate later. Set aside to cool.

Line the inside of a 20cm/8inch ring mould with a strip of
acetate and place it onto a sturdy baking tray that has been covered with
clingfilm. Trim off the sides of the sponge before cutting a long strip of
sponge, 6cm tall from the long side of the sponge. Cut a similar sized strip
from the shorter edge of the sponge and use them to line the inside edge of the
ring mould. Make sure to have the design facing outwards, so it will show off
the outside of the dessert once the ring is removed. Push the edges of sponge
together to join them together and trim off any excess. Cut out a circle from
the leftover sponge, slightly smaller than the diameter of the tin, and use it
to line the base of the ring mould, design facing down. Spread the cooled
cranberry compote evenly over the base of the sponge inside the ring.
For the chocolate mousse, break the chocolate into pieces
and place into a small pan along with the water. Heat on the lowest heat,
stirring occasionally until the chocolate is melted and combined with the
water.
Separate the eggs, putting the whites into a clean bowl.
Beat the yolks into the chocolate mixture and set aside.
Whisk the egg whites to the soft-peak stage, then whisk in
the sugar, about a third at a time, whisking until the whites are glossy. Fold
one-third of the egg whites into the chocolate mixture to loosen it; then
carefully fold in the rest. Whip the cream until it just starts to hold its
shape but is still very soft. Carefully fold this into the chocolate mixture.
Pour all the chocolate mixture into the ring mould, over the
top of the cranberry compote. Don’t worry if it rises and fills the mould above
the rim of the cake, this is fine. Carefully cover the top of the ring mould
with clingfilm and place in the fridge to firm up and set for at least 6 hours,
preferably overnight.
The following day, make the chocolate glaze. Break up the
chocolate and place it into a small pan along with the cocoa powder, sugar and
water. Heat over a low heat, stirring continuously until everything is melted
and combined into a glossy sauce. It should be of a pouring consistency. If too
thick, add a little boiling water from the kettle and stir to create the
desired consistency. Do not add cold water or the mixture will seize.
Remove the torte from the fridge and pour the chocolate
glaze over the top. Use a small pallet knife to spread it out to the edges.
Give it a gentle shake to smooth the top.
Melt the white chocolate and drizzle or pipe it over the top
of the torte to decorate.
Return to the fridge and chill for a further 2 hours before
serving
To serve, carefully lift the torte off the baking tray and
transfer to a serving plate. Remove the outer ring mould, this should lift off
easily due to the acetate sheet beneath. Carefully peel away the acetate from
the torte and serve. Use a sharp knife to cut down in one swift motion to get a
clean cut. It’s quite rich so you only need fairly small slices.
Store any leftovers in the fridge and eat within 3 days.
Makes 1 x 8inch torte


.jpg)
.jpg)
.jpg)
.jpg)
.jpg)
.jpg)
.jpg)
.jpg)
.jpg)
.jpg)
.jpg)
.jpg)

.jpg)
.jpg)
.jpg)


