Sunday, 28 July 2013

Summer Veg & Bean Salad in a Smoky Tomato Dressing

Now that we have had a couple of weeks of glorious warm and sunny weather it means things like summer salads, wedges of cold quiche and crunchy coleslaw are finally back on the menu. Last weekend I decided to prepare a huge veg and bean salad to have on hand for either work lunches or as part of a quick evening dinner for when it was just too hot to cook.

I’ve discovered that I absolutely love the combination of using both roasted and raw veg in a salad. They add such a wonderful texture and flavour contrast to each other. The roasted veg is sweet, soft and often slightly smokey or charred, while the raw veg is fresh, crisp and crunchy. That together with a mix of creamy starchy beans and a nice dressing makes for a delicious salad. It’s also the perfect tasty way to getting your 5 a day – did you know that beans (baked beans too) count as one of your 5 a day – its true! So think how healthy and delicious a tasty veg and bean salad it.

I’ve also discovered that making a dressing on the baking tray the veg has previously been roasted on, not only helps get those sticky stuck on pieces off the tray, but also adds a wonderful flavour base to the sauce. The sticky juices, edges of stuck on veg and scraps of roasted garlic are a delicious addition to the dressing. For this sauce I did a mix of tomato puree, paprika and chipotle chili powder for a smoky, only faintly spicy warmth.

This salad kept me going for 4 days. It makes a great meal in itself, but is also a lovely accompaniment to a wedge of quiche or on the side of a BBQ meal.

Summer Veg & Bean Salad in a Smoky Tomato Dressing
For Roasting
¼ head cauliflower
2 carrots
¼ fennel bulb
1 large onion
1 yellow pepper
2 cloves garlic
1 tbsp oil
1 tsp dried oregano

For Salad
1 x 400g can mixed beans
¼ head broccoli
2 spring onion
50g mange tout
4 tbsp sweetcorn
2 tbsp broad beans
10 basil leaves

Dressing
1 tbsp tomato puree
2 tsp smoked paprika
1 tsp chipotle chili powder
½ tsp balsamic vinegar
100ml water
1 tsp cornflour
Salt and pepper

Method
Heat the oven to 220C. Have a large baking tray ready, but don’t line it with foil.
Divide the cauliflower into small florets. Peel and slice the carrots into thin batons and chop the fennel, onion and yellow pepper into squares. Place all the veg onto the baking tray.
Finely chop the garlic and sprinkle it over the veg along with the oregano, oil and a pinch of salt and pepper. Use your hands to mix everything together until all the veg is coated. Spread into a even layer.
Place in the oven for 20 minutes before giving everything a mix and roasting for a further 10-20 minutes depending on the size of your veg.
Remove from the oven and set aside to cool.
Meanwhile, cut the broccoli into small florets. Either blanch them in a pan of boiling water or in the microwave until they are slightly softened, but still firm and crisp. Cool under cold water, pat dry and add to a large bowl.
Slice the mange tout on a diagonal, so you get thin long strips. Thinly slice the spring onions. Add them to the bowl along with the sweetcorn and broad beans (you can pod them if you want, but mine were young and sweet so it wasn’t necessary).
Drain and rinse the beans and add them to the bowl along with the cooled roasted veg.
Shred the basil and sprinkle it over the top. Give everything a good mix together.
Your baking tray will probably have some sticky veg juices from roasting, which will form the base of the dressing. Add the tomato puree, paprika and chili powder onto the baking tray. Stir in the water and then place over the hob and heat gently, stirring constantly with a spoon or spatula. Rub the spatula over the base of the pan, scraping up any sticky bits of stuck on veg. Stir in the balsamic vinegar.
If the dressing looks a little thin, dissolve the cornflour in a little cold water and then stir into the dressing. Heat until slightly thickened.
Season with salt and pepper to taste.
Remove the smokey tomato dressing from the heat and pour over the salad. Toss everything together so that it all gets coated in the dressing.
You can eat ti straight away but it tastes even better is allowed to sit in the fridge for a few hours or even overnight. This allows the veg and beans to absorb some of flavour from the dressing.
Serve as a meal or as an accompaniment to other summery food.

Sunday, 21 July 2013

Crustless Lemon Tart with Mango, Basil & Elderflower

Not too long ago I bought a large net of lemons intending to make a hot baked lemon pudding cake, but then boom, we are suddenly in the middle of the hottest weather we have experienced in 6years and the idea of baking and eating a hot dessert was no longer appealing.

I still wanted to enjoy some weekend baking but it had to be quick, simple and fresh. I decided to use my lemons to make something zingy and chilled. I find citrus so refreshing in hot weather. Instantly I thought of a lemon tart, but didn’t want the hassle of having to make and bake my own gluten free pastry. Instead I decided to simply make the filling and bake these into little dishes, which I could then eat chilled. This also meant minimal preparation and amount of time the oven had to be on.

I based the recipe on one of Delia’s for a lemon tart. This called for cream which I didn’t have, so instead I used yogurt which I thinned with a little milk. This worked really well and gave the finished ‘tart’ a fresh and clean taste, rather than making it too rich and creamy.

The lemon mix only needs lightly whisking together and it’s ready. I chose to bake it in a water bath as without the pastry crust, and in individual servings, I felt it was at risk of over baking from the dry heat in the oven. This worked well and resulted in a thin firmer top with a delicious, softly set, almost crème brulee like zingy lemon filling.

To make the dessert extra special I served it with some tiny cubes of super sweet fresh mango that I first marinated in basil and homemade elderflower syrup. The basil may sound like a strange addition, but it just added another clean fresh note, without being too obviously basil. Mint would be a great substitute too. The floral mango and elderflower went perfectly with the fresh and zingy lemon.

The desserts were fresh, light and zingy. If you can image stirring lemon curd into a set custard that’s the kind of flavour and consistency you get, only slightly lighter. The perfect sweet treat to enjoy after a light dinner on a hot day.

Crustless Lemon Tart with Mango, Basil & Elderflower
Ingredients
80-100ml lemon juice
Zest of 2 lemons
2 eggs
60g caster sugar
50ml milk
40g Greek yoghurt

To serve
½ ripe mango
2 basil leaves (or mint)
3 tsp homemade elderflower syrup (or lemon syrup or Limoncello)
Cream or Greek yoghurt

Method
Preheat the oven to 180C.
Lightly whisk together the eggs and sugar, you want them combined, but not fluffy.
Add the lemon zest and juice and stir to combine.
Mix the yoghurt and milk together and then add to the lemon mixture.
Mix until smooth and combined.
Divide the lemon mix between two pudding dishes (approx 12cm diameter) or 3 ramekins.
Place the dishes or ramekins into a deep sided baking tray. Add boiling water from the kettle carefully into the tin, so that it reaches half way up the sides of the dishes.
Place into the oven for 15-18 minutes.
They should be softly set on top and still slightly wobbly in the centre when baked.
Remove from the oven and take the dishes out of the water bath. Leave to cool for 1 hour before chilling in the fridge for at least 3 hours.

Meanwhile, slice one mango cheek into thin fingers, remove the skin and cut into cubes about 5mm square.
Place into a small bowl along with 2 finely shredded basil or mint leaves.
Drizzle over 3tsp elderflower syrup and stir until evenly coated.
Chill in the fridge until required.

To serve, place a large spoonful of the marinated mango onto the chilled lemon dessert. Serve with a blob of lightly whipped cream or thick Greek yoghurt.
Eat and enjoy
Serve 2-3 depending on dish used
Note: Recipe can easily be doubled or quadrupled as required

To make your own elderflower syrup
Elderflower grows wild in huge bushy patches almost everywhere. Make sure the flowers are pure white and fragrant. If they are yellow, they are past their best.
Pick the flowers off a large bunch of elderflower and place into a saucepan with 1 pint of water. Bring to the boil, then simmer for 15 minutes. Then turn off the heat and leave until cool.
Strain the water through a fine sieve or muslin to remove the elderflowers. Weigh the amount of water you have left and add the same quantity of caster sugar.
Stir together and bring back to the boil. Reduce to a simmer and then allow to bubble until thick and syrupy.
Transfer to clean seteralised jars that you have first heated in the oven.
Store in the fridge
Great in drinks, over ice cream or yogurt or drizzled over fresh fruit or cake

Tuesday, 16 July 2013

Life, Lunch & Friends

Sorry for the long absence. The week before last I was unwell and not up to eating anything, let alone cooking. I then made one of those big life changing decisions, and foolishly made the wrong one, and went off down the wrong track. It’s been a very stressful and emotional week trying to set it right again and I dearly hope things are now back on the right path. To be honest I’d love to scrap the last few days from existence, but I have learnt things too, such as don’t make important when you have been ill and are not thinking straight!

In order to offer some support and take my mind of things one of my best friends from ‘back home’ came to Sheffield to visit me over the weekend. I haven’t seen her since Christmas, so it was lovely to see her again and do normal things like go out to lunch and catch up on her news.

As Saturday seemed to be one of the hottest days in Sheffield, we didn’t want anything too heavy or more importantly cooked for lunch and so instead decided to visit Fusion Organic Café which is located down a side street (Arundel Street) near Sheffield Hallam Uni.

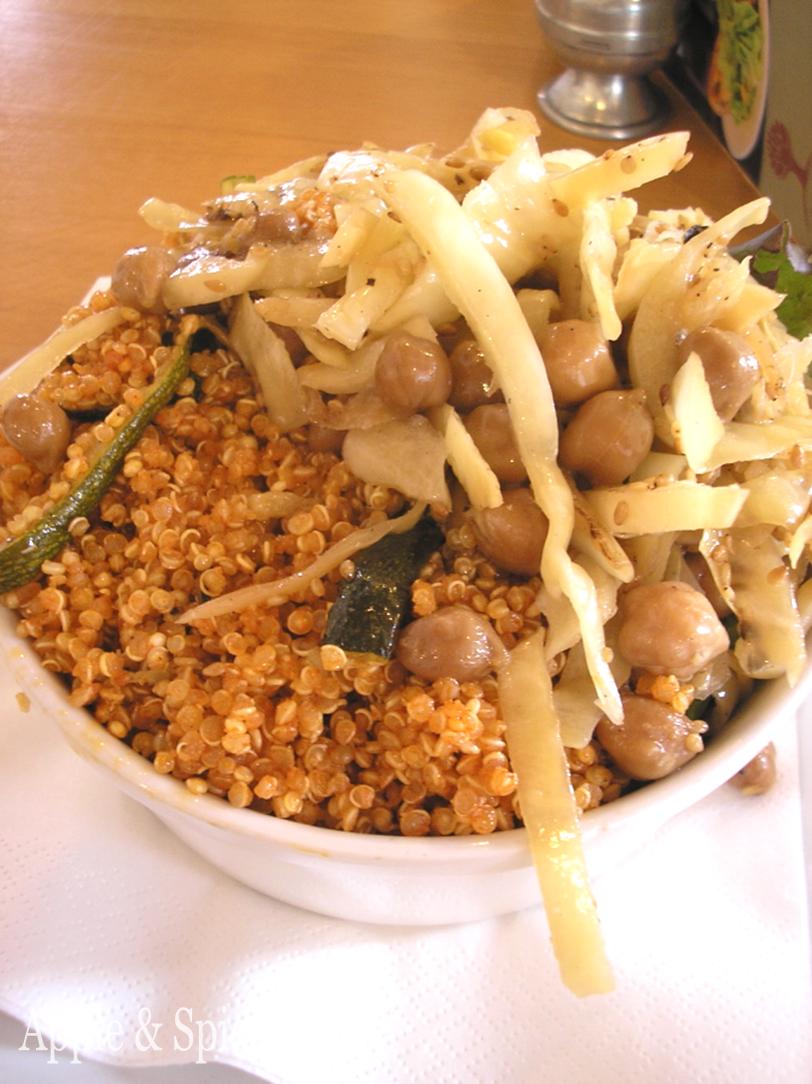
This is a great little café where they make all their own salads, quiches and soups fresh on site daily. The menu is always changing to accommodate what’s in season or what they fancy making – my kind of place. We each opted for the salad bowl which was a choice of 3 of their 5 salads of the day. I went for a bigger portion of just 2 salads, the chickpea and cabbage salad which was in a light dressing and then also the smoked paprika quinoa salad which had a delicious smoky heat to it.

My friend chose the Moroccan cous cous salad, the quinoa salad and a broccoli noodle salad. We both agreed everything was delicious and very generous portions considering we got all that for £3.80 each! I’d defiantly recommend it. They always have a range of gluten free or vegan options too. It’s a little hidden, but well worth the hunt out. (They are now open Saturdays too)

As the day was so swelteringly hot we decided to cool down with a pot of frozen yoghurt from a shop on Pinstone Street called Flurt. They had a choice of 3 flavours on the day, natural, chocolate or raspberry. We both went for raspberry. Our medium tubs were £2.80 and each topping was 30p extra. They had lots of toppings to choose from but couldn’t guarantee any of them were gluten free as they were all kept in the same unit, so I had mine plain while my friend chose white chocolate and strawberries for hers.

I was slightly disappointed at the lack of flavour options, as their website lists many more. Still the raspberry flavour was very fruity and refreshing, although I found it a little icier than previous frozen yogurts I’ve tasted. I also thought they were a bit stingy with the portion size considering my pot cost £2.80 and actually turned out to be swirled around the edge of the pot and the middle was hollow. We’d wandered off into the city before I discovered this but it left me feeling a bit cheated. It was very refreshing but I’m not sure I’d buy one again. Still, I may just have been unlucky.

It was a lovely way to spend a sunny day, especially when I had the company of one of my best friends. Long may the sunny weather continue!

Saturday, 29 June 2013

Cherry Brandy & Chocolate Surprise Cheesecake

Do you ever have some days or weeks where you are craving a certain food or flavour and you just can’t get it out of your head? Last weekend for me that was cheesecake. I just had a craving for it that wouldn’t go away. Normally my dessert of choice is something cakey or spongy, but last weekend I wanted rich, creamy indulgent cheesecake!

Being coeliac sadly means I can’t pop down the shops for a quick cheesecake fix, but have to make one myself. However this has its advantages. Not only do I love baking, but baking it yourself allows you the freedom to be as simple or wacky as you want with the flavours, plus at the end you end up with an entire cheesecake to devour, rather than a single slice wahhhha!

As I went cream cheese hunting I instead discovered a different sort of soft cheese called Quark. This cheese is almost like a cross between cream cheese and ricotta and feeling adventurous I decided t use it as the base for my cheesecake. This proved to be a very good idea as the Quark was thicker and creamier than normal cream cheese, which I’ve found can sometimes go a little runny when I’ve baked with it in the past. Like ricotta, the Quark is made with strained milk, meaning it’s a lot healthier than cream cheese too, all the more reason for a bigger slice!

I had a jar of Morello cherries in syrup that I had been wandering what to do with and so decided to make a cherry studded cheesecake. Cherry Brandy flavoured ice lollies used to be one of my favorites. I’d buy them from the ice cream van outside school and feel ever so grown up as it had ‘brandy’ in the title (can you still get these?) I decided to soak the cherries overnight in Brandy to give them a bit of more a kick.

Chocolate always goes well with cherries and so I made a chocolate biscuit base for my cheesecake, which also added a nice colour contrast. While preparing my cheesecake I suddenly decided to create a hidden middle layer of chocolate cheesecake, encased in the cherry cheesecake. This created a fun surprise when the cheesecake was sliced, as from the outside all you could see was the pale cherry. Chocolate and cherry are also a fabulous flavour pairing.

As I still had some cherry juice leftover I made a quick cherry jelly using a little of the agar agar powder I have been experimenting with recently. This finished the cheesecake off nicely and gave it a wonderfully glossy mirror top.

I was really pleased with my finished cheesecake and it certainly satisfied my cheesecake cravings. Morello cherries steeped in brandy, a hidden chocolate layer, a rich chocolate base and a glossy cherry glaze and combined into a velvety smooth and creamy cheesecake. What’s everyone else been craving recently?

Cherry Brandy & Chocolate Surprise Cheesecake
For the cherries
100g drained, pitted Morello cherries in syrup (reserve the syrup)
40ml Brandy

For the base
90g gluten free shortbread or digestive style biscuits
50g butter
20g caster sugar
10g cocoa powder

For the cheesecake
400g Quark or soft cream cheese
100g caster sugar
2 eggs
10g cornflour
50g dark chocolate

For the cherry jelly
130ml cherry syrup reserved from earlier
20g caster sugar
½ tsp agar agar powder

Method
The day before, remove the cherries from their syrup, cut them in half and place into a small bowl. Pour over the brandy, stir and cover with clingfilm. Set aside for 6 hours, or preferably overnight to allow the cherries to steep and absorb the flavour of the brandy.
The following day, line a 6inch/15cm deep springform tin with baking parchment. Wrap the base and sides of the tin with a large sheet of foil, you want it cover the whole base and up and sides of the tin in one piece. Repeat so you have two layers of foil wrapped around the outside of your tin.

For the base, blitz the gluten free biscuits in a food processor until they resemble fine crumbs. Add the sugar and cocoa powder and blitz again briefly.
Melt the butter, pour it over the cocoa crumbs and pulse briefly until and crumbs resemble damp sand.
Tip the biscuit mix into the base of your lined tin and press down into an even layer. Place the tin in the fridge to chill while you prefer the filling.
Preheat the oven to 175C.

For the filling, beat the Quark or cream cheese until smooth. Add the eggs and sugar and beat again until well combined.
Now remove one-third of this mixture and place it into a separate bowl. Melt the chocolate and add this to the removed third of the cheese mixture, stirring it together until well combined. Set aside.
Sift the cornflour over the remaining two-thirds of mix. Then pour the soaked cherries and their brandy liquid into the cream mixture and fold in to incorporate. It will turn a light pink colour and be quite runny, this is fine.
Pour half of the cherry cheesecake mixture over the chilled biscuit base, spreading it into an even layer.
Place small spoonfuls of the chocolate cheesecake mix over the top of the cherry cheesecake until it is all used us. Gently try and smooth the chocolate cheesecake into an even layer, but don’t worry too much about making it perfect.
Then pour the remaining cherry cheesecake mix on top, covering the chocolate filling inside. Tap the cheesecake on the counter 2-3 times to remove any trapped air.
Place the foil wrapped tin into a larger deep baking tray.
Fill the tray with boiling water so that it reaches halfway up the sides of the cheesecake tin.
Carefully transfer this to the 175C preheated oven to bake for 50-60minutes. The cheesecake should be set around the edge but still a little wobbly in the centre when gently shaken.
Once baked, quickly remove the cheesecake tin from the water bath and return it to the switched off, but still warm oven. Leave the oven door ajar and leave the cheesecake to cool down gradually for 45-60 minutes.

For the jelly, start this once your cheesecake has been cooling in the oven.
Add another 130ml of cherry juice to a small pan along with the sugar and agar agar. Heat gently, stirring until the sugar has dissolved.
Bring the mixture to the boil for 15 seconds, then remove from the heat and allow to cool for 3 minutes.
Remove your partially cooled cheesecake from the oven and carefully pour the hot cherry glaze over the top. It must still be hot, or else it will have set into a solid.
Carefully transfer the cheesecake to the fridge and allow to chill for at least 4-6 hours before serving.
Makes 1 x 6inch/15cm cheesecake

Saturday, 22 June 2013

Devnaa Indian Sweets Tiffin Box: A Review

Now, this may look like a fancy box of chocolates – but don’t be fooled. These are not just your ordinary box of truffles and caramels, oh no. These are so much more indulgent and exciting than that!

Devnaa is a relatively new company who make gourmet boxes of sweet Indian treats, specially developed to represent the infamous tiffin boxes of India, used to transport food. They also make Indian inspired bars and drinking chocolates too. The box itself looks very artisan, but lift the lid, peel back the paper and the most intricate box of beautifully decorate chocolates are revealed. However, these are not actually ‘chocolates’ as we known them, but a range of specially designed and delicately spiced classic Indian sweets, which have been enrobed in chocolate and beautifully decorated.

Bite into one of these and you won’t find ganche or salted caramel, instead your get to experience a pistachio barfi delicately flavoured with cardamom and rosewater and encased in dark chocolate and finished with chopped pistachios. Or, how about a coconut barfi enrobed in milk chocolate or one of the other fabulous combinations including vanilla, saffron, orange, strawberry and chai!

I’m not much of a chocolate lover – shocking I know. On the odd occasion I have been given a box I usually eat one or two and then put them in a cupboard and forget about them. Not so with these divine creations. I was so excited when I opened the box that I ate two just after breakfast. I just couldn’t resist trying them immediately.

My first choice was Cinnamon Chai. A signature chai blend of cinnamon, cardamom, ginger and close infused barfi which is enrobed in milk chocolate. Wow, it was divine. You could taste all the spices, the cardamom in particular, but nothing too strongly overpowered anything else. The spices were delicate and fragrant and worked so well with the coating of smooth milk chocolate. The barfi itself had a creamy, yet slightly crumbly texture and wasn’t overly sweet, which let the spices really shine through.

I couldn’t resist trying another one and selected the Velvety Vanilla. A Madagascan vanilla barfi with hints of saffron and cardamom, covered in white chocolate. This was fabulous too. Again I loved the cardamom flavour and how you could see speckles of it throughout the barfi. The saffron flavour was subtle but still noticeable and also gave a light golden hue to the barfi. So good, I sat there in my PJ’s grinning over my box of Indian treats.

All the barfi sweets were amazing and I’d much, much, much sooner be presented with a beautiful box of these than a box of regular chocolates (even the expensive ones). I adored their soft melt-in-the-mouth texture, how the spices were delicate and yet still shone through, how the centres were made from delicious barfi rather than chocolate or truffle based and the presentation is stunning. Plus, this particular box (Signature Indian Sweets Collection) is entirely gluten free! (although some of their other Inidan Sweet boxes do contain gluten so ask before buying).

So friends and family take note, next time its my birthday, Christmas or you are just feeling generous…keep your chocolates and jewelry, I’ll have a box of these please! I might even let you try one too.

Sunday, 16 June 2013

Buffalo Milk, Honey & Almond Gelato

Recently I was having a discussion with a friend about buffalo milk. They were raving about its thick creamy taste and texture and couldn’t believe I had never tasted it. The next time I saw them they bought me a gift – a carton of buffalo milk. I was slightly unsure how it would taste. Buffalo are big hairy animals and I could image their milk tasting quite unusual and strongly flavoured, a bit like goats milk. However, on drinking a glass I couldn’t believe how fresh and clean it tasted. No goaty or animal taste to it at all. It was clean, rich and unbelievably creamy.


The milk was so indulgent and creamy that I decided to use the rest of it to make some buffalo milk gelato. Gelato is similar to ice cream, only its lighter as it’s made with a milk base, rather than cream.

I wanted the creaminess to be the star, so decided to flavour the gelato only lightly with honey and some chopped almonds. My idea was based on my love of creamy thick Greek yoghurt with honey and almonds, which always tastes lovely and fresh. The honey also added sweetness without having to use sugar.

After churning in an ice cream maker, the gelato had retained the buffalo milks freshness and richness. It was naturally not as thick or full on creamy as ice cream, but it was very refreshing. I found it also tended to melt a lot more quickly than ice cream, I suppose because it doesn’t have so much butter fat or any eggs compared to ice cream to help stabilise it.


The honey flavour was subtle but went very well with the freshness of the gelato. The almonds added a nice crunch too.

Has anyone else tried buffalo milk? I have recently discovered it in Waitrose if anyone wants to try some for themselves. Also, does anyone know why its called buffalo milk/cheese when (to my understanding, I may be wrong!) buffalo are the males and it’s actually bufala, the females who produce the milk? In Italy there is a cheese called Mozzarella di Bufala, which in 1993 was grated DOC status and in 2008 was awarded Protected Geographical Status. Maybe this means no one else can now call it Bufala?

Buffalo Milk, Honey & Almond Gelato
Ingredients
700ml buffalo milk
250ml full fat milk
100g honey
35g almonds, skin on
½ tsp vanilla extract

Method
Set your ice cream to freeze*Mix all the ingredients together, making sure your milk is well chilled first.
Pour this mixture into your ice cream maker and churn according to manufactures instructions. It should be thick and softly set when done after about 45 minutes.
Transfer the ice cream to a large container and place in the freezer to stiffen up for about 30-60 minutes.
Scoop your ice cream into serving bowls, drizzle over a little honey and a few chopped almonds.
Eat and enjoy in the sunshine (if it ever reappears!)
Makes 1 litre ice cream

Note* If you don’t have an ice cream maker, simply pour the ice cream mix into a plastic container and place in the freezer. Take it out every half and hour and give it a bit of a whisk to ensure an even freezing, until you’ve reached your desired consistency.

Monday, 10 June 2013

Deconstructed Pavlova – Buttermilk Panna Cotta, Mini Meringues & Textures of Strawberry

I have recently been reading about a vegetarian gelatine alternative called agar agar, which is derived from boiling several kinds of seaweed together. It’s dried and sold in powder form, flakes or bars and has similar properties to gelatine, in that it can set things into a gel or jelly.

I was intrigued and ordered some of the powder form online to have a play. As the weather was bright and sunny, I decided to try and replicate a recipe for buttermilk panna cotta, using the agar in place of the gelatine. Using buttermilk rather than cream appealed to me as it sounded lighter and fresher than regular panna cottas.

Seeing the first English strawberries starting to appear in the shops, I couldn’t resist buying a large punnet of them. I decided to pair them with the buttermilk panna cotta in order to create a light and summery dessert. As I was in an experimental mood and had set aside a whole day to play with my new agar ager, I decided to have some fun and use the strawberries in three different ways. Some I kept fresh and whole, others I sliced thinly and dehydrated until crisp and the rest I pureed, mixed with some agar and set the mixture into a jelly, which I then cut out small dots/circles of to decorate the plate. Strawberry 3 ways!

Thinking through the dessert I decided I needed to add some chew or crunch element to compliment the other softer textures. Mini piped meringues seemed a good idea and I was struck with how my dessert now resembled a deconstructed pavlova.

I was a little anxious my buttermilk panna cotta wouldn’t set, as I wasn’t sure how to much to use. As it turns out I actually used far too much, as my panna cotta was more like a firm jelly, than a softly set cream. It still tasted nice, but wasn’t the texture I hoped for.

I have decided not to give any recipes for the dessert, as although I was happy with the presentation and the flavours, I felt the textures of both the panna cotta and meringues could have been improved. The panna cotta was much too firm and the meringues were more chewy than crisp.

The flavours were lovely when eaten together. The buttermilk panna cotta was fresh, and only lightly sweet, the strawberry elements had ripe fruity flavours that actually tasted like strawberries and the meringues had a lovely crisp outer crust and very very chewy interior.

I tried really hard with the presentation and was happy with how the dish looked. It just needs some tweaking to perfect the recipes. I need to read up about how to correctly substitute powdered agar agar for gelatine.

Anyone else got experience of working with agar agar?

Sunday, 2 June 2013

Roasted Butternut Squash Houmous

I love houmous and its one of my household staples that appear in my fridge at least 2-3 times a month. You can get some really tasty and interesting houmous varieties in the shops these days, but recently I have found I also enjoy making it myself.

Having recently bought some of the new Warburtons gluten free tortilla style wraps to try, I wanted some houmous to eat them with. As I had some butternut squash languishing in the fridge from making my butternut and ginger soup I decided to roast it and then blitz it into some homemade houmous to add a bit of interest.

Butternut squash is one of those fabulous vegetables – well tubers really, that go fabulously sweet and soft after a little roasting in the oven. You’d never think that something so tough and hard to slice could be transformed into something so soft and almost creamy, in just a few minutes. The vibrant golden orange colour helps add a little sunshine to whatever it’s served with too.

I had a jar of garlic chutney in the fridge too, so used some of that in place of the standard freshly grated garlic. This gave it more of a subtle sweet garlic flavour rather than the harsher raw garlic hit, but either works well. I also added a squeeze of lemon juice as I’ve found this really seems to enhance the flavours in houmous.

The resulting houmous was soft with an almost creamy mouthfeel from the velvety roasted squash, which also gave it a delicious natural sweetness. Although creamy in the mouth, the houmous itself was still a little on the coarse side which I like, as it adds texture and interest. I also left it quick thick so that it would be easier to spread on wraps and in sandwiches, but you can always make it thinner if you want to use it as a dip instead.

I loved the rich orange roasted colour it produced. Even though I usually associate roasted veg with winter, this seemed very fresh and summery. I served mine with an assortment of salads and olives, along with strips of the gluten free tortilla wrap. I then had fun making up little handheld wraps, almost soft taco style, using the houmous as the base. Delicious

Roasted Butternut Squash Houmous
Ingredients
300g butternut squash
400g tin chickpeas
1 tbsp roasted garlic puree/chutney (or 1 clove garlic grated)
2 tbsp olive oil
½ tbsp lemon juice

Method
Preheat the oven to 200C. Line a baking tray with foil.
Cut the butternut squash into 1cm thick slices and lay them out on the baking tray, leaving the skin on. Brush with half a tablespoon of oil and roast for 25-30 minutes until softened and just starting to take on some colour.
Once roasted, remove from the oven and set aside to cool.
Place the chickpeas, 1 tbsp of water from their tin and the remaining 1½ tablespoons of olive oil into a food processor and blitz to create a chunky paste. Scrape down the sides once or twice during the process.
Add some roasted garlic puree/chutney, or grate in 1 clove of fresh garlic and a pinch of salt and pepper.
Peel the skin off your roasted and cooled butternut squash using your fingers, it should come away easily.
Briefly mash the butternut into a mush and add to the blitzed chickpeas along with the lemon juice. Blitz again until well combined and the mixture is as smooth or chunky as you desire. (You can add a little more oil or a drop of water if it is too thick)
Spoon into an airtight container and store in the fridge until required.
Delicious served with crudités, on jacket potatoes, salads, wraps with crackers or in sandwiches etc.
Makes around 800g (you can freeze some in a Tupperware container if you don’t think you will eat it all straight away)

Monday, 27 May 2013

Nutty Cinnamon Sultana Crumb Cake

I first made this cake a few years ago in my pre-coeliac days. I have fond memories of it being one of my favourite cakes I’ve ever baked. I have recently been longing to recreate it, but part of me was worried it either wouldn’t live up to my expectations, or else wouldn’t replicate so well in gluten free form.

This weekend I decided to do some therapeutic cake baking, and wanted something tasty and yet not piled high with mountains of frosting (I’ve really gone off buttercream frosting recently). My thoughts drifted back to this cake and I decided to bite the bullet and bake it.
 

The original cake calls for a much bigger pan, so I started my halving the quantities. I then used a combination of different gluten free flours and added some xanthan gum to held bind it all together. Tapioca starch is a recent discovery of mine and it adds a great chewy moistness to baked products, you only need a little though. It wouldn’t be suitable to use all tapioca starch.

I also substituted the milk with buttermilk, which like yoghurt, I find adds a lovely moistness and tenderness to the crumb. I also increased the quantity of the buttermilk, as gluten free flours are quite starchy and tend to absorb more liquid. The final substitution I made was to swop the raisins for sultanas.

The cake comprises of a thick vanilla cake mix layered with cinnamon sugar, melted butter, sultanas and chopped pecans. A second layer of cake mix is added before the cake is topped off with more of the nutty cinnamon. The cake batter itself turned out quite stiff, almost like a very soft scone mixture, but still light and airy. At first there didn’t look enough to cover the middle layer, but it puffed up and rose nicely in the oven.
 

Half an hour later I removed the cake from the oven. The top had turned into a crisp sugary cinnamon surface, studded with the sultanas and now-lightly-toasted pecans. It smelt divine and I had to prevent myself from sticking my fork straight in. I managed to resist temptation and left it to cool in the tin while I went and did my weekly shop.
 

Upon returning, the waft of sweet spicy cinnamon and freshly baked cake hit me as soon as I opened the door and I knew it was time for a taste.

The cake was light and tender in texture but sturdy enough to hold together well on slicing. The top and sides were crisp and slightly chewy while the middle was soft and yielding to the fork. The sultanas gave a wonderful chew and the nuts were…nutty thanks for their toasting in the oven. The cake batter itself is not that sweet, the main sweetness coming from the generous layers of cinnamon sugar both inside and out. I think using buttermilk in the batter was good too, as its natural acidity and tang helped combat some of the sweetness, preventing the finished cake from being overly sweet.
 

The texture had a slight chew to it, almost like it was a yeasted cake. It took me a while to realise what it reminded me of – a cinnamon roll! This cake is like a cinnamon roll in cake form – that same soft yet sturdy texture to the crumb. Delicious.

This cake was a little different in texture, but just as tempting tasty as I remember. I love how it has two distinct layers of the cinnamon, nuts and fruit, rather than everything being mixed together. I really enjoy having lots of different textures in a cake, and this one didn’t disappoint. A mix of tender cake, chewy raisins, toasted nuts and a generous sprinkling of cinnamon sugar which turns crisp and caramelised during baking. I might just go and have another slice…just to neaten off the edges.

Nutty Cinnamon Sultana Crumb Cake
(Recipe loosely based from Southern Cakes by Nancie McDermott)
Cake
90g white rice flour
50g brown rice flour
30g tapioca starch/flour
2 tsp gluten free baking powder
1 tsp vanilla extract
165g buttermilk
100g butter, softened
70g caster sugar
1 egg

Nutty Cinnamon Sultana Filling
65g light soft brown sugar
1 tbsp white rice flour
1 tbsp cinnamon
100g sultanas
70g pecans
70g butter, melted

Method – Nutty Cinnamon Sultana Filling
Combine the light brown sugar, flour and cinnamon in a bowl and stir with a fork to mix everything well. Roughly chop the pecans and mix with the sultanas in another bowl. In a third bowl, melt the butter until liquid and set aside for use later.

Method - Cake
Preheat the oven to 180C. Grease and line an 8x8inch/20cm square pan.
In a large bowl combine the butter and sugar and beat with a mixer on high speed until pale and evenly mixed. Scrape down the bowl and add the egg and vanilla and beat until the mixture is smooth and aerated.
Combine the flour and baking powder in a separate bowl. Add about a third of the flour mixture to the butter mixture and stir with a spatula, only until the flour disappears. Add a third of the buttermilk and fold in. Repeat twice more until all the flour and buttermilk have been incorporated. Stir just enough to incorporate the ingredients.
Spread half the batter evenly into the prepared pan. Sprinkle half the cinnamon mixture over the batter and then drizzle over half the melted butter using a spoon. Scatter half the sultanas and nuts over the top.
Drop spoonfuls of the remaining batter carefully over the filling and use a spatula to smooth the batter all the way to the edges of the pan. (It will look like there isn’t enough, but it puffs up on baking). Top with the leftover cinnamon, butter and nut mixture, covering the cake evenly.
Bake for 30 minutes, until the cake is golden brown, fragrant and beginning to pull away from the edges of the pan. A skewer can have a few sticky cinnamon crumbs attached, but no raw batter.
Place the tin on a wire rack and leave the cake to cool completely in the tin before cutting into generous squares and devouring.
Store any leftovers on a plate wrapped in clingfilm or an airtight container
Makes 1 x 8inch cake