Saturday 21 July 2012

Whole Lemon, Almond & Rosemary Cake & Some Exciting News!

Before I get to the cake, I have some exciting news. I’ve been offered a job in Sheffield and I am moving there tomorrow! I only found out on Monday so it’s been a very quick and hectic turnaround trying to get everything sorted, but I’m very excited. However, I am going to be without internet for several weeks until they can send an electrician round to connect me with a phone line, so I will be MIA from the blog for a while. See you in a few weeks! Now for some cake to celebrate!

One of my favourite go-to cake recipes for an afternoon treat is this Orange Chocolate & Almond Cake. It’s a bit of a talking point as it’s made with a whole pureed orange, skin, pith, pulp and all. This gives it an intense orange flavour and helps keep the cake moist. It’s also made with ground almonds instead of flour and contains no butter or dairy and so the end result is both gluten and dairy free, although you wouldn’t know it.

Recently I began to wonder if I couldn’t make the same recipe, using another type of fruit instead. Apple and almond is a classic combination but apples are nothing like the texture of an orange and I wasn’t sure it would work. Instead I decided to stick with citrus and try a lemon version instead.
           
Not wanting to play things too safe I also added some rosemary extract that I’d recently discovered in a deli/farm shop. I’ve now idea what the extract is intended to be used for – possibly marinating meat? – but I couldn’t resist the change to try it out in the cake recipe. Lemon and rosemary always taste delicious when paired together with potatoes, so why not in cake!? You could also use some very finely chopped fresh rosemary if you don’t have extract.

I was a little nervous/excited to see how the cake would turn out and I’m relieved to say it was delicious! The cake was quite closely textured, but not heavy or dense, as you can see from the scattering of tiny air pockets. It was soft and tender and so delicious I had to go back for a second slice. The lemon wasn’t bitter or overpowering, and if fact could possibly even have done with a bit more lemon! I loved how each slice was speckled with little shreds of lemon, so pretty.

The rosemary flavour was only faintly there. It sort of lingered in the background, letting the lemon be the star of the show before starting to creep through as you finished a slice. I might try adding a little more next time to make the flavour more pronounced.

I finished the cake with a simple lemon glaze which added a lovely lemon zing to each bite. All in all a success and I’m now plotting my next non citrus whole fruit creation. I know this concept sounds a bit strange, but do give either the orange or this lemon version a go, I’m sure you won’t be disappointed.

Whole Lemon, Almond & Rosemary Cake
Ingredients
1 large lemon, approx 140g weight
125g caster sugar
30ml extra lemon juice
3 eggs
75g ground almonds
50g brown rice flour
½ tsp gluten free baking powder
½ tsp bicarbonate of soda
1 – 1½ tsp rosemary extract or 1 tsp very finely chopped rosemary

Lemon Glaze
3tbsp icing sugar
Juice of ½ lemon

Method
Grease a 6 inch spring form tin with oil and line the base with greaseproof paper. Preheat the oven to 180C.
Wash the lemon and place in a microwavable bowl, fill with water until the lemon is mostly covered. Loosely cover the top of the bowl with clingfilm and microwave on high for 10 minutes.
Use oven gloves to remove the bowl from the microwave and drain off the water. Cut the lemon in half, remove any pips and chop roughly.
Place the entire lemon (peel and all), in a food processor along with the sugar and extra lemon juice. Whizz to a pulp, scraping down the sides once or twice, although a few larger shreds of lemon are fine.
With the mixer running, add the eggs, one at a time, and whizz until pale and foamy.
Add the baking powder, bicarbonate of soda, rosemary, almonds and brown rice flour. Whiz together until a smooth batter is formed. There will still be a few shreds of lemon visible in the batter, which is fine.
Pour the cake mixture into the prepared tin and bake for 40 minutes. It should be slightly risen and springy to the touch.
Allow the cake to cool for 30 minutes in the tin, before releasing from the tin and leaving to cool completely.
Mix the icing sugar and lemon juice together to create a thin spreadable glaze (add a tiny amount of water if needed). Spread over the top of the cake and decorate with a sprig of fresh rosemary.
Makes 1 x 6 inch cake

Wednesday 18 July 2012

Goody Good Stuff – A Very Sweet Review

Growing up everyone has their favourite treats. For some people its crisps, others chocolate bars or weird flavoured bubble gum, but for me it was sweets. I wasn’t a fan of boiled sweets, but I loved penny chews, flying saucers, milk bottles and millions from the pick n mix selection. Over the years my tastes changed and now my treat of choice would be a slice of cake or some rich dark chocolate. This is probably a good thing, as when I became vegetarian and now coeliac, this puts nearly all sweets in the forbidden bin…or so I thought!

When the lovely people at Goody Good Stuff offered to send me some of their new range of suitable-for-everyone sweets, my childhood nostalgia took over and I eagerly accepted. The entire sweet range is vegetarian, fat, gelatin, dairy and nut free. They are also made with no artificial colours, use natural flavours and are Halal & Kosher certified. Wow!

I was sent 6 of their 8 varieties to try and in the interest to giving them a fair review I teamed up with C, one of my coeliac friends, for a sweet taste test. We took out jobs very seriously and made score sheets and everything! Each of the sweets was awarded marks of out 10 for Aroma, Appearance, Texture and Flavour. I’ve then added together our scores and took the average to create an overall score out of 40 for each one. It was a lot of fun, although I was on a complete sugar high by the end of it!

Interesting enough, our top and bottom choices were the same, but the middle ones shifted about a bit. Here is the summary:

Cheery Cherries
I couldn’t help but smile when I saw these, they used to be one of my favourites growing up. The aroma of cherry hits you the minute you open the bag, it’s a sort of fake cherry smell but so reminiscent of my childhood. The texture of them is bouncy and chewy, yet surprisingly soft. Not as hard as Haribo sweets, probably due to their lack of gelatine. They had a lovely cherry flavour and we both agreed we would happily eat these again. Joint score 66/80

Cola Breeze
Again the aroma was very strong and smelt just like you’d opened a can of coke. These scored highly on texture and appearance and I loved the sugar coating, it was ever so slightly sharp and fizzy and really enhanced the cola bottle experience. Sadly I’ve never liked cola bottles, but I could tell they were a very good representation so tried to be fair with my marks; C adored them – hence their high score of 65/80

Strawberry Cream
These were fun little sweets. A mix of white ‘cream’ and red ‘strawberry’ blobs. They were springy and chewy and the perfect size to pop 2 or 3 in your mouth at the same time. I liked how the white and red blobs tasted different too, rather than just being a different colour, so worked well eaten together. I would have liked the strawberry ones to have been a little bigger though, possibly also strawberry shaped like in one of the other packets. Scored 60½/80

Summer Peaches
Another sweet I remember fondly. Again, the aroma was strong when opening the bag and it smelt quite fresh, rather than chemical. I loved the two tone, blushing red and orange hue to the sweets, just like a real peach. The texture was wonderfully soft and also juicy, not chewy. The fine coating of sugar was just right too, not too thick, so that it didn’t actually crunch when you bit into it. I loved these but C wasn’t so keen on the flavour (like me with cola bottles) so it scored 52½/80

Tropical Fruit
This was a mix of shaped, coloured and flavoured gummy sweets. Unfortunately, this meant that the smell of them together in the bag was a bit overpowering and confused, due to all the different flavours fighting for attention. However, the sweets themselves were very nice and we were both impressed with the attention to detail on the shapes of the sweets. They were slightly firmer in texture than the cherries but still soft enough to chew easily. The flavours were a bit off though. The pineapple tasted very tropical, but the strawberry one I had tasted more like orange and the banana was a very fake banana milkshake flavoured banana. Good, but we both felt they could have been better. 50/80

Sour Fruit Salad
This was our least favourite. To start with the majority of the bag was green and yellow sweets, with only one red, orange and pink sweet in the bunch (there’s more sweets than shown in photo). I thought at first they were all the same shape, but they are in fact different, only subtly so. The sugar coating doesn’t help, but we felt they could have been more distinctively shaped, more like the tropical fruit mix. They were also called ‘sour’ but neither of us got any kind of sour flavour from the sweets nor the sugar coating. On the plus side we loved the gooey soft texture of the sweets, but felt overall these were a bit hit and miss. 43/80

All in all both C and I were impressed with the variety and quality of the sweets, and we would definitely buy our top four again. They are a great choice for people with certain dietary requirements, or vegetarians alike. I’m sure they would be a hit at a children’s birthday party. You can find a list of their stockists on their website.
Goody Good Stuff also told me that the sweets are suitable for baking with as they can withstand temperatures up to 250C. Naturally I wanted to try this out and used some of the Strawberry Cream sweets to create a cupcake. Their small size and flavour seemed to make them the ideal choice. I mixed some of the red strawberry sweets into a vanilla sponge base and used the cream sweets on top as decoration. Whipped cream seemed appropriate to use as the topping and I flavoured it with a few spoonfuls of strawberry jam and a hint of pink to tie it all together.
The sweets held up well in baking and kept both their colour and flavour. However, I had to store my cupcakes in the fridge as I’d used fresh cream for the topping, which did cause the sweets to go a bit hard and chewy, but otherwise they worked well. I bet they would be great in a cookie or slice or some kind.

Saturday 14 July 2012

Roasted Pumpkin & Feta Quiche with Mint

I bought a large pumpkin a few days ago in order to make a pumpkin risotto. After making the dish I was left with three quarters of a pumpkin still to use and decided to simply roast it in slices as I love any sort of roasted veg. Even after eating some in salads, with houmous and general munching I was still left quite a considerable amount leftover. I hate to waste food and so decided to use it in a quiche. I had a rummage through the fridge to see what else needed using up and came up with half a block of feta cheese and some fresh mint. Right pumpkin, feta and mint quiche it was to be!

I was a little unsure about adding the mint to the quiche and nearly didn’t do it, but I’m so pleased I decided to take a chance any include it. It really adds a freshness to the finished quiche, the same way lemon does, only…more minty! It tasted delicious with the little cubes of salty feta and peas (I add peas to most savoury things!) I must use mint more often in my cooking, it was a revelation.

The tiny cubes of feta seemed to melt into the egg quiche mixture, become very soft and creamy. You could taste when you bit into a chunk, but the chalky, crumbly texture was gone, which worked really well. The cubes of roasted pumpkin were delicious too and I loved how each slice looked so pretty, orange, cream and green.

I cut most of it into slices and stashed it away in the freezer for when I’m in need of a quick dinner. I love how using leftovers can often produce the best tasting meals.

Roasted Pumpkin & Feta Quiche with Mint
Gluten Free Pastry
200g gluten free plain flour (Doves Farm)
20g brown rice flour
½ tsp xanthan gum
85g butter
1 egg, lightly beaten
1 - 2 tbsp cold water

Filling
170g roasted pumpkin or squash*
80g feta cheese
50g frozen peas, thawed
3 eggs
300ml milk
8 large mint leaves
Salt and pepper

Method
Preheat the oven to 180C. Have an 8inch/20cm tart tin ready.
Mix the flours and xanthan gum together in a bowl to combine.
In a separate bowl, add your butter, (it should be soft, if not blast it in the microwave for a few seconds) along with half the flour mixture, the egg and 1 tablespoon of the water. Beat with a spoon or spatula to form a paste. (Yes I know this goes against all traditional pastry making!) Add the rest of the flour and bring the mixture together to form a dough, switching to your hands at the end. Add a little more water if it seems dry. Knead the dough gently for 1 minute to ensure everything is well combined.
Roll out the pastry between two large sheets of clingfilm to the size and shape of your tart tin, plus an extra 1-2 inches for the sides.
Peel off the top sheet of clingfilm, and use the base sheet to help you flip the pastry into the tin and press it down gently. Trim off the excess and patch up any cracks with the off-cuts of pastry.
Prick the pastry lightly with a fork and place on a baking tray. Bake for 15 minutes until lightly golden, then remove from the oven and set aside to cool slightly. (You don’t need to add any baking beans as GF pastry doesn’t shrink like ‘normal’ pastry as there is no gluten!)
Meanwhile, prepare the filling. Increase the oven temperature to 190C.  Cut your roasted squash or pumpkin into 2cm cubes and the feta into 1cm cubes.
In a jug, whisk together the eggs, milk and a little salt and pepper.
Scatter the pumpkin, feta and peas over the base of the tart. Chop the mint into shreds and arrange over the top.
Place the tart into the oven and then pour the egg mixture over the top, using the jug to help you.
Bake in the oven for 25-30 minutes until the middle is set when gently shaken.
Allow to cool slightly before serving. Also tastes delicious cold.
Makes 1 x 8inch quiche

Note
* I had leftover roasted pumpkin from a previous dinner, but if you don’t, then simply cut your pumpkin into large slices, drizzle with a little oil and roast at 200C for 25-30 minutes. You can leave the skin on, as its edible once roasted

Wednesday 11 July 2012

Soft & Cakey Triple Ginger Cookies

These cookies are amazing! I couldn’t sleep last night as I had too many thoughts racing through my mind. During the night my mind wandered off to baking. As I was feeling restless it was warming, comforting food I was craving. By morning my mind was made up – gingerbread cookies. Not the crisp and crunchy kind, the soft, thick kind. Rich in spices, ginger and treacle.

I have a favourite soft ginger cookie recipe which I used to bake quite often, but I have not tried baking them since going gluten free. Some textures, soft and chewy in particular, are harder to achieve in a gluten free baked good, which often produce crisper and crumblier results, especially in cookies. This made me a little anxious to bake this recipe again, as I had such fond memories of it. My desire for gingerbread won over though and I set to work.

These cookies get their ginger flavour from a generous amount of ground ginger and also chopped crystallised ginger. I wanted an extra warming kick and so today I also added some chopped stem ginger (the kind that comes in syrup). Mixed spice and a sticky spoonful of black treacle are also added which lends a deep spicy aroma and flavour to the cookie. It’s also important to use granulated sugar, NOT caster sugar in the mix, as the larger granules produce a cookie with a slightly crackly texture and crunch which just makes them that little bit extra special.

I wanted thick cookies and so chilled the dough briefly before baking them. This worked well and helped ensure the middle stayed soft and tender while the outside became ever so slightly crisp. They smelt amazing while baking in the oven, warm and spicy, almost like Christmas cake!

Taking a bite, you first hit the crisp edge which yields to a soft, slightly chewy, thick cakey middle. The warming spices come through instantly, but not overpoweringly so. More a soothing, comforting warmth with little kicks of hot spicy ginger hitting your taste buds as you bite into a little nugget of chewy crystallised or stem ginger.

A subtle warming spiciness lingers on your tongue for several minutes even after you’ve finished it. Warm, soothing and comforting. Just breathing in their smell is enough to relax the mind and muscles. They are truly amazing cookies and just what I needed after a restless nights sleep.

Soft & Cakey Triple Ginger Cookies
Ingredients
240g gluten free plain flour (Doves Farm)
135g butter
180g granulated sugar (not caster)
1 egg
2 tsp ground ginger
½ tsp mixed spice
45g black treacle
1 tsp gluten free baking powder
30g crystallized ginger
30g stem ginger

Method
Line a large baking tray with greaseproof paper (not silicone or else they spread too much) and set to one side. Line another smaller tray with clingfilm.
Make sure your butter is soft, add the sugar and cream together using an electric mixer until fluffy.
Beat in the egg and spices until well incorporated. Chop the crystallized ginger and stem ginger into small pieces and stir through the batter along with the black treacle.
Scatter the flour and baking powder over the batter and beat together until just combined.
Use an old fashioned ice cream scoop, or a tablespoon, to take equal amounts of the cookie batter and place onto the clingfilm lined baking tray (you can arrange them close together).
Place the cookie balls into the fridge to firm up for 30-40 minutes.
When ready to bake, preheat the oven to 180C.
Arrange the chilled cookie balls onto the greaseproof paper lined baking tray, about 2inch/5cm apart. Press down on the tops gently to create a flat top, but you don’t want them to actually spread out at all.
Bake in the oven for 13 minutes until puffy and slightly crackled on top.
Allow to cool for 2 minutes before carefully transferring the cookies to a cooling rack – they will still be soft at this stage.
Repeat with the remaining cookie balls if required.
Allow to cool completely before storing in an airtight container. They go completely soft after the first day.
Makes 15 thick cookies

Saturday 7 July 2012

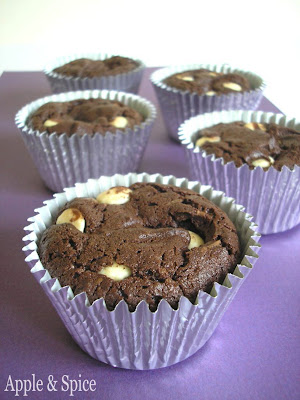
Squidgy Chocolate Muffin Cakes

I am so pleased I finally get to share this recipe with you. I created these little squidgy chocolate cakes back in my university days, a sort of muffin-brownie hybrid. I had the recipe saved on my laptop, which later went and died on me. I had my uni work back up but feared the recipe lost forever. However, last weekend I was looking back through my family’s old computer archives when I discovered a file called ‘Katie Laptop Backup.’ It turns out my Dad had taken a copy of all my files shortly before my laptop died, not just my uni work. Hidden amongst the essays and coursework was this recipe – hurrah! Thank you Dad! I was so excited and set about baking them at once.

They are just as good as I remember, despite now baking them using gluten free flour. They have a slightly chewy top crust which hides a squidgy chocolate middle, reminiscent of a brownie and then a cakey base. They are quite rich and packed with dark chocolate flavour.

The recipe only makes 6 cakes, created at a time when dark chocolate, butter and eggs seemed ridiculously expensive for a student, but I’m sure the recipe would double up easily. The rather shocking thing about these cakes is the temperature they are baked at – 200C. This means they only have 10-12 minutes in the oven and helps create the top surface while maintaining a soft and gooey centre. It’s not uncooked batter, more brownie like.

I also added a few white chocolate drops as decoration, which added little blobs of melty chocolate and a little sweetness. I shared them with my family and they were devoured in one sitting (there were 5 of us) with the last one being fought over. I’ve already been asked to make them again. My Dad wants me to try baking them with some cherries in the centre – sounds good to me!

Squidgy Chocolate Muffin Cakes
(Apple & Spice own recipe)
Ingredients
65g dark chocolate
110g butter
1 egg
½ tbsp rapeseed oil
60g gluten free plain flour (I used Doves Farm) (‘normal’ plain flour works too)
80g caster sugar
12g cocoa powder
½ tsp instant coffee (optional)
½ tsp baking powder
24 white chocolate chips/small chunks

Method
Preheat the oven to 200C (yes, really that hot). Line a muffin tin with 6 paper cases.
In a small pan, melt the dark chocolate, cocoa, coffee (if using) and butter together until melted and glossy. Set aside to cool slightly.
Whisk together the egg, oil and sugar until it has turned slightly thicker and become moussy in texture, about 2 minutes.
Add the flour and baking powder and beat again.
Add the melted chocolate mixture and beat again briefly. The mixture will suddenly become very thick and glossy, this is how it should be.
Divide the mixture between the muffin cases and add 4 white chocolate drops or chunks on top of each one. Press them down until nearly submerged in the cake batter.
Bake for 12 minutes. They will be slightly risen with a crisp top surface, but still soft in the centre.
Leave them to cool in the tins for at least 20 minutes before transferring to a cooling rack. They will sink slightly on cooling due to their soft centres.
Store in an airtight container and eat within 3 days.
Makes 6 cakes – easily doubled

Wednesday 4 July 2012

4th July Mini Cupcakes

Today is American Independence Day and over the past few days lots of red, white and blue themed treats and snacks have been appearing on blogs. I know we don’t celebrate it here in the UK, but that doesn’t mean I can’t enjoy getting in the spirit of things and baking some red, white and blue mini cupcakes, in honour of my American friends.

These are simple, all-in-one, mini vanilla cupcakes that I tinted red with a few pin-pricks of food dye. I then made a quick butter and icing sugar frosting which I tinted blue before topping them with a teeny-weeny white sugar star. You can go from raw ingredients to finished cupcakes in only 30minutes. Cute, bite-sized and delicious!

4th July Mini Cupcakes
Cupcakes
60g GF self raising flour
60g butter
60g caster sugar
1 egg
½ tsp vanilla
½ tsp GF baking powder
Red food paste

Icing
70g butter
140g icing sugar
2-3 tsp milk
Blue food paste

Decoration
Mini white sugar stars or fondant stars

Mini Cupcakes
Preheat the oven to 170C. Line a mini cupcake tin with 24 paper cases.
Make sure the butter is very soft. Mix all the ingredients, except the food dye, together until smooth and beat until light and fluffy.
Add a tiny amount of food paste using the tip of a cocktail stick. Mix to combine, adding more food dye if necessary.
Divide the batter between the paper cases using a teaspoon.
Bake for 13-15 minutes until springy to the touch.
Allow to cool in the tin for 5 minutes before transferring to a cooling rack.

Icing
Make sure the butter is soft and beat until soft and fluffy. Add the icing sugar and blend until well incorporated.
Add the milk and mix to create a smooth thick frosting. Add a tiny amount of food paste using the tip of a cocktail stick. Mix to combine, adding more food dye if necessary.
Pipe on top of the cooled mini cupcakes using a large star nozzle.
Decorate with white sugar stars or cut a small white star out of fondant icing
Makes 24 mini cupcakes