Tuesday 30 October 2012

Treats for Halloween

It’s Halloween tomorrow and I am all unprepared. I had planned to bake something pumpkin related, but due to unforeseen circumstances I am currently car-less, meaning I haven’t been able to get out and about to the shops like I would have done.

So rather than bypass the whole event, I thought I would share with you some of the treats I’ve previously baked for Halloween.

Here we have some spooky zombie gingerbread men – I love how each one has its own character!

How about some pumpkin cupcakes with carved pumpkin fondant toppers?

Or a delicious pumpkin chocolate chip loaf cake – a great way of using up the leftover pumpkin from carving the lantern


For people who prefer something savoury there is this delicious butternut squash and red lentil soup

Whether you celebrate Halloween or now, I hope everyone has a great day!

Friday 26 October 2012

Pizza Hut Suitable for Coelicas? – Yes!

It has been many a year since I have eaten at Pizza Hut. It’s hardly the first place you’d think of when planning a gluten free meal out. However, on reading the latest Coeliac UK newsletter I was very excited to learn that Pizza Hut have just introduced a new gluten free pizza. They have worked closely with Coeliac UK to ensure there is no cross contamination and even changed some of their topping suppliers so that all their toppings are gluten free too.

Hearing that something is gluten free instantly makes me want to try it out and so I asked a friend to come with me and do a bit of gluten free research. We ordered our pizzas and the server knew all about the new gluten free base which put me at my ease. When our pizzas arrived I was thrilled to find that all the gluten free pizzas come on square pizza bases – yes square! How cool is that? Not only do they look funky and stylish, but eliminates any doubt that the pizzas had got mixed up with the regular ones. Great idea!

So how did it taste? Very good actually, I was pleasantly surprised. Maybe slightly denser than a regular pizza base, but it wasn’t crumbly, dry, gummy or as hard as a house brick. The base had quite a nice flavour and was thinner than most gluten free pizzas bases I’ve had, which often are so thick you have to spend several minutes sawing through them. There were plenty of toppings and the pizza itself was of a very generous size. It’s lovely to know there is somewhere regular on the high street that I could find a meal, should the need arise, or if I’m out somewhere new. I’m sure my friends will be pleased at the prospect of going out for dinner without having to feel guilty at eating pizza in front of me. Have you tried Pizza Huts square gluten free pizza? What did you think?

I’ve heard Domino’s, Prezzo and Ask are also launching gluten free pizzas – more taste testing trips required I think!

Note: Pizza Hut did not pay or ask me to write anything about them. I was just very excited to discover their new pizza and wanted to share the experience.

Saturday 20 October 2012

The Cake Slice October 2012: Banana Walnut Cake

October is the last month that The Cake Slice bakers are baking from our current cake book, the suitably titled The Cake Book by Tish Boyle. Keeping to tradition, as it was our last month we were free to choose any recipe from the book we wanted to bake. Looking through the recipes there were so many delicious sounding cakes, but in the end I settled on a simple sounding banana walnut cake. There is something so pleasing about a humble banana cake and seeing as I have some overripe bananas sitting on the counter it seemed like the ideal choice

The recipe made a large 9inch round, but I decided to halve the recipe and bake it in a 2lb (18x11cm) loaf tin instead. Once baked, I decided to forgo the suggested cream cheese frosting as the cake was perfectly moist without it. This made it more of a snacking cake and meant I could keep it at room temperature, rather than in the fridge.

I substituted the flour in the recipe with some gf white teff flour, brown rice flour and a little xanthan gum. However something in my mix was obviously not quite right as the middle of the cake stayed sunken – it didn’t sink on cooling, it never rose in the first place! I’ve had this happen before and found reducing the baking powder helped, I’ll have to try it again and see. The middle was still fully cooked, no raw batter, so I didn’t really mind. It looked more rustic that way (that’s what I’m saying anyway).

The cake was also studded with little chunks of walnut and a few hazelnuts which added a nice crunch. The cake batter itself also contained some cinnamon and brown sugar which helped give it its pleasing golden brown colour and added a wonderful depth of flavour and a warming treacly note against the banana, which itself was quite subtle.

All in all a lovely flavoured cake. The banana and sour cream gave it a lovely soft and tender crumb. It was far too easy to keep going back to cut off another slice.

I’ve really enjoyed the recipes we have baked from The Cake Book, but am now eagerly looking forward to some tasty new bakes our next cake book. Come back next month to find out what it is!

Click here to see the Cake Slice blogroll.

Banana Walnut Cake
(Recipe from The Cake Book by Tish Boyle)
Recipe
180g plain flour (I used a mix of white teff & brown rice flour)
½ tsp xanthan gum (if making gf)
½ tsp baking powder
½ tsp bicarbonate of soda
½ tsp cinnamon
180g butter
150g caster sugar
100g light soft brown sugar
2 eggs
1 tsp vanilla extract
120g sour cream
120g mashed banana (2 small bananas)
55g chopped walnuts, hazelnuts or pecans

Method
Preheat the oven to 170C. Grease a 9inch round deep springform tin and line the base with baking paper.
Mix together the flour, (xanthan gum), cinnamon, baking powder and bicarbonate of soda.
In a separate bowl, beat the butter until smooth and creamy. Add the sugars, a tablespoon at a time, beating until light and fluffy.
Add the eggs, one at a time, followed by the vanilla.
Mix in the mashed banana and sour cream.
Add the dry ingredients and mix gently until the flour is just combined.
Chop the nuts into chunks and stir through the cake mixture.
Pour the batter into the tin and bake for 35 minutes until springy to the touch when gently pressed and a skewer inserted in the middle comes out clean.
Allow to cool in the tin for 15 minutes before releasing from the tin and leaving to cool completely.
Top with a light dusting of icing sugar. You can add a chocolate or cream cheese frosting if you want to be extra decedent.
Makes 1 x 9inch cake

Note: I halved the recipe above and baked it in a 2lb (18x11cm) loaf tin for 25-30 minutes.

Wednesday 17 October 2012

Roast Butternut Squash with Qunioa

Being coeliac limits the types of wholegrains and cereals I can eat. Grains such as couscous, bulgur wheat, spelt, pearl barley and semolina are all off the menu for a coeliac. When recipes call for one of these ingredients it’s usually easiest and quickest to substitute it with rice. However, some days I get a bit fed up with rice, which is where quinoa comes in.

Quinoa is actually a bit of a super food. Unlike wheat or rice, quinoa is a complete protein, meaning it contains all 8 of the essential amino acids that we must get from our diets. Having all 8 is actually quite unusual for a single ingredient/food. Often foods contain 3 or 4 different amino acids meaning we have to eat a combination of different foods in order to get the full set, not true with quinoa. Quinoa is also high in fibre, something else which can be difficult for coeliacs to find from their foods, as well as containing a whole host of other vitamins and minerals. The thing I like about quinoa, is how it looks and behaves a little like bulgur wheat, in that it is firm and slightly nutty to taste. The little grains actually seem to pop slightly as you chew them, which add a nice texture. It tastes quite bland on its own, but adapts well to a whole assortment of flavours.

Last weekend I picked up a butternut squash from the market, my first for many a month, but it seemed fitting now the days are becoming more autumnal. My favourite way to eat squash is to simply roast it with a little olive oil and some herbs, allowing the vegetables natural sweetness to intensify and shine.

In need of a quick lunch I simply added my roasted squash to some quinoa that I cooked with a little veg stock and a few peas for colour. Soft, warm and slightly creamy it made the perfect accompaniment to the roasted butternut. A sort of cross between a bulgur wheat salad and a risotto. I really must remember to use it more often.

Roast Butternut Squash with Qunioa
(This recipe is really more of a combining of ingredients than a recipe with exact quantities)
Ingredients
½ large butternut squash
1 tbsp olive oil
Fresh or dried thyme and oregano
Lemon zest and juice
Quinoa
Handful of frozen peas per person
Salt and pepper
Vegetable stock
Firm cheese to finish

Recipe
Preheat the oven to 220C.
Slice your butternut squash into thick rounds, and then slice each round into 3 strips (no need to peel, the skin is edible when roasted and full of fibre). Arrange the slices on a baking tray lined with foil. Drizzle over the olive oil and some finely chopped fresh or dried thyme and oregano. Mix to coat the squash evenly.
Roast in the oven for 25-35 minutes until soft and just starting to caramelise around the edges.
Meanwhile, cook your quinoa according to the pack instructions, using veg stock in place of the water for extra flavour (not essential). Cook as much as stated on pack for the number of people you are serving.
When the quinoa is nearing the end of cooking, add in a handful of frozen peas per serving.
Once the squash is roasted, reserve a few strips for decoration and chop the rest of it into cubes and stir it through the cooked quinoa. Add the zest of ¼ to ½ a lemon and a squeeze of lemon juice. Stir through some extra herbs and season with salt and pepper to taste.
Serve onto plates and decorate with a few of the reserved roasted squash strips. Add a little finely grated firm cheese if desired.
Eat and enjoy

Note: Any leftover roasted squash tastes fantastic as a sandwich filling with cream cheese or houmous

Tuesday 9 October 2012

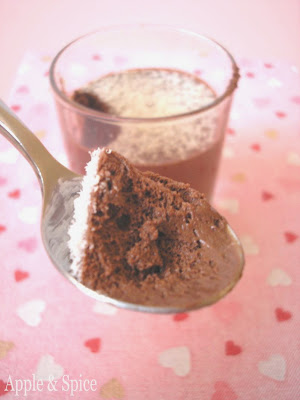
Intensely Chocolaty Mousse

This is the best chocolate mousse I have ever made/eaten. It’s rich and intensely chocolaty, but also incredibly light and…moussey. The whole thing can be made from start to finish in about 15 minutes and what’s even more amazing is that it’s made with only 4 ingredients and one of those is water!

I invited a friend round for dinner with only a few hours notice, meaning it was a matter of ‘what can I make using the ingredients I have!?’ I did a simple stir fry for the main course, it’s amazing what a bit of ginger and chili can do to some rice and vegetables, but I wanted something more special for dessert.

I had a quick flick through some recipes and settled on Delia’s recipe for chocolate mousse. It needed only a few ingredients and seemed very simple to prepare. Plus I loved how I could make it straight away and leave it to sit in the fridge until required, meaning no last minute panic in the kitchen. 

The results were amazing! It was so quick and simple to make and tasted divine. Packed full of chocolate flavour yet still wonderfully light for a dessert. It contains no cream meaning it’s not too heavy or sickly and no marshmallows or gelatin so it wasn’t sticky or overly sweet. In fact its vegetarian, gluten free and also dairy free if you use a high enough percentage dark chocolate. As this mousse is basically melted chocolate lightened with some whipped egg whites, a rich intense dark chocolate is the way to go.

I also added a splash of rum to my mousse for an extra after dinner indulgence, but it’s just as fabulous without it. I loved how when you took a spoonful the mousse let out a little squish sound as you broke through the air bubbles. It just melted on the tongue.

Do give this chocolate mousse a go. People often say simple is best, and this chocolate mousse is the perfect example of that.

On a separate note, I’ve just changed computers and lost my usual photo editing programme and don’t like this new one at all! I can’t get it to do what I want. Can anyone recommend a good one? Preferably free and easy to use. Just simple applications like brightness and contrast, I’m not after anything fancy! Thanks.

Intensely Chocolaty Mousse
(Recipe from How to Cook by Delia Smith)
Ingredients
200g dark chocolate – 70% cocoa
120ml water
3 eggs, separated
40g caster sugar
1 tbsp rum or liquor of choice (my addition)

Method
Place a glass bowl over the top of a saucepan filled with gently simmering water. Break the chocolate into small pieces and place into the bowl along with the 120ml water and rum if using. (if you add cold water to unmelted chocolate they will melt together into a lovely glossy mixture. Don’t try and add any water to chocolate that’s already melted, or it will seize into a horrible mess). Allow to melt and combine gently, stirring occasionally until you have a glossy mixture.
Meanwhile, separate your eggs, placing the whites into a large clean bowl.
Remove the melted chocolate mixture from the heat. Lightly mix the egg yolks until they are broken and then add them a little at a time to the chocolate mixture. Stirring with a spatula until combined. (The chocolate will thicken)
Whisk the egg whites until soft peaks form. Scatter over half the caster sugar and whisk again. Add the remaining sugar and whisk until the egg whites start to form stiff peaks.
Fold a third of the whisked egg white mixture through your chocolate mixture, stirring with large folding strokes, until no streaks remain.
Add half the remaining egg white mixture and fold in more gently, before adding the last of the egg whites. Do not over mix or you will knock out all the air.
The chocolate mixture will be quite soft and runny at this stage.
Carefully pour the chocolate mousse into 6 serving glasses and place in the fridge to set for at least 2 hours. (Can be made the day before)
When ready to serve, decorate with a little whipped cream or a fine grating of white chocolate.
Eat and enjoy
Makes 6 individual mousses

Friday 5 October 2012

Carrot & Tomato Soup

As the days are getting wetter, colder and darker it’s time for warm and wintery soups to make an appearance. At the weekend I bought a huge bag of carrots on offer and knew they were destined for soup. Lentil soup is one of my favourites and I was sure I had a tin of lentils in my cupboard so planned on making carrot and lentil soup. On returning home I discovered the tin was actually a tin of chopped tomatoes. Darn.

Carrot and tomato soup still sounded wonderfully appealing and so I carried on regardless. To compliment the tomato element I added some oregano and paprika and a little cumin to add a warming note.

The finished soup was lovely. I left it slightly coarse rather than super smooth, as I like the texture this gives for eating it as a meal. Perfect for mopping up with a bit of gluten free bread.

At the last minute I added just a smidge of balsamic vinegar and it really lifted and enriched the flavour of the tomatoes.

I live on top of a hill in Sheffield, meaning it’s quite open and exposed. I often get a bit battered by the wind and rain and in these situations a big steaming bowl of soup is just what’s needed. With winter starting to draw in, there will be lots more soup on the horizon I think!

Carrot & Tomato Soup
Ingredients
1 onion
1 large potato
5 carrots
1 x 400g tin chopped tomatoes
1 tbsp olive oil
1½ pints of vegetable stock
2 tsp dried oregano
½ tsp ground cumin
1 tsp smoked paprika
1 tbsp tomato puree (or ketchup)
½ tsp balsamic vinegar
Salt and pepper

Method
Peel and roughly chop the onion. Also dice the carrots and potato, although you don’t need to peel them.
Heat the oil and add the vegetables, stir to coat them in the oil and then place the lid on and allow the veg to sweat in the steam they produce.
Cook for 15 minutes, stirring every so often to prevent the veg from burning.
Add the herbs, spices, water/veg stock, tomato puree, the tin of chopped tomatoes and a little salt and pepper. Bring the mixture to a simmer and place the lid partially back on, to allow the steam to escape. Simmer for 30 minutes until the veg is soft and tender.
Remove from the heat and blitz in a liquidizer or using a stick blender. You can make it as smooth or as chunky as you like. Season to taste.
Stir through the balsamic vinegar and serve with bread for dipping.
Serves 4-6