Wednesday, 27 March 2013

Prune & Beetroot Brownies

Yes I know another beetroot recipe, but this is the last one I promise, at least for a few weeks! I decided to have another go at making beetroot brownies. I made some about 5 years ago and remember them being very tasty. Recently there seems to have been a surge of beetroot brownies and chocolate beetroot cakes around, which got me craving one again.

Back in my uni days I actually did my dissertation about the acceptability on taste of replacing the butter in brownies with fruit and vegetable purees. Beetroot was one of the veg I used and worked very well, producing a moist and tender brownie with no added butter. Another variety I tried was using pureed prunes. This too worked well, although it gave a denser and very sweet tasting brownie.
 

I hit upon the idea of using pureed beetroot to replace the butter in my brownies and combining it with pureed prunes, this time to replace the sugar in my brownies, as both prunes and beetroot are naturally very sweet. I had a quick internet search for prune and beetroot brownies and was actually quite chuffed when I couldn’t find a single one. There were plenty of prune OR beetroot brownies, but no prune AND beetroot brownies – a new brownie innovation hurrah! Feeling very excited I set to work.

The brownie batter turned out quite thick and a little coarse from the blitzed prunes and beetroot, but smelt very rich and inviting. I did use chocolate in the recipe, but as it was dark chocolate this would have contributed very little sugar or fat to the recipe. The lick of the spatula also tasted lovely.
 

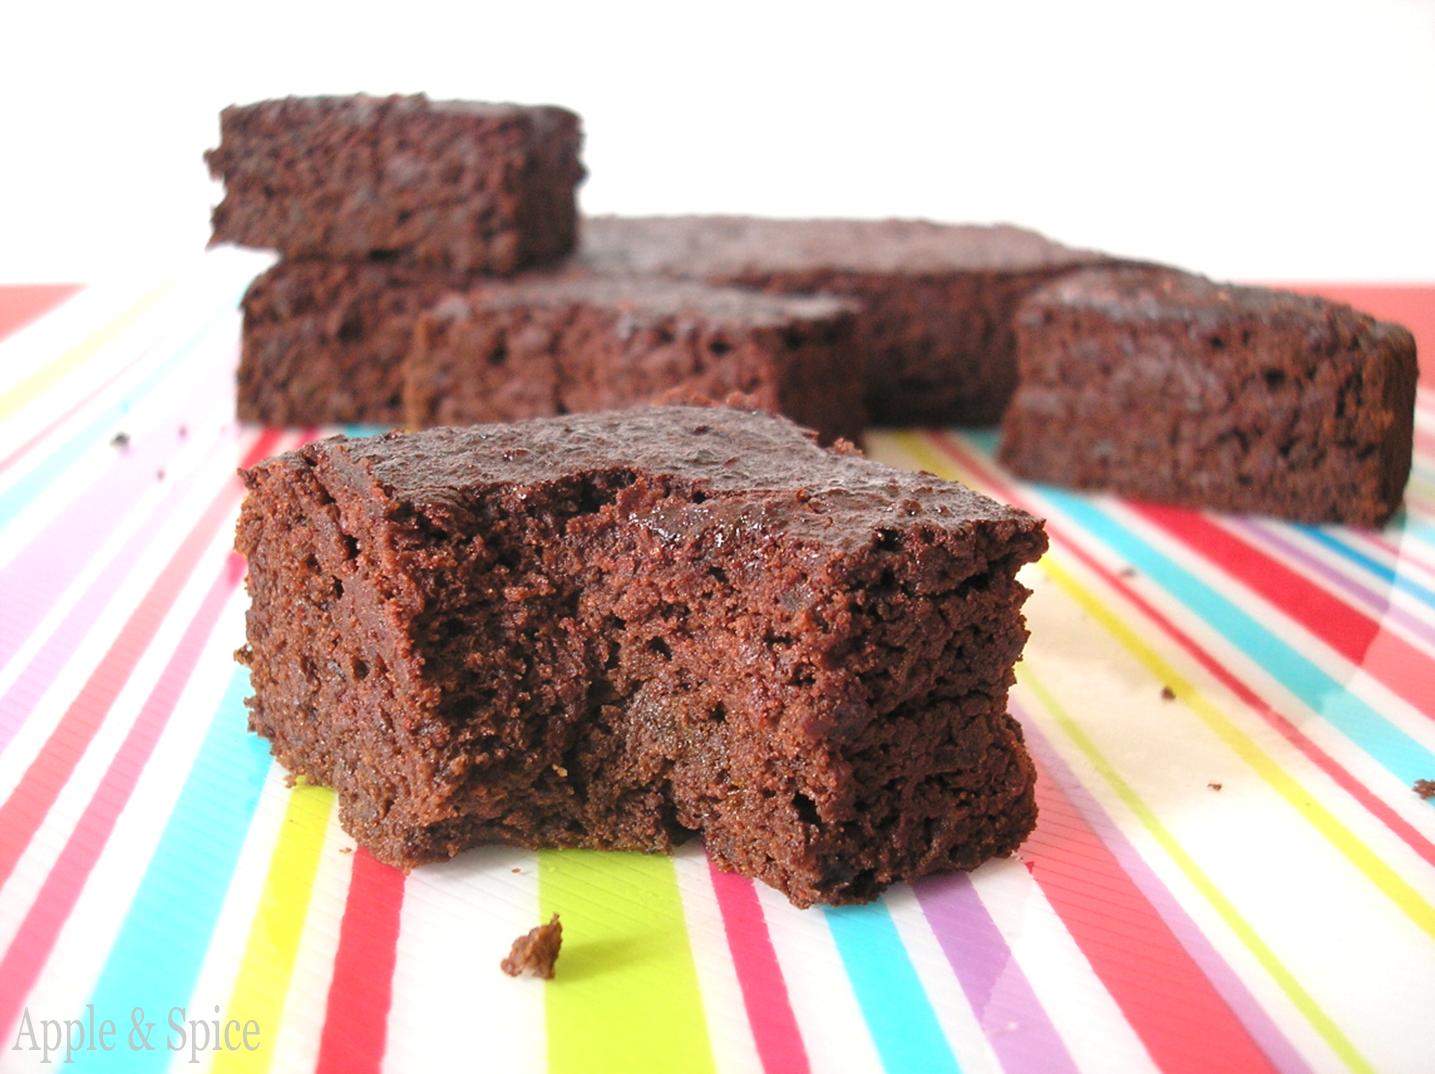
After baking the brownies had puffed up slightly and yet set into quite a heavy feeling brownie. On slicing I was pleasantly surprised it was actually very light, moist and fudgy in texture, similar to a flourless chocolate cake. It had a fabulous deep chocolate colour with a dark ruby hue to it.
 

The top surface was slightly crackled and nicely sticky. The flavour was of a strong earthy chocolate, largely down to the beetroot, with a fabulous springy bite and nice chew from the pureed prunes. It was perfectly sweet and almost treacly in flavour which I think was contributed by the prunes. It was really rather addictive and I didn’t feel at all guilty eating 1 or 2…ok 4 squares in one afternoon as they must be relatively healthy brownies. Not that you’d know it!
 

The following day the brownies had become more compact and a little dense, but stayed wonderfully fudgy with a slight chew. So if you are looking for a chocolaty Easter treat that won’t pile on the pounds, maybe give these prune and beetroot brownies a go! Gluten, wheat, dairy (if non dairy choc), added fat and added sugar free! Probably higher in fibre, lower GI with added vitamins and minerals too. Now you can have your chocolate brownie and eat it too!

Happy Easter Everyone

Prune & Beetroot Brownies
An Apple & Spice original recipe
Ingredients
200g cooked beetroot
100g soft prunes
150g dark chocolate 60-70%
15g cocoa powder
60g brown rice flour
2 eggs
¼ tsp gluten free baking powder
2 tsp vanilla extract

Method
Preheat the oven to 175C. Line the base of an 8inch tin with baking paper.
Place the prunes into a food processor and blitz until a thick sticky paste is formed. You may need to scrape down the sides of the mixer every so often.
Remove the prunes, and add the beetroot. Puree until very finely chopped and almost pureed.
In a medium sized pan melt the chocolate until smooth and glossy, then remove from the heat.
Lightly beat the eggs and then quickly mix them into the warm chocolate mixture, followed by the vanilla.
Add the prune and beetroot purees and fold together.
Scatter over the flour, baking powder and cocoa and fold in well to create a thick, slightly coarse mixture.
Spread the mix into the prepared tin and bake for 25 minutes.
It should be evenly risen, firm yet slightly squishy to the touch. Leave to cool for 20 minutes in the tin before removing to a rack to cool.
Slice and enjoy

Saturday, 23 March 2013

Heinz Gluten Free Pasta & Pasta Sauces – A Hit & Miss Review

I’m always on the lookout for new gluten free foods, so when Heinz got in contact to say they were about to launch a range of certified gluten free pasta and would I like a sample, I was more than happy to accept.

The new pastas are (to my knowledge) Heinz’s first contributions to the gluten free market, by which I mean specially designed gluten free products rather than their ketchup which is naturally gluten free. They have produced a range of 3 pasta varieties and 3 tomato based pasta sauces. The pastas include penne, spaghetti and macaroni and are apparently made in Italy. I received the macaroni pasta which I was delighted about. I love macaroni and until now there has not been a gluten free equivalent available in the supermarkets.

The 3 pasta sauces come in individual little tetra pack cartons, which I thought was a great idea. They are sturdy enough to take on holiday or carry around with you without being heavy or at risk of shattering like glass would be. The 3 flavours are Tomato Frito, Tomato & Oregano and Tomato & Basil and are produced in Spain to an “authentic recipe.” In my sample box I got the oregano and basil varieties.

The first thing that struck me about the pasta was its use of an unusual ingredient. Along with potato and cornflour it also contained lupin flour. I have heard of lupin, but never seen or eaten it in a product before and was curious to see what it tasted like. Apparently the pastas have been “crafted to ensure ultimate taste and a perfect bite.”

I know from experience that gluten free pasta tends to go from firm to soft and mushy very quickly. I tasted a piece of pasta after only 6 of the 8-9 minutes specified cooking time and found it already very soft, so removed it from the heat immediately. If I had left it cooking for the required time I am fairly sure it would have disintegrated. Given their “perfect bite” statement and the fact it’s been produced in Italy where they are known for their love of al-dente pasta, this surprised me.

I decided to taste some of the pasta plain, to see what the flavour was like. I’m afraid I wasn’t overly impressed. It tasted a little bitter and almost musty, which I can only attribute to the lupin flour. Not a good start. I decided not to judge too harshly at first as not many people would eat completely plain pasta and so I heated up the tomato & oregano pasta sauce and stirred it through.

The sauce smelt lovely and very fresh. I was impressed at its ingredient list too which was simple and free from any strange preservatives. It was perhaps a little smoother than I would normally choose as I like a chunkier tomato sauce, but no different to most shop bought tomato pasta sauces.

Eating both the sauce and pasta together helped mask the strange flavour from the lupin flour, but I did find the pasta sauce itself to be quite sweet. Although, there was no denying its strong tomato and oregano flavour. The herb flavour really shone through and tasted lovely and fresh. However, I’m still not entirely sure I liked the pasta, as the slightly strange flavour still lingered in the background.

I didn’t use the whole pack of my sauce when I made my pasta and used the rest of as the tomato base for a homemade pizza, which worked really well. Later on I tried the tomato and basil sauce and was again impressed with its fresh flavours.

I would certainly recommend and buy the pasta sauces again and at only £0.89 each they are very affordable. The pasta I’m afraid to say probably won’t be making another appearance in my shopping basket. This is a shame as I would have loved to have an easier source of macaroni pasta, rather than having to buy it online as I do now. At £1.80 for a 500g bag it’s also very competitively priced for a gluten free product. For me though, the lupin flour (I assume it’s this as there was nothing else unusual in the ingredient list) just didn’t work for me. Who knows, some people may love it, and maybe covered in a thick cheesy sauce you wouldn’t detect the bitter musty note, or maybe I just got a dud batch, but I’m afraid it wasn’t for me. The pasta sauces get a definite thumbs up though.

Note: This review is purely my own perspective of the product and has not been influenced by anyone else. I received no payment for this review, excluding the free samples mentioned above.

Thursday, 14 March 2013

Beetroot & Bean Houmous

I think my brain was away on holiday when I went food shopping last weekend. It’s not been long since I finally finished munching my way through a large bunch of fresh beetroot, and getting a bit fed up with it by the end. You might think this would mean I wouldn’t want any more for at least a few weeks. Well, this is what I thought too, but when I saw beetroot on offer over the weekend I somehow ended up coming back with two more packs of the stuff – yes two!

It was on offer, one of those 89p for one or £1 for two offers. My brain thought “oh I have some goat’s cheese in the fridge that beetroot would be really tasty with, I’ll get some.” Then when I spotted the offer, well it was too good to pass up. Thankfully this time the beetroot was the cooked, vacuum packed kind (not vinegary), so it will keep for a few weeks, but honestly! What am I like? I’m not normally taken in by offers, but somehow I can never pass up a fruit and veg offer.

Once home I was determined to use up a good portion of it in a different style to just salads and sandwiches. I decided on beetroot houmous. Perfect fodder for taking to work for lunch. Rather than use chickpeas, I decided to use a tin of black eyed beans. I really like the texture of these beans, they seem softer and creamier than chickpeas, which can sometimes be a bit chalky.

I adore the colour of the houmous once finished, a real vibrant pinky purple. It made me smile just to look at it. It retained a slightly coarse texture which was nice, with little flecks of bean or beetroot scattered throughout. The earthy woodsy flavour of the beetroot was livened up by a generous squirt of lemon juice and zest. Along with its almost psychedelic colour it made the perfect sunny lunch time food, adding a bit of brightness and freshness to what has otherwise been a very cold and dreary week. I’ve been taking little pots of it into work and slathering it onto hot toast at lunchtime, delicious.

So although I may have got carried away buying two packs of beetroot for a single person, long live beetroot I say!

Beetroot & Bean Houmous
Ingredients
200g cooked, peeled beetroot
400g tin black eyed beans
Zest & juice of ½ lemon
2 tsp Henderson’s relish (or balsamic vinegar)
2 tsp olive oil
½ tsp dried oregano
Salt, pinch

Method
Place the beetroot into a food blender and blitz until finely minced, you don’t want puree, a few chunky flakes are fine.
Drain the beans and add to the beetroot. Blitz again until a thick chunky puree is achieved, scraping down the sides when necessary.
Add the oil, lemon juice, lemon zest, oregano, Henderson’s relish and a pinch of salt. Blitz again until a coarse houmous-like texture is achieved. A few little chunks or flecks of bean or beetroot are fine and actually add a nice texture.
Transfer to a lidable container, and store in the fridge for up to one week.
Enjoy with crackers, toast, veg crudités, salads, sandwiches or jacket potatoes…basically anything you fancy!

Thursday, 7 March 2013

Simnel Cake & Mothers Day

Simnel cake is often associated with Easter, but it is traditionally a cake baked for Mothering Sunday. Young girls who lived and worked away from home in service were given half a day off on Mothering Sunday, during which they would bake this cake and take it home to their mothers. This year Mothers Day is Sunday 10th March.

A Simnel cake is a light fruitcake containing sultanas, apricots and cherries that is topped off with a layer of marzipan and decorated with 11 marzipan balls around the edge. This fruitcake is also extra special as it also contains a middle layer of marzipan that is baked into the cake itself, producing a delicious moist and gooey almond middle layer. It’s quite unique and I know of no other cake which does this. I suppose Stollen is similar in that it has marzipan baked inside, but Stollen is more of a bread than a cake, and there is no marzipan decoration.

The marzipan on top of the cake is often lightly toasted gently under a grill to give it a speckled golden appearance and a little more depth of flavour. Alternatively you swipe at it with a blowtorch (I did!) I find this results in a more even browning.

The eleven marzipan balls around the edge are meant to represent the twelve disciples, minus the traitor Judas. However, I’m unsure if this was present on the traditional Mothers Day Simnel cake as this seems to symbolise an event more associated with Easter, so this may have been added later. Either way if you are a lover of marzipan, then getting a slice of cake with one of the marzipan balls is an extra treat.

My mother and I both love this cake and I try to bake her one every year. Unfortunately (for me) she is away on holiday over Mothers Day this year, but I am going to see her in a few weeks time, and plan to bake her one then. These photos are actually from a previous years Simnel cake, but I wanted to encourage everyone to bake one themselves.
This recipe originally came from The Ultimate Cake Book by Mary Berry. I have been baking Mary Berry’s recipes since I was a little girl and this book belongs to my mum. It’s much used, its batter splattered pages a record of years of enjoyment. I have fond memories of sitting for hours and reading through the recipes and gazing in wonder at the (now slightly dated and faded) photographs. I like to think I knew and loved her long before her Great British Bake Off  fame.
This cake is light, moist and studded with a colourful array of fruits. The sweet gooey marzipan adds a wonderful flavour that goes so well with the fruits. I find baking one a very enjoyable experience as mixing the batter always makes me reflect back on happy memories, mixing a little love into the cake itself. I’m sure this is one of the reasons it tastes so good, as a cake made with love, for someone you love is truly a special thing.

Simnel Cake
(Recipe adapted from Mary Berry’s Ultimate Cake Book)
Ingredients
175g light soft brown sugar
175g butter
175g gluten free (or regular) self raising flour
3 eggs
25g ground almonds
2 tbsp milk
100g sultanas
100g dried apricots
100g glace cherries
50g extra dried fruit of choice – raisins, pear, cranberries etc
2 tsp mixed spice
½ tsp cinnamon
250g marzipan
2 tbsp apricot jam

Method
Preheat the oven to 160C. Grease and line the base and sides of a deep 8inch/20cm round cake tin with greaseproof paper.
Weigh the sugar, butter, flour, ground almonds, eggs and spices into a bowl. Beat together using an electric mixer until smooth. Beat in the milk.
Weigh out the dried fruit and chop the apricots and cherries into large pieces using a pair of scissors.
Fold all the dried fruit into the cake batter.
Pour half the cake mix into the tin and spread into an even layer.
Take 100g of the marzipan and roll out into a circle. Use the base of the cake tin to cut out a circle. Place this circle of marzipan on top of the cake batter in the pan. Top with the remaining cake mix and spread out evenly.
Bake in the oven for 1 hour before quickly removing the cake from the oven, covering the top of the tin with foil to prevent it from browning any further and return the tin to the oven for a further 30-40 minutes
It should be firm yet springy to the touch when cooked.
Remove from the oven and leave to cool completely in the tin. Once cool, release from the tin and carefully peel off the greaseproof paper.
Thinly roll out the remaining marzipan and cut out another circle, using the cake tin as a guide like before.
Heat the apricot jam until soft. Brush over the top of the cake and place the marzipan disc on top. Use your fingers to crimp the edges slightly.
Gather up the leftover scraps of marzipan and roll into 11 balls. Use a little jam or water to attach them around the rim of the cake.
Heat your grill and place the cake under the grill and allow the marzipan to toast and go golden brown. Rotate the cake as needed and keep a careful eye on it as it will start to brown very suddenly. Alternatively use a blowtorch (I find this works best) or leave it natural.
Tie a ribbon around the cake and present to your Mum.
Makes one 8inch/20cm cake

Sunday, 3 March 2013

Little Hanoi, Sheffield

Yesterday I agree to act as taxi service for A, as he wanted to visit a few electronic stores around Sheffield in his quest to find a new stereo system. I understand that you can only research so much online, and it’s better to see things in ‘the flesh’ and press a few buttons before making a decision. I was more than happy to accompany him on his research mission, particularly as he promised to buy me lunch as a thank you.

As we ended up in the London Road area of Sheffield, we decided to try a fairly new Vietnamese café called Little Hanoi. I’ve heard good things about this place both from co-workers and reviews online. I love anything with noodles and a bit of spice and had been longing to visit them and try the food for several weeks. When eating out, I much prefer places that make food I probably couldn’t recreate so successfully at home. Pizza and pasta places (gluten free) are fine, but I often end up thinking I could have produced the same, if not better, myself at home for half the price. So I was delighted when A agreed to give Little Hanoi a go. Plus anything that can be eaten with chopsticks is always a bonus.

Once inside and perusing the menu I was delighted to see that they had some really authentic sounding dishes and I liked how each dish had its own description, rather than being a generic noodle dish that you added your own topping to. As I’m coeliac, I spend a few minutes quizzing the waitress about the ingredients that went into the dish I was interested in – Pho xao – stir fried flat noodles. She didn’t really understand ‘coeliac’ or ‘no gluten’ but once I conveyed ‘no flour, no wheat, no soy sauce’ she understood and confirmed that the flat noodle dish was made with rice noodles made with only rice, no wheat. She also informed the chef I wanted the dish made with no soy sauce and confirmed this again on bringing the cooked dish to the table. (I don’t actually know if the dish originally contained soy sauce, but as this style of cuisine often uses it as a seasoning, I thought it best to ask for it not to be used, just to be on the safe side).

As we waited for our order we were provided with complimentary rice crackers. I thought at first they might be prawn crackers, but A assured me they were just plain rice. This was a nice gesture and they were lovely to munch on while we chatted and took in the surroundings.
When our food arrived I was presented with an absolute mountain of Pho xao dau rau (Stir fried flat noodles with vegetables and tofu). (The photo doesn’t do it justice, but that plate was about 10-11inches square!) I love flat rice noodles. The fat ribbons of soft and slightly chewy rice always end up sticking together when I try and cook them, but here they were perfectly cooked and coated in the sauce. The veggies included bok choi, Chinese mushrooms, carrot, pepper, bean sprouts and Chinese cabbage. They were still a little crisp and crunchy which is just how I like them. Large chunks of fried tofu were mixed in amongst the noodles which I was pleased to find wasn’t greasy and lovely and soft and creamy inside. I hate it when you take a bite and all you taste is a mouthful of oil, not the case here. The dish was topped off with lightly fried shallots which were crisp and sweet.

A chose Bo xao dau dua (stir fried beef with green beans). As his dish didn’t come with rice or noodles he chose a side order of chicken fried rice. He said the beef was very good and not chewy. After only about three mouthfuls he said we would have to come back again, so I think it’s safe to say he enjoyed his meal as much as I did.

I only managed about two-thirds of my dish and A didn’t finish all his rice and they were more than happy to package it up for us to take home. The food was very reasonably priced, especially considering the portion sizes, quality and freshness of the food. Two of us with drinks, complimentary rice crackers, two main courses and a side order of chicken rice came to less than £20.

The only thing I feel let the place down was that the food was served on very cold plates. In my opinion hot food should always be served on hot plates, but these were decidedly chilled. However, as I never got to the bottom of my dish this didn’t really matter, but it’s still a pet hate of mine. That small detail aside it was a delicious meal and I’m sure we’ll go back.

I’m pleased to say I couldn’t taste anything untoward/gluten-containing in the dish and it’s now the following morning and I’ve had no stomach issues so I’m confidant they were able to make it gluten free for me – hurrah!

Address: 216-218 London Rd, Sheffield S2 4LW
Phone: 01142 583836

Friday, 22 February 2013

Further Fun with the Food Dehydrator

I enjoyed the outcome of my first experiments with my new food dehydrator a few weeks ago and decided to experiment some more. The first time around I kept things safe and simply tried dehydrating some slices of apple and pear. This worked well but I learnt that you have to keep your slices fairly thick and chunky if you want to achieve soft and squishy dried fruit. The first time I cut my apple and pear slices quite thin which resulted in dried fruit that was halfway to being a fruit crisp as it dehydrated to practically nothing. Tasty yes, but not what I was after.

This time around I cut my fruit chunkier and also experimented with some different fruits. Apple, nectarine, blueberries, plum and ….carrot! (A rogue vegetable)

I get strangely excited by new gadgets and experimenting with food. There is always the eager anticipation as to what will be produced. I layered up the fruit, set a time for 5 hours and left it to do its thing.

On the base layer I put apple and nectarine quarters. The apple slices turned brown during the dehydration process as I didn’t dip them in anything acidic or chemical, I rather liked their appearance. They looked almost like they had been caramelised or dipped in cinnamon. Being chunkier, they also retained some of their moisture this time. Juicy and slightly firm, yet not crisp. The apple flavour was really pronounced too. Very good.

The nectarine slices kept their colour, if fact they turned positively golden! They took on a slightly withered appearance but this turned them deliciously chewy and sticky. A very successful dried fruit replica and their flavour and sweetness intensified due to the drying. My favourite of the lot.

I was unsure what would happen to the blueberries. I had read it was advised to place them on baking paper so they didn’t fall through the gaps in the grating as they dried. I was unsure how successfully they would dehydrate, being as they are sort of enclosed in their own skin. I had wondered if I should prick them with a knife to help some of the moisture escape, but in the end I just left them as they were. Below is a before and after shot. You may notice they don’t look particularly dried out and they weren’t, but the drying still altered their flavour and texture. They were soft yet with a firmer texture than before, not so fleshy or juicy. Their flavour had also intensified, making them actually taste like a really good blueberry, rather than a water mush with a hint of berry flavour. A good standby for improving their flavour of winter, but I think it may be more worthwhile just waiting to buy them in the summer when they are in season. I don’t think you can get quite the same dried blueberry result as ones sold in shops. Those are probably dried for days and coated in sugar. An interesting experiment nonetheless.

For the plums I simply cut off the cheeks either side of the stone. These dried in such a way that they ended up looking like poppy heads. Darker centres surrounded by a crinkled red skin. Rather attractive really. In terms of eating, I couldn’t decide whether I liked them or not. They stayed strangely crisp and get more chewy than juicy. Their flavour had intensified but it also brought out a slightly bitter note. They were nice dipped in peanut butter, but I’m not sure I’d make them again. Maybe I was just unlucky and used a bland tasting plum to begin with.

Now the mystery addition to the range – carrot coins! You don’t see many dried vegetables amongst the dried fruit snacking options and it turns out there is a good reason for this – they don’t taste very nice! The carrot probably dehydrated the most successfully, becoming shrivelled and crinkled on drying, probably due to its lower moisture content to begin with. I was quite excited when I saw them, but unfortunately they were not pleasant to eat. Have you ever found a really old carrot in the back of your fridge? One that’s turned shrivelled and bendy and yet somehow still breaks in half with a snap? Well, this was what happened to the carrot coins. Soft around the edge but oddly crisp and a little bendy. They did taste strongly of carrot, but I ended up feeling like I was eating a really old carrot, rather than a nicely dried one. I intend to try making carrot crisps using paper thin slices of carrot, but I don’t recommend carrot coins – leave those to the instant noodle snack people!

The only drawback I discovered to having the fruit juicer and free from any preservatives or nasties is that they went mouldy after 4 days. So I’d recommend either eating them quickly or else refrigerating or freezing them.

I’m having so much fun experimenting – anyone got any suggestions or good recommendations as to what I should try next?

Saturday, 16 February 2013

Celebrating 6 Years of Apple & Spice with Apple, Caramel & Almond Tart with Peanut Praline

Wow I can’t believe this is my blogs 6th anniversary. I never thought I would keep it up when I started all those years ago. There has been some distinctive changes in my life throughout the span of this blog, but my love of food and baking has remained steadfast.

A few weeks ago, I almost considered finishing the blog. I was finding I had less time to bake and blog and when I did get round to baking at the weekend, I felt I should be making the recipes for either the Daring Bakers group or The Cake Slice group that I am a member of. It felt there was always a recipe I should be baking and my own ‘to bake’ list kept growing larger and larger without me ever getting the chance to bake any of them. I have come to the decision to give up the baking groups and instead focus on the recipes I want to bake and eat. After all, surely that’s what my blog should be about, the kind of food I like to bake and eat.

I’d like to say a big Thank You to Paloma of The Coffee Shop who has taken over the management of The Cake Slice group, that I set up and have run for the past 5 years. Thanks Paloma, you are doing a fabulous job.

Anyway, back to Apple & Spice and all things deliciously apple-y! Every blog anniversary I have always made an apple inspired recipe to celebrate.
1st year – Spiced Apple Cake


4th year – Fruity Tea Loaf


This year I made Apple, Caramel and Almond Tart with Peanut Praline. A sweet pastry tart with a layer of dulce de leche caramel, topped with almond frangipane and decorated with slices of fresh tart apple and finished with peanut praline. Yum!

I really wanted to make an apple tart this year and love the flavour of apple and almond together and so decided to make an almond frangipane to go underneath my apple slices. This got me thinking that it would be even better if there was a hidden layer of something underneath the frangipane, which let me to dulce de leche caramel. Apple, caramel and almond – what’s not to love?!

You may notice that the apple slices have been arranged horizontally, rather than the usual vertical fan formation. This allows you to build up layers to create an effect that almost resembles a rose or flower.

Once baked the tart looked and smelt lovely, but I still felt it needed something extra and my eyes settled on a bar of peanut brittle. A quick attack with a rolling pin and I had some peanut praline crumbs to sprinkle over the top of the finished tart.

The tart was delicious, even if I do say so myself. All the flavours worked together so well and the peanut praline crumbs really made it. Adding a little nuttiness and crunch against the sweet and fruity tart.  I love how you can see all the layers in each slice.

I fed it to a couple of work colleagues, one of whom told me in advance not to be offended if she didn’t like it as she wasn’t a dessert person. She ended up asking me for the recipe, and I don’t think (I hope) that she was just being polite. It’s got a few components but is quite easy to put together and tastes like you have been slaving away for hours. Do give it a go, it’s sure to impress.

Apple, Caramel & Almond Tart with Peanut Praline
Gluten Free Sweet Pastry
200g gluten free plain flour blend
90g butter
1 egg
40g icing sugar
½ tsp xanthan gum
1-2 tbsp water

Apples
3 Granny Smith apples
Juice of ½ lemon

Almond Frangipane
55g ground almonds
55g caster sugar
55g butter
10g plain flour
1 large egg
½ tsp almond extract

Caramel Filling
1 small tin dulce de leche

To Finish
1 tbsp caster sugar
10g butter
Apricot jam to glaze
30g peanut brittle/praline

Sweet Shortcrust Pastry
Have a 7-8inch fluted tart tin to hand. Preheat your  oven to 200C.
Mix the flours and xanthan gum together in a bowl.
In a separate bowl, add your butter, (it should be soft, if not blast it in the microwave for a few seconds) along with half the flour mixture, the egg, sugar and 1 tablespoon of the water. Beat with a spoon or spatula to form a paste. (Yes I know this goes against all traditional pastry making!) Add the rest of the flour and bring the mixture together to form a dough, switching to your hands at the end. Add a little more water if it seems dry. Knead the dough gently for 1 minute to ensure everything is well combined.
Roll out the pastry between two large sheets of clingfilm to the size and shape of your tart tin, plus an extra 1-2 inches for the sides.
Peel off the top sheet of clingfilm, and use the base sheet to help you flip the pastry into the tin and press it down gently. Trim off the excess and patch up any cracks with the off-cuts of pastry.
Prick the pastry lightly with a fork and place on a baking tray.
Blind bake the pastry for 15 minutes until just starting to brown.
Remove from the oven and set aside. Reduce your oven to 180C.

For the Apples
Fill a large bowl with water and add the juice of half a lemon
Peel and core the apples. Slice into 3mm thick slices and add to the lemon water while you cut the rest. (This stops them browning)

For the Frangipane
Soften the butter and then cream it together with the caster sugar until fluffy. Add the egg and almond extract and beat again. Add the flour and ground almonds and beat again to incorporate.

Assembly
Spread some of the dulce de leche caramel into the base of your tart. Add blobs of the almond mixture on top and smooth over to create an even layer.
Drain the water from the apples and pat them dry.
Arrange the apple slices in a fan formation on top. Start at the edge and work you way into the middle, overlapping each slice. Arrange them curve side out towards the edge, rather than the usual fan formation. This ends up creating more of a rose/flower effect to the apple slices.
Melt the 10g butter and brush over the apple slices. Sprinkle over the tablespoon of sugar.
Bake in the oven at 180C for 35 minutes.
Remove from the oven and allow to cool.
Glaze with a little warmed apricot jam. Crush the peanut brittle into crumbs and scatter over the top of the tart before serving.
Makes 1 x 7-8inch tart

Saturday, 9 February 2013

Chocolate Beetroot Cake with Beetroot Glaze

I’m sorry I have not posted in a while. I had a cake in mind and a blog post all ready to go only to be hit with a nasty stomach bug, meaning food has been the last thing on my mind. I’m pleased to say I’m now well on the road to recovery, my taste buds have rejoined me and I have rediscovered my appetite! So without further ado, here is a rather belated chocolate beetroot cake.

Chocolate and beetroot has now become another ‘classic’ flavour combination, but aside from a chocolate beetroot brownie a few years ago, I have not explored the pairing much myself. I love fresh beetroot, its moody, dark, blood red colour and mysterious earthy flavour always draws me to it. A few weeks ago I picked up a huge pack and enjoyed a happy few days eating it roasted or shredded into salads and sandwiches. However, it got to a stage where every time I opened the fridge I seemed to discover yet another beetroot still waiting to be used. There is only so much beetroot I can take before my mind starts imagining how to include it in a baked treat.

Beetroot and chocolate seemed the place to start and I decided on a simple cake. I wanted the beetroot to be the star of the show and so shunned anything covered in mountains of cream or frosting in flavour of a simple snack cake. I then hit upon the idea of jazzing it up with a glaze, made a fabulous vibrant pinky/purple using the juice of the cooked beetroot. This added both a burst of vibrant colour and little sweetness, while being completely natural, no food dye required!

The cake itself is on first glance just a chocolate cake, but if you look more closely you can see a definite rustic burgundy hue to the sponge. It also smelt different to regular chocolate cake, slightly earthy, mysterious and yet still very chocolaty. The flavour too was chocolaty, only more complex with an undertone of there being something a little bit extra special included, without it actually screaming beetroot. I would liken it to when you add just a touch of coffee to chocolate cakes, you don’t necessary taste the coffee, but it adds a depth and richness to the chocolate. This seemed to work in the same principle.

On the first day the cake was light and tender but over the next two days it became softer and stickier as the beetroot released its moisture into the cake. I think the cake was at its optimum about 2 days after baking, when I couldn’t stop eating it. The arty drizzle of beetroot glaze worked really well against the flavour of the cake and added little bites of sweetness against the rather intense chocolate flavour of the cake.

This was a delicious cake and I loved its simplicity yet complex flavour. I’ll be experimenting with other beetroot baked treats again, it’s worth the ruby stained hands, although you could always buy the precooked stuff – just not the kind in vinegar please!

Chocolate Beetroot Cake with Beetroot Glaze
Cake
180ml vegetable or sunflower oil
180g gluten free self raising flour
55g cocoa powder
1 tsp bicarbonate of soda
200g caster sugar
250g cooked beetroot (or 350g raw)
3 eggs
1 tsp vanilla extract

Beetroot Glaze
80g royal icing sugar (*see note)
Juice from the cooked beetroot

Method
Preheat the oven to 170C and grease and line a deep 8inch springform tin.
If you are using a packet of cooked beetroot then continue onto the next step. If using raw beetroot, trim the ends and peel the skin from the beetroot. Cut each beetroot into quarters and place into a small glass bowl. Add 1 tbsp water and cover the top with clingfilm. Microwave on high for 8 minutes until the beetroot are just softened. Set aside to cool, but do not throw away any of the beetroot juice created.
Place your cooked beetroot (reserve any juice for later) into a food processor and blitz until you have fine shreds. Add the eggs and blitz again. Add the oil and vanilla and mix again until well combined.
Sift the flour, cocoa powder and bicarbonate of soda into a bowl and add the sugar. Pour your beetroot mixture on top and fold everything together using a large spoon of spatula.
Pour the cake mix into the tin and bake for 35-40 minutes until slightly springy to the touch and a skewer inserted in the middle comes out clean.
Leave the cake to cool in the tin for 10 minutes, before running a knife around the edge of the tin and releasing the cake from the tin. Leave to cool completely.
Once cooled, place the royal icing sugar into a small bowl and slowly add the reserved beetroot juice, 1 teaspoon at a time, until you achieve a thick, yet drizzle-worthy glaze. It will be a gorgeous bright purple colour.
Transfer the cooled cake to a serving plate and artfully drizzle the glaze over the top of the cake.
Leave to set for 20 minutes before serving.
Makes 1 x 8inch cake

The cake tastes even better as it ages, as the beetroot slowly releases its moisture into the cake making it turn softer and moister. I found 2 days in it was at its best.

* Note: Royal icing sugar sets hard and won’t be so easily absorbed into the cake, making for a better finish. You can use regular icing sugar in place of the royal icing sugar, but it will remain wet and soak into the cake and disappear over time