Showing posts with label Dip. Show all posts

Sunday, 16 March 2014

Carrot & Fennel Seed Mash

I had a surplus of carrots in the fridge and decided to turn them into a carrot mash to have in place of mashed potatoes with dinner. I’ve recently been experimenting with the more aromatic spices in my savoury cooking such as fennel, cardamom and cumin and so decided to add some crushed fennel seeds to my carrot mash.

Fennel has an aromatic, slightly aniseed flavour to it and I could imagine it working well with the sweet carrots. To add more flavour and a touch of luxury to my carrot mash, I poached the carrots in fennel infused milk rather than boiling them in water and then used this lightly spiced milk mixture to puree with the carrots.

I decided to make a thick mash, so only used about half the milk mixture when pureeing the cooked carrots. I ate some of it warm with dinner and put the rest in the fridge for later. I intended to reheat it, but on a whim I used it as a spread in a wrap with some falafel and it was delicious! I then ate the rest of it as you would houmous so it works brilliantly hot or cold. I think I almost preferred it cold as the fennel flavour seemed to have developed overnight.

The flavour of the fennel remained quite delicate, while the carrots were sweet with an almost creamy texture in the mouth, despite their slightly rough appearance (they won’t fluff up like mashed potatoes). The subtle aniseed flavour paired brilliantly with the sweet carrot and transformed a standard side dish into something special. The carrots natural orange brightness added colour to anything I served it with.

A quick a delicious way to use up those often overlooked carrots. If you don’t fancy fennel seeds, try coriander or cumin instead. Sorry for the poor photos, it was dark and I was hungry J

Carrot & Fennel Seed Mash
Ingredients
5 large carrots
200-250ml milk
2 tsp fennel seeds
Salt & pepper

Method
Peel and roughly chop the carrots. Lightly crush the fennel seeds to break them slightly. Add the carrots and fennel to a pan with enough milk to nearly cover them.
Bring the mixture to a simmer and then leave to cook for 15-20 minutes until the carrot is completely softened. As there is less liquid, stir occasionally to ensure an even cooking.
Add the softened carrot to a small blender along with half the milk (leave the fennel seeds in). Blitz to form a puree, adding more milk until you have the thickness you desire be it a thick mash/houmous consistency or a thinner style puree.
Season to taste.

Serve warm in place of mashed potatoes or cold as a dip or sandwich filling, as you would houmous.

Sunday, 1 September 2013

Baba Ghanoush

What do you do when you’ve been tempted by some offers in the reduced section of the supermarket and come home with a bag of 4 aubergines that you snaffled for 80p? I ate half of one in a stir fry and used the rest to make baba ghanoush.

I’ve only tasted baba ghanoush once before, but loved its smoky mysterious flavour and have often considered making it myself. As I suddenly had a big bag of aubergines at my disposal, now seemed the ideal time to try it out.

There is a minefield of recipes and variations out there, but after a quick hunt I went with a recipe by Nigel Slater, whose recipes I trust. The only substitution I made was to use sesame seed oil in place of the tahini and olive oil called for, as I didn’t have any tahini. The recipe instructs you to char the aubergines over a lit gas ring, but I decided to roast my aubergines in a really hot oven until the skins were blackened. I live in a flat with a very sensitive smoke alarm and I don’t think the neighbours would have been too happy if I’d set them off from attempting to roast veg over the flames. I think roasting is a better idea anyway, as my aubergines released some liquid during their roasting, which otherwise would have spilled out over the oven top creating a terrible mess.
Once roasted and withered the aubergines smelt lovely. Slightly earthy yet also surprisingly sweet and slightly smoky. Aubergines can be a bit spongy and slimy if not cooked well, but after roasting I slit the skins and the flesh inside was so soft and silky I could scoop it out with a spoon!
I made a slight mistake of blitzing the aubergine with the garlic and oil rather than chopping it, meaning my baba ghanoush was more of a dip/paste than chunky but this didn’t stop it being delicious. It also meant it was far easier to dip crudités into and as a tasty and different sandwich filling.

The flavour of the aubergine was surprisingly good. Sweet with a slight roasted flavour from the blackened aubergine skin, not used in the dip but it did impart some flavour. It was also surprisingly creamy with a good strong kick of garlic, tangy fresh lemon and then a mellow nuttiness from the sesame oil. I loved eating it with falafel. I’ve often said I’m not a fan of aubergine, but this has changed my mind. A long roast until the aubergines are soft and yielding is clearly the way to eat them.

Baba Ghanoush
Recipe adapted from Nigel Slater
Ingredients
3-4 large aubergines
2 cloves of garlic
1 tbsp olive oil
2 tbsp sesame oil
Juice of ½ lemon
Small handful fresh parsley
Salt and pepper to season

Method
Preheat the oven to 250C.
Wash the aubgergines and prick their skins all over with a sharp knife. Place onto a baking tray and roasted for 45 minutes until they are beginning to whither and soften. Remove from the oven, flip the aubergines over and roasted for a further 15 minutes. They should be soft and collapsed. Leave to cool slightly.
Roughly chop the garlic and add to a small food processor. Add the oils and lemon juice and blitz until the garlic is in small pieces.
Scoop out the flesh from the aubergines, discarding the skins. Add to the food processor along with the parsley and pulse until combined but still a little chunky. (I did mine too long and got a smoother paste).
Season with salt and pepper to taste.

Sunday, 2 June 2013

Roasted Butternut Squash Houmous

I love houmous and its one of my household staples that appear in my fridge at least 2-3 times a month. You can get some really tasty and interesting houmous varieties in the shops these days, but recently I have found I also enjoy making it myself.

Having recently bought some of the new Warburtons gluten free tortilla style wraps to try, I wanted some houmous to eat them with. As I had some butternut squash languishing in the fridge from making my butternut and ginger soup I decided to roast it and then blitz it into some homemade houmous to add a bit of interest.

Butternut squash is one of those fabulous vegetables – well tubers really, that go fabulously sweet and soft after a little roasting in the oven. You’d never think that something so tough and hard to slice could be transformed into something so soft and almost creamy, in just a few minutes. The vibrant golden orange colour helps add a little sunshine to whatever it’s served with too.

I had a jar of garlic chutney in the fridge too, so used some of that in place of the standard freshly grated garlic. This gave it more of a subtle sweet garlic flavour rather than the harsher raw garlic hit, but either works well. I also added a squeeze of lemon juice as I’ve found this really seems to enhance the flavours in houmous.

The resulting houmous was soft with an almost creamy mouthfeel from the velvety roasted squash, which also gave it a delicious natural sweetness. Although creamy in the mouth, the houmous itself was still a little on the coarse side which I like, as it adds texture and interest. I also left it quick thick so that it would be easier to spread on wraps and in sandwiches, but you can always make it thinner if you want to use it as a dip instead.

I loved the rich orange roasted colour it produced. Even though I usually associate roasted veg with winter, this seemed very fresh and summery. I served mine with an assortment of salads and olives, along with strips of the gluten free tortilla wrap. I then had fun making up little handheld wraps, almost soft taco style, using the houmous as the base. Delicious

Roasted Butternut Squash Houmous
Ingredients
300g butternut squash
400g tin chickpeas
1 tbsp roasted garlic puree/chutney (or 1 clove garlic grated)
2 tbsp olive oil
½ tbsp lemon juice

Method
Preheat the oven to 200C. Line a baking tray with foil.
Cut the butternut squash into 1cm thick slices and lay them out on the baking tray, leaving the skin on. Brush with half a tablespoon of oil and roast for 25-30 minutes until softened and just starting to take on some colour.
Once roasted, remove from the oven and set aside to cool.
Place the chickpeas, 1 tbsp of water from their tin and the remaining 1½ tablespoons of olive oil into a food processor and blitz to create a chunky paste. Scrape down the sides once or twice during the process.
Add some roasted garlic puree/chutney, or grate in 1 clove of fresh garlic and a pinch of salt and pepper.
Peel the skin off your roasted and cooled butternut squash using your fingers, it should come away easily.
Briefly mash the butternut into a mush and add to the blitzed chickpeas along with the lemon juice. Blitz again until well combined and the mixture is as smooth or chunky as you desire. (You can add a little more oil or a drop of water if it is too thick)
Spoon into an airtight container and store in the fridge until required.
Delicious served with crudités, on jacket potatoes, salads, wraps with crackers or in sandwiches etc.
Makes around 800g (you can freeze some in a Tupperware container if you don’t think you will eat it all straight away)

Thursday, 14 March 2013

Beetroot & Bean Houmous

I think my brain was away on holiday when I went food shopping last weekend. It’s not been long since I finally finished munching my way through a large bunch of fresh beetroot, and getting a bit fed up with it by the end. You might think this would mean I wouldn’t want any more for at least a few weeks. Well, this is what I thought too, but when I saw beetroot on offer over the weekend I somehow ended up coming back with two more packs of the stuff – yes two!

It was on offer, one of those 89p for one or £1 for two offers. My brain thought “oh I have some goat’s cheese in the fridge that beetroot would be really tasty with, I’ll get some.” Then when I spotted the offer, well it was too good to pass up. Thankfully this time the beetroot was the cooked, vacuum packed kind (not vinegary), so it will keep for a few weeks, but honestly! What am I like? I’m not normally taken in by offers, but somehow I can never pass up a fruit and veg offer.

Once home I was determined to use up a good portion of it in a different style to just salads and sandwiches. I decided on beetroot houmous. Perfect fodder for taking to work for lunch. Rather than use chickpeas, I decided to use a tin of black eyed beans. I really like the texture of these beans, they seem softer and creamier than chickpeas, which can sometimes be a bit chalky.

I adore the colour of the houmous once finished, a real vibrant pinky purple. It made me smile just to look at it. It retained a slightly coarse texture which was nice, with little flecks of bean or beetroot scattered throughout. The earthy woodsy flavour of the beetroot was livened up by a generous squirt of lemon juice and zest. Along with its almost psychedelic colour it made the perfect sunny lunch time food, adding a bit of brightness and freshness to what has otherwise been a very cold and dreary week. I’ve been taking little pots of it into work and slathering it onto hot toast at lunchtime, delicious.

So although I may have got carried away buying two packs of beetroot for a single person, long live beetroot I say!

Beetroot & Bean Houmous
Ingredients
200g cooked, peeled beetroot
400g tin black eyed beans
Zest & juice of ½ lemon
2 tsp Henderson’s relish (or balsamic vinegar)
2 tsp olive oil
½ tsp dried oregano
Salt, pinch

Method
Place the beetroot into a food blender and blitz until finely minced, you don’t want puree, a few chunky flakes are fine.
Drain the beans and add to the beetroot. Blitz again until a thick chunky puree is achieved, scraping down the sides when necessary.
Add the oil, lemon juice, lemon zest, oregano, Henderson’s relish and a pinch of salt. Blitz again until a coarse houmous-like texture is achieved. A few little chunks or flecks of bean or beetroot are fine and actually add a nice texture.
Transfer to a lidable container, and store in the fridge for up to one week.
Enjoy with crackers, toast, veg crudités, salads, sandwiches or jacket potatoes…basically anything you fancy!

Tuesday, 5 July 2011

Smoky Chilli & Lime Houmous

Yesterday I was really fancying some houmous to go with some nice crunchy salad and crackers for lunch. I love houmous and often (I’m ashamed to say) buy it from supermarkets, but its so quick and easy to make at home that I decided to have a little fun and jazz up some homemade houmous.

Simple clean flavours are all well and good, but I also love things with a bit of spice and after a browse though the fridge and spice cupboard I decided to make houmous with a little lime and cumin for aromatics and paprika and cayenne for a smoky kick.

I’m not a great fan of tahini, even though I love sesame and sesame oil, so instead I used peanut butter to add that creamy nutty note. This may sound a little odd, but it really works.

The houmous took literally 10 minutes from start to finish and I ended up with a lovely big pot for only a few pence, a bargain compared to shop bought. It reminded me that I really should make my own more often.

It smelt amazing and quite Moroccan so I dipped a cracker in and took a bite. At first I just got a creamy texture and a fresh zesty flavour from the lime. Then the smokiness from the paprika came in and started to develop into a gentle heat from the cayenne pepper, leaving my mouth with a warming tingle.

I loved its terracotta orange colour from the paprika, very Middle Eastern. It’s quite addictive and perfect summer lunchtime munching.

Smoky Chilli & Lime Houmous
Ingredients
1 x 400g tin chickpeas
½ tsp ground cumin
¼ tsp cayenne pepper
½ tsp sweet paprika
1 tbsp peanut butter or tahini
Juice of ½ lime
4-6 tsp vegetable oil

Method
Place all the ingredients, expect the oil, into a small blender and blitz until chunky. Scrape down the sides and briefly blitz again.
Add 4tsp of oil and blend until smooth or at your desired consistency (I like it coarse). Add a little more oil or a touch of water if it’s too thick.
Transfer to an airtight container and store in the fridge.
Eat within 5 days.

Sunday, 7 June 2009

Barbequed Aubergine with Chermoula

What is chermoula? I hear you ask. Until recently I hadn’t heard of it either, but chermoula is spicy, aromatic North African dip or marinade that is traditionally served with fish but can also be used with chicken, vegetables or in stirred into couscous. I happened across it while looking for interesting veggie alternatives for a BBQ last weekend. The chermoula caught my attention firstly for its unusual name – cher-mou-la and secondly for its wonderful mix of Moroccan sounding ingredients such as sweet paprika, mint, cumin and harissa paste that sounded perfect for a hot summers day.

I found a recipe that suggested serving the chermoula as an accompaniment to grilled aubergine and decided sliced aubergines would be ideal for putting on the Barbeque. The chermoula looks a little like a pesto, the spices and herbs mingling together in a golden saffron oil. Before barbequing, I also brushed the aubergine slices with some of the smoky oil that was produced when making the chermoula which helped glaze them a lovely rustic orange colour.

The aubergine slices were served warm with extra chermoula drizzled on top. The slightly smoky flavour from the charred aubergine complemented the spicy, African flavours of the sauce. There was a tingling warmth from the harissa but it was also very fragrant thanks to the herbs and spices. I’m told by other family members it goes very well with chicken and sausages too. I had some of the leftovers the following day and it seemed to have increased in spiciness and had a fuller rounded flavour, so I think making the sauce a few hours or the day before you need it would be good. You can adjust the level of spiciness you want by the strength of the harissa you use – I find some are hotter than others.

Barbequed Aubergine with Chermoula
(Recipe adapted from Delicious Magazine)
Ingredients
2 large aubergines
3 tsp salt

For the chermoula
3 garlic cloves
1 tsp ground cumin
2 tsp ground coriander
1½ tsp sweet paprika
Small pinch saffron strands
2 tsp harissa paste
1 tbsp lemon juice
20g fresh coriander
20g fresh mint
150ml olive oil

Method
Cut the aubergines lengthways into 1cm thick slices. Sprinkle them with the salt and lay them in a colander to drain away any bitter juices. Leave for 40-60 minutes.
Meanwhile, make the chermoula. Finely grate the garlic into a pestle and mortar and add the cumin, ground coriander, paprika and saffron strands.
Add a little oil and grind everything together to make a thick paste. Finely chop the herbs and add to the pestle along with the harissa and lemon juice.
Crush everything together well, while drizzling in the oil to create a sauce with a pesto-like consistency.
Transfer to a small bowl and cover until required.
When the aubergines have drained, rinse them under the tap to remove any excess salt and pat them dry. Arrange them on a tray and brush both sides with some of the chermoula. Add more oil to the sauce if needed.
Cook on the BBQ for 3-4 minutes each side, until soft and tender and grill lines are apparent on the slices. You could also use a grill pan if you don’t want to BBQ.
Keep warm in the oven until required. Serve with extra chermoula and other usual barbeque meal accompaniments.
Serves 6 - 8

Saturday, 27 September 2008

Daring Bakers September Challenge: Lavash Crackers

I was excited when I saw this months challenge was for Lavash Crackers as I had about them and seen them around on a few blogs but never tried making them myself. They are thin crispy little crackers often topped with seeds or spices and make a great accompaniment to dips. We were given free rein over the toppings we used and were also told to create a dip of our choosing to accompany our crackers. As an extra twist the dip also had to gluten free and vegan friendly.

We were given the option to make gluten free crackers too, but I decided to stick with the wheaty version. I also used 75% white flour and 25% wholemeal for some added extra fibre. I was initially surprised that the crackers included yeast, but this makes sense as it allowed the dough to become nice and subtle and roll out thinly without tearing.

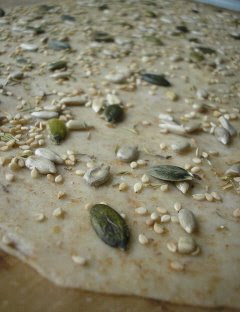
As the dough had to be rolled out very thinly, I had enough to split the dough in half and made two different sheets of crackers. I started with a seeded one which involved sesame seeds, pumpkin seeds, sunflower seeds and lots thyme which I always think gives a wonderful flavour to savoury foods.
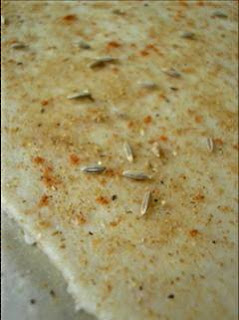
On the second cracker sheet I went for spices – cumin seeds, curry powder and smoked paprika which gave the crackers a dusty red hue with just a tingling of heat.
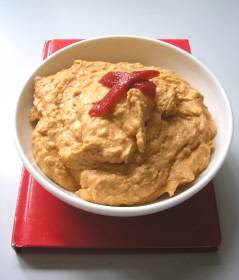
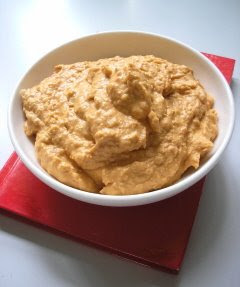
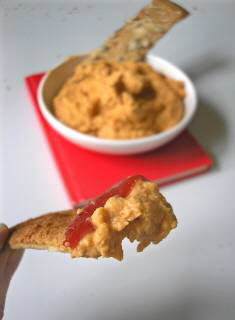
For my dip I initially thought of making a salsa but then I hit upon the idea of making red pepper houmous as I had some tahini and roasted red peppers sitting in the fridge clamoring to be used. I love the orangey-red colour the houmous turned and it tasted wonderful, nutty and sweet and was very dip-able with both varieties of cracker and can be made in a matter of moments in the food processor.
I really enjoyed making and munching these crackers and will definitely be making them again as nibbles for when I next have friends round. Be sure to check out the blogroll to see other bakers Lavash Crackers. And our hosts, Natalie from Gluten A Go Go and Shel from Musings From the Fishbowl.

Lavash Crackers
Recipe from The Bread Bakers Apprentice by Peter Reinhart
Ingredients
190g strong white bread flour (I used 150g white and 40g wholemeal)
½ tsp salt
½ tsp instant yeast
1 tbsp caster sugar
1 tbsp vegetable oil
75-110ml warm water
Seeds, herbs or spices of your choice

Method
In a bowl, stir together the flour, yeast, salt, sugar, oil and just enough water to bring everything together into a ball.
Sprinkle a work surface with flour and kneed the dough for 10 minutes until it become smooth and elastic when stretched.
Place the dough in a lightly oiled bowl and cover with clingfilm.
Allow to rest at room temperature for 90 minutes, until double in size.
Preheat the oven to 180C
Cut the dough in half and lightly oil a work surface with oil and roll out each dough half until almost wafer thin.
Transfer the dough onto a sheet of greaseproof paper on a baking tray and lightly brush the surface with water to help the toppings stick.
Scatter over the toppings of your choice and mark the dough into long bars using a sharp knife, but do not cut all the way through. Allow to rest for 5 minutes.
Bake for 15 minutes until the crackers and crisp and a deep golden brown.
Remove from the oven, transfer to a wire wrack to cool before breaking the cracker sheet into bars along the pre-scored edges.
Repeat with the remaining half of the dough.
Serve with a variety of dips and store any leftovers in an airtight container.

Red Pepper Houmous
Ingredients

1 x 400g tin chickpeas
1 roasted and skinned from a jar
Juice of ½ lemon
2 tbsp tahini paste
½ tsp salt
Ground pepper
2 tbsp olive oil
1 clove garlic

Method
Place all the ingredients into a food processor and blitz together until smooth.
Store covered in the fridge until required.
Eat with 4 days.