Friday, 29 January 2010

GU Goodies: A Review

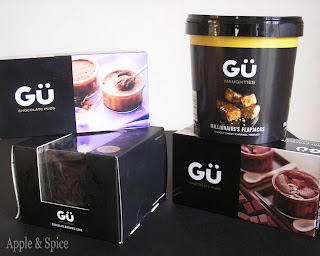
Last week I opened the door and was presented with a selection of the latest indulgent chocolate GU puds, packed in an appropriately named special goodie bag. I had been asked if I would like to review some of their products a few weeks back but the original delivery date got cancelled due to the snow, so it was a lovely surprise to open the door to them last week.

I opened the bag with glee and found a box of their chocolate mousses, a box of hot chocolate soufflés, a tub of millionaires flapjack and a most decadent looking chocolate brownie cake. You can only imagine the squeal of delight from my chocolate-obsessed family at seeing all these goodies. I managed to prevent them from ripping open the boxes straight away and instead set up a taster session over the next few nights to ensure we all got a taste of the goodies.

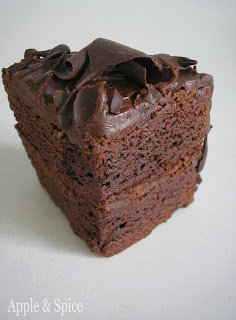
First on the list was the Chocolate Brownie Cake, the newest addition to the GU range. Its appearance is one of insane chocolate indulgence. Two layers of dense chocolate brownie cake sandwiched together with a chocolate cream, topped and covered in a rich chocolate icing, finished with dark chocolate curls and studded with chocolate teardrops. Now that’s a lot of chocolate! It’s cute and dinky in size but so rich that we found it served 6 quite easily.

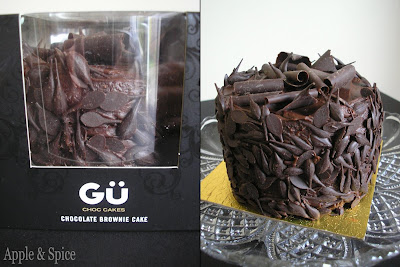
The cake/brownie layers I found to be very dense and stiff, so much so that it was quite hard to cut through, but it was a very cold day so I don’t think that helped. The layers were very sweet and fudgy with a slight chew. The appearance of the cake looked quite soft and gooey but unfortunately I found them to be a little dry. I tried warming a slice in the microwave and this improved the cake immensely. The chocolate melted and the brownie layers softened and turned gooey. I think GU should suggest heating the cake as a serving suggestion, as warming it made it taste divine.

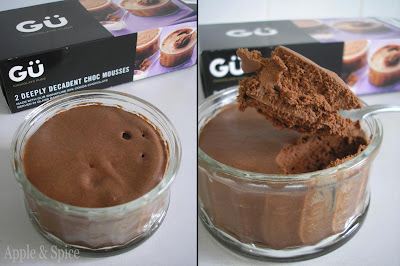
Next on the list were the Deeply Decadent Choc Mousses. I liked how they came in their own glass ramekins, which made them seem much more sophisticated than if they had been served in a plastic container. Plus, you get to keep the ramekins after you’ve eaten the pud. The mousse itself was thick yet studded with tiny air bubbles which kept it light and helped it melt deliciously on the tongue. It tasted of real chocolate, rather than cocoa powder and was not too sweet nor too bitter as it was made with a good high percentage milk chocolate.

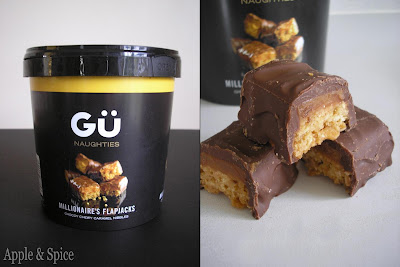
GU have recently launched three different tubs of chocolaty themed treats, all appropriately named Naughties. I was sent a tub of Millionaires Flapjack – flapjack base topped with a layer of caramel and a thick top coating of chocolate, oh so naughty but oh so nice. The flapjack was chewy yet not too sweet with a good texture from the oats. The caramel layer was smooth and creamy and the thick top coating of chocolate added a nice contrast. I can imagine a tub of these disappearing in minutes if left unattended on a desk.

The Hot Chocolate Soufflés were the puds I was most looking forward to and they didn’t disappoint. They start off looking similar to the chocolate mousses, but after a short bake in the oven they form a thin delicate sponge crust which when pierced with a spoon reveals a dark oozing hot chocolate gooey centre. The aroma that wafted up from the soufflé was amazing, a deep dark chocolate that just made my mouth water. As I tasted the first spoonful my mouth filled with an intense chocolate flavour, so intense that it almost tasted like there was some Brandy in it (there’s not – I checked).
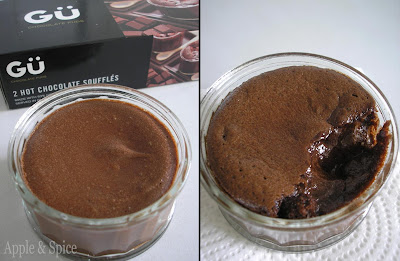
The warm bubbly soufflé mixture was wonderfully light and airy and the oozing centre so indulgent. They also came in their own glass ramekins meaning you could easily serve them to guests without having to try and transfer them into another dish before serving. I would definitely recommend these they were pure chocolate indulgence.
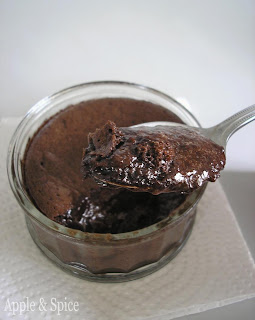
Sunday, 24 January 2010

Kiwi Honey & Lime Jam

A few months ago my grandmother bought a jar of kiwi and lime jam from a farmers market when she was visiting some friends. It wasn’t one she had tried before but she is a lover of kiwis and is quite adventurous in her food purchases and always willing to try new foods. It turned out to be quite delicate and floral and she absolutely loved the jam but wasn’t able to find anything similar locally. Not being one to pass up the opportunity of a challenge I snuck a look at the ingredients listed on the jar and decided to try and make a batch for her myself.

One of the interesting ingredients listed was honey. Ah-ha! That explains the floral note. So armed with my ingredient list I set about concocting my jam.

It turned out to be quite a straightforward process. The main issue I had was that the kiwi’s did not cook down into a mush as I expected, but remained relatively intact in their small dice. I solved this problem by giving them a quick squish with a potato masher. This resulted in a slightly coarse yet spreadable jam.

Once cooked, I adored the colour of jam – such a bright glossy emerald green and studded with tiny jet black seeds. It had a slightly sharp and tangy flavour with just a hint of citrus thanks to the lime. The sugar and honey kept it sweet yet with a mellow floral overtone.

This jam had two purposes for not only was my grandmother delighted with it, but I discovered I can eat cooked kiwi. Normally when I eat raw kiwi my tongue and mouth go all prickly and sore within a few minutes, but I found on tasting a tiny bit of the jam (out of curiosity as to its flavour) that it didn’t affect me in the usual way. I suppose boiling it denatured the enzymes. I’m not sure how useful this piece of information would be to me, but it’s interesting to know.

The jam wasn’t quite the same as the one my grandmother bought on the market, but this doesn’t mean it was any less delicious. It certainly added a bit of zing to some morning toast.

Kiwi Honey & Lime Jam
Ingredients
11 ripe kiwi fruit
175g caster or granulated sugar
100g runny honey
1 lime

Method
Place 2 or 3 jam jars and their lids into a cold oven. Heat to 120oC for at least 10 minutes to sterilise the jars. Once heated, turn off the heat but leave the jars in the oven so they remain hot while you make the jam.
Peel the kiwi fruit, cut into quarters and roughly chop into 5mm pieces. Remove the white core from the fruit if it feels particularly hard or woody.
Add the chopped kiwi’s, sugar and honey into a medium sized saucepan. Heat gently, stirring occasionally, until the honey has softened and the sugar dissolved.
Stir in the finely grated zest of the lime and its juice. Bring the mixture to the boil and allow to bubble for 10 minutes, stirring every so often to prevent it from sticking to the base of the pan.
Then reduce the heat and use a potato masher to gently squash/crush the kiwi into a chunky mush. You don’t want (and won’t get) it smooth, but you want an easily spreadable consistency.
Allow to simmer for 2 minutes before removing from the heat. Take the hot jars from the oven and divide the jam between them while both the jam and jars are still hot. Be careful not to get any on you as it’s very hot!
Wear rubber gloves to screw the lid onto the jars and leave to cool before storing in a cool dark place until required. The seal button in the lids will suddenly pop back down as the jam cools, as a sterile vacuum is created within the jar. They will give a loud ‘pop’ when this happens, so don’t be alarmed.
Once opened, store in the fridge and eat within 2 weeks.
Makes 2-3 jars

Wednesday, 20 January 2010

The Cake Slice January 2010: Red Velvet Cake

With over 50% of the votes, The Cake Slice bakers cake of choice to kick start 2010 was a Red Velvet cake. It seems we were all eager to start the new year off with a little colour and excitement. A Red Velvet cake is a unique and instantly recognizable cake due to its deep dark red colour thanks to a hint of cocoa powder and lots of red food dye. It has a soft and tender crumb thanks to the inclusion of vinegar and buttermilk in the cake and is often topped with a cream cheese or buttercream frosting. However, this cake is a little different as it called for a cooked milk based topping mixed with coconut and pecans which resulted in a nutty, nobly fluffy icing.

Red Velvet cake is relatively unknown here in the UK, although you do occasionally see it in London cupcake shops. I have only eaten it once, when I was in Chicago during the summer, and have longed to try baking one myself ever since, so I was particularly excited by this months choice.

I had no call for a large cake and so instead I halved the recipe and baked a batch of cupcakes instead. This also allowed me to use some of the cute red and white spotty cake cases I was given at Christmas. Just perfect for Red Velvet cupcakes!
The colour of my sponge turned out quite a lot darker than I expected, not the vibrant red colour I was anticipating but I think this was because I used gel food dye rather than the liquid version called for. Gel is more concentrated and so I reduced the amount – I now realize I reduced it a little too much, but the crumb still had a nice earthy red hue to it. Will add more next time!

The texture of the cake was wonderful. It was very light, quite tender and moist thanks to the buttermilk. It had a faint cocoa richness that paired with the sweet creamy topping perfectly, without being obviously chocolaty. The icing was soft and creamy and I loved its quirky nubbly appearance and texture. A bite resulted in a great contrast between the nutty sweet coconut icing and the soft cake beneath.

The icing itself was unlike any other icing I have made before. You heat some milk and flour together until it forms a thick paste, just like a rue when making a béchamel sauce. You leave the paste to cool and then beat in butter, caster sugar and a little vanilla. You end up with an icing the consistency of spreadable butter into which you stir the coconut and pecans. I was quite dubious about how it would taste but it was surprisingly smooth and creamy, thick without the need of too much sugar and I didn’t notice any graininess from the caster sugar either. Who would have guessed?! I think I still prefer cream cheese icing myself, but I would urge you to give it a go, for learning a new technique if nothing else.

Red Velvet Cake
(Recipe from Southern Cakes by Nancie McDermott)
For the Red Velvet Cake
300g plain flour
½ tsp salt
1 tsp vanilla extract
225ml buttermilk (see note below)
2 tbsp cocoa powder
2 tbsp red food colouring
200g butter
400g caster sugar
2 eggs
1½ tsp baking soda
1 tbsp cider vinegar or white vinegar

For the Coconut Pecan Icing
225ml milk
2 tbsp all purpose flour
200g butter, softened
200g caster sugar
1 tsp vanilla extract
75g sweetened shredded coconut
100g finely chopped pecans or walnuts


Method – Red Velvet Cake
To make the cake, heat the oven to 180C. Grease two 9 inch round cake pans and line them with waxed paper to kitchen parchment. Grease the paper and flour the pans.
Prepare three separate mixtures for the batter. Combine the flour and salt in a medium bowl and use a fork to mix them together well. Combine the cocoa powder and the red food colouring in a small bowl, mashing and stirring them together to make a thick smooth paste.
In a large bowl, beat the butter with a mixer at low speed for 1 minute until creamy and soft. Add the sugar and then beat well for 3 to 4 minutes, stopping to scrape down the bowl now and then. Add the eggs one at a time, beating after each one until the mixture is creamy, fluffy and smooth. Scrape the cocoa-food colouring paste into the batter and beat to mix it in evenly.
Add a third of the flour mixture and then about half the milk, beating the batter with a mixer at low speed. Mix only enough to make the flour or liquid disappear into the batter. Mix in another third of the flour, the rest of the milk and then the last of the flour in the same way.
In a small bowl, combine the baking soda and vinegar and stir well. Use a wooden spoon or spatula to quickly mix this last mixture into the red batter, folding it in gently by hand. Scrape the batter into the prepared pans.
Bake at 180C for 20 to 25 minutes (20 for cupcakes) until the layers are spring back when touched lightly in the centre and are just beginning to pull away from the sides of the pans.
Cool the cakes in the pans on wire racks or folded kitchen towels for 15 minutes. Then turn them out onto the racks, remove the paper and turn top side up again to cool completely.

Coconut Pecan Icing
Combine the milk and flour in a small or medium saucepan. Cook over medium heat, whisking or stirring often until the mixture thickens almost to a paste, around 2 to 4 minutes. Remove from the heat and scrape it into a small bowl to cool completely.
Meanwhile, beat the butter with a mixture at high speed until light and fluffy. Add the sugar in thirds, beating well each time until the mixture is creamy and fairly smooth. Add the cooled milk and flour mixture and beat for 1 to 2 minutes, scraping down the sides now and then to combine everything well. Using a large spoon or spatula, stir in the vanilla, coconut and pecans, mixing to combine everything well into a thick, fluffy, nubbly icing.

To Assemble
Place one cake layer top side down on a cake stand or serving plate. Spread a third of the icing on top. Place the second layer, top side up, on top. Frost the sides and then the top of the cake with the remaining icing. Refrigerate for 30 minutes to help the icing set.
Makes one 9inch double layer cake or 24 cupcakes

NOTE: If you can’t find buttermilk, stir 1 tbsp lemon juice or vinegar into 225ml of milk and leave to stand for 10 minutes before using.

Friday, 15 January 2010

10 Things Award

A few days ago I was delighted to receive award from Issy of Cupcakes and Cornwall. The idea behind the award is to list 10 things that make you happy and then pass the award on to 10 bloggers whose blogs brighten your day.

So 10 things that make me smile are:
1. The aroma of a cake baking in the oven
2. Going for walks and being rewarded with finding secret hidden views
3. Sinking into a hot bath on a cold day
4. The taste of freshly baked bread
5. Reading a good book snuggled up in bed
6. A hug
7. Sharing life’s ups and downs with a friend over dinner
8. Finding a new variety of apple to taste
9. Spending a day with the family
10. A good nights sleep (I’m a bit of an insomniac)

The 10 bloggers who I am passing the award on to for brightening my day are:
1. The Caked Crusader
2. Lick The Bowl Good
3. Maltese Bakes and More
4. Let Her Bake Cake
5. Feeding My Enthusiasms
6. Green Gourmet Giraffe
7. Antics of A Cycling Cook
8. Pig Pig’s Corner
9. Technicolour Kitchen
10. Katie Cakes

If you want to take part in this blogging award you can! Just follow these instructions:
1. Copy the award image into a post
2. Then list 10 things that make you happy
3. Tag 10 bloggers who brighten your day
4. Put in a link to their blogs
5. Notify the award receivers
6. Award recipients must link back to sender's blog

So, what makes you smile?

Wednesday, 13 January 2010

Jordans Cereals HQ

I count myself very fortunate and lucky to live in the countryside. I love looking out over open fields, seeing a rabbit run across the path in front of me and watching the trees and plants blossom and grow with the changing seasons. I think it would such a shame if all our farmland was to disappear. After meeting up with Jordans Cereals last month for their Country Crisp Appreciation Society day, I realised they share my love of nature and the countryside. They are based just a few minutes down the road from where I live so when they contacted me recently to ask if I would like to visit them in their HQ and learn a bit more about the company I was delighted. It’s always good to learn a bit of local history.

It was a cold snowy morning when I drove out to meet them, and thanks to my fantastic sense of direction I got a little lost. I knew I must be close as the air was filled with the aroma of hot, toasting grains. It really did smell like a bowl of steaming porridge, warm, wholesome and comforting.

Upon arriving at Jordans I met up with Mathilde, a fellow blogger who had also been at the Country Crisp day. She had brought along her friendly photographer Dave to take some photos – how cool is that, her own photographer! We were greeted by Rachel and Julia who talked us through the history of Jordans and the development of all their cereal range of mueslis, crunchy oats, cereal bars, country crisp and porridge, all displayed in big trays for us to look at and sample.

Jordans Cereals is still a family run business and they try to source as many of their ingredients as locally as they can. All their oats and grains are grown for them by local farmers and to conservation grade, meaning they have to be done in a way good for the environment. There was actually a very good article published in the Telegraph about them recently, which you can read here for more information.

Mixing their cereals in not such a straightforward task as it may sound. They are passionate about only using natural wholesome ingredients which has sometimes proved a problem when sourcing particular items. For years they restrained from using dried apricots due to the sulphur dioxide which is added to make them retain their colour, but there has been a foodie breakthrough by using natural fruit juices as the preservative. Another time their shipment of specially selected ingredients was being brought over by boat and the boat got hijacked, taking the ingredients with them!! I can imagine that was rather a surreal day when they got that phone call!

They also baked up two bowls of porridge for us to try. One using the traditional jumbo rolled oats and the other a finer milled oat for people who need porridge in a hurry. Both were very creamy and we had an interesting discussion about different toppings and various recipes.

We then got to visit the original Jordans Mill which is now sadly un-operational but is still very much a part of Jordans. It’s the buildings featured on all their boxes and is on the site of their outlet shop in Biggleswade. We were treated to a look inside and it was fascinating seeing the old flour milling machines. The mill may not be operating as a working mill, but it is still useful as a water wheel generates the electricity for their on site shop, thanks to it being situated next to the river.

We ended our tour with a visit to the shop which is a treasure-trove of raw ingredients and of course, their cereals, it’s well worth a visit. I love how colourful they look displayed on the shelves. Thanks Rachel and everyone at Jordans for such an insightful and enjoyable morning.

Sunday, 10 January 2010

Chocolate Chestnut Truffle Torte

As both my brother and sister were visiting for the holidays a delicious dessert was on the cards and seeing as they are both complete chocoholics, I knew chocolate would have to be the main feature. My brother in particular is such a chocoholic that he won’t even consider eating a dessert that doesn’t involve chocolate. In my opinion he doesn’t know what else he is missing out on, but as he was home for a visit I was more than happy to accommodate. When I found this torte in a recent food magazine I knew it more than met his requirements.

The original torte called for a sponge base, but I changed this to a chocolate biscuit base, as I wanted something with more of a textural contrast to the soft torte. I also added in a shot of Brandy to add a little extra decadence, a decision that was noticed and appreciated by my siblings.

The torte is quite unassuming to look at, but it tasted fabulous. It was quite dense and truffle-like in texture when cut, but light and melting in the mouth thanks to the addition of whipped egg whites in the mix. It was packed with rich chocolate flavour that developed and intensified as the torte softened in your mouth. The chestnut puree still contained tiny amounts of ground chestnut pieces which added to the texture and resulted in a creamy nutty flavour which was the perfect pairing to the rich bitter chocolate. The Brandy made it taste very decedent and just that little bit more special. The chocoholics were more than satisfied and couldn’t help but let out a little moan of ‘Mmmm’ when they took their first bite.

Chocolate Chestnut Truffle Torte
(Recipe adapted from BBC Good Food Magazine)Ingredients
200g Bourbon biscuits (these are chocolate crème sandwich cookies)
50g butter
1 x 435g can unsweetened chestnut purée
2 eggs
400g dark chocolate (around 60%)
600ml double cream
2 tbsp Brandy

Method
Grease a 25cm/10inch springform tin and line the base with baking paper.
Start by making the biscuit base. Place the biscuits, crème filling and all, into a food processor and blitz until you achieve fine crumbs. Melt the butter, drizzle it over the biscuit crumbs and pulse until mixed and the crumbs look damp.
Pour the crumbs into the tin and press down well to a flat even surface. Place in the fridge to firm up while you make the topping.
To make the truffle topping, separate the egg whites and yolks into different bowls. Add the chestnut puree to the egg yolks and beat until well combined (it won’t go completely smooth).
Melt the chocolate, Brandy and half of the cream together in a bowl set over a pan of simmering water. Once melted and glossy, remove from the heat and beat it into the chestnut mixture.
Whip the remaining half of the cream until thick enough to hold its shape, but not too stiff, before folding it into the chocolate mixture.
Whisk the egg whites until stiff peaks form. Carefully fold them into the chocolate mixture until no streaks remain.
Pour the rich chocolate chestnut mixture over the chilled biscuit base and shake gently to level the surface. Place in the fridge to chill and firm up for at least 5 hours, or preferably overnight.
When ready to eat, run a hot knife around the edge of the pan to release it from the tin. Dust the top with cocoa powder and serve with lightly whipped cream or crème fraiche if desired.
The torte can also be frozen for up to 2 months. Allow to thaw in the fridge overnight before using.
Serves 12-16

Note: The torte contains raw egg and so is not recommended for pregnant women or people recovering from illness.

Sunday, 3 January 2010

Christmas Pudding Truffles

With Christmas and New Year over things are starting to settle down and return to the regular routine, with the last few slices of Christmas cake or pudding the lingering reminder of the festivities.

My homemade Christmas pudding was a great success on Christmas day. It had been maturing for a month by the time it was given a final steam, doused in a copious amount of Brandy and set alight. The wispy blue flames looked so pretty dancing around the edge of the pudding. I did try and take a photo of it, but the flames haven’t really shown up. The pudding was very moist and flavoursome. The fruits and Brandy had mingled together nicely to give a deep, rich fruity overtone and the cakey bit was light and moist. I’m definitely going to make it again next year.

Over Christmas a friend had also given us a bought Christmas pudding and rather than eat it simply as a pudding (as we had the homemade one) I was given permission to turn it into truffles…Christmas pudding with Brandy butter chocolate truffles!
To make the truffles, you simply crumble the leftover pudding into a bowl, warm it gently in the microwave to make it soft and gooey and then mix in a little Brandy butter to help stick everything together (regular butter would do if you don’t have any leftover). It was then a matter of rolling them into balls, chilling them and covering with melted dark chocolate or a dusting of cocoa powder and your done. Delicious truffles, that look and taste like you must have been working in the kitchen for hours and yet in reality they are made from a few simple leftovers.

They were very moreish. The chocolate coating cracked with a very satisfying crunch as you bite into it yielding to a soft, fruity, boozy interior. The perfect after dinner treat when you don’t want a full dessert.

Christmas Pudding Truffles
Ingredients

500-600g leftover Christmas pudding
25g Brandy butter (or regular butter with ½ tbsp Brandy)
200g dark chocolate
Cocoa powder for dusting

Method
Line a baking tray with greaseproof paper and set aside.
Crumble the Christmas pudding between your fingers into a bowl. Add the Brandy butter and place the bowl in the microwave for 30 seconds, until warmed but not hot.
Mix everything together, until combined.
Take teaspoonfuls of the mixture and squish it gently into balls using the tips of your fingers. Place on the prepared baking tray. Continue until all the mixture is used up.
Place the baking tray in the freezer for an hour to completely chill the pudding truffles (this prevents them from breaking up when you dip them in chocolate).
After an hour, melt the dark chocolate until smooth. Remove the truffles from the freezer and dip each one into the melted chocolate, turning it until well covered. Use two small forks to help you.
Place the chocolate covered truffles back onto the baking tray. Once the chocolate has been used up, roll any remaining balls in cocoa powder.
Leave the chocolate to set at room temperature. Once set, place the truffles in small petit fours cases and serve.
Store any leftover truffles in an airtight container.
Makes around 30 truffles

Sunday, 27 December 2009

Daring Bakers December 09 Challenge: Gingerbread House

The December 2009 Daring Bakers’ challenge was brought to you by Anna of Very Small Anna and Y of Lemonpi. They chose to challenge Daring Bakers’ everywhere to bake and assemble a gingerbread house from scratch. They chose recipes from Good Housekeeping and from The Great Scandinavian Baking Book as the challenge recipes.

I was so excited by this challenge as for the last three years at Christmas I have been telling myself that I would make a gingerbread house and yet one never materialised. So when Decembers challenge was announced as a gingerbread house I knew this year would be THE year.

Rather than attempt a big gingerbread house I decided to halve the recipe and make a smaller version to adorn the top of my Christmas cake. We had the choice of two recipes but I went for Anna’s recipe choice from Good Housekeeping as I know and trust their recipes. The recipe can be found here.

The side walls for my gingerbread house I cut 8 x 8cm square and the front and back I cut 8 x 12 but then cut two diagonal middle points from the 8-12 cm height to create the middle points on which the roof would sit. The two roof pieces I cut 12 x 8 so that they would overhang the walls a little on each side rather than fit snugly on top. It sounds complicated but in practise it’s quite straightforward.

A few people on the forums were saying that the dough was rather dry and crumbly, and following other peoples advice I left my dough overnight in the fridge before using it and had no problems with it. I also cut out a little door from the scrapes to attach later in order to make it stand out more.

When you want to decorate the house you need to do it while all the pieces are still flat and separate. If you try and pipe icing onto an assembled house it will be very tricky and the icing will probably run where you don’t want it to. I piped on a few windows and attached the door and stuck on a wreath I had made out of fondant. I wanted the roof to look like it was tiled and I discovered that using large chocolate buttons was ideal as they were light enough not to add too much weight and blended in well with the rest of the house. I simply piped on lines of royal icing and then stuck the buttons on top, slightly overlapping them. I think it gives a good effect.

Assembling the walls and roof of the house was rather fiddly. I glued all the walls together first using royal icing and simply held them in place until the icing was dry enough to support itself. The roof was more tricky as it was set against the sloping sides and gravity naturally made it slide down. In the end I solved this problem by propping up the roof on either side with the weights from my weighing scales. I left it well alone for several hours until the icing glue had dried hard before nervously removing the weights…hurrah it worked! The roof felt quite sturdy and well attached. I had some mini snowflake sprinkles and decided to add these along the top edge of the roof to resemble crenulations which I think was a nice finishing touch.

After covering my Christmas cake in marzipan and fondant I simply placed the gingerbread house on top and decorated the surrounding cake with a few trees and an adorably cute snowman I made out of leftover fondant. I wanted the house to look like it belonged on in the scene, rather than just plonked randomly on top of the cake. I also added a little snowflake path and gave everything a light dusting with icing sugar. I love the look of it on the trees and rooftop, it makes it look as though there has been a light snowfall and very festive. I could almost imagine a little family sitting inside, enjoying Christmas day.

Thanks Anna and Y for choosing such a fun and festive challenge. Click to see a list of fellow Daring Bakers and their gingerbread houses.

For anyone who remembers me soaking the fruit and baking the Christmas cake a few weeks back, here is what it looks like after we cut into it on Christmas day. Packed full of sweet and moist fruits, some chewy, some soft or tangy and the occasional little crunch from the dried figs. The cake was light and nicely spiced with the odd nugget of an almond.

Friday, 25 December 2009

Happy Christmas

Happy Christmas everyone!
I just wanted to share with you my finished Christmas cake, the one I made on the blog a few weeks back. I decided to decorate it with a gingerbread house this year, which was ideal as a gingerbread house was this months Daring Bakers challenge. I made a mini version so I could put it on the cake. I think it looks so cute with the little snowman for company. I will be posting a proper report for Daring Bakers in a few days time when most of the festivities are over (we get a week to post about this one).
Until then I wish you all a very Merry Christmas.

Wednesday, 23 December 2009

Spiced Christmas Biscotti with Raisins, Dried Blueberries, Almonds & Pistachios

Biscotti are the perfect homemade Christmas gift as they keep well for a couple of weeks thanks to their being twice baked. This means you can make them a little ahead of time or send them off in the post without fear of them going stale. This is especially good at Christmas when people are more likely to be inundated with food, most of which has to be eaten straight away and so can run the risk of it being overlooked. Once the turkey has gone and the mince pies gobbled up, the little packet of biscotti will still be there to savour and munch on with a well earned cup of tea/coffee. That being said don’t let this fool you into thinking biscotti are dry and dull, they are anything but. Biscotti are crisp with a light open texture and are ideal for dunking into a hot drink or a glass of sweet dessert wine. They are often packed full of chunks of almonds, chocolate chips, candied peel or dried fruits meaning they are anything but boring.

When I decided to make biscotti this year I wanted one that would incorporate a little festive flavouring and this recipe hit just the right note. It’s studded with chunks of almonds, raisins, chewy dried blueberries and creamy pistachios. The dough includes hints of orange and mixed spice which give it a very warming flavour and aroma. The colour of the fruit and nuts and the mix of chewy fruits and nuggets of almond all encased in a crisp and crunchy biscotti make for one tasty biscuit.

I used lightly salted pistachios in my biscotti, mainly because I couldn’t find unsalted ones, and this resulted in a faint salty note every time I bite into one, which may sound odd and unpleasant in a sweet biscuit, but it actually worked really well against the sweet chewy fruits.

Traditional Italian biscotti (like this one) do not contain any butter, making them extra crisp, but if you prefer your biscotti with a slightly softer bite there are plenty of American style biscotti recipes around that do contain butter.

Once baked, sliced and baked again, my biscotti were packed into little cellophane bags and given little labels. I think this makes them look just as good as anything you can buy from shops or delis and ideal gifts for those hard-to-buy-for friends. Plus you can also change the add-ins to whatever suits the recipient, meaning they are bound to please.

Spiced Christmas Biscotti with Raisins, Dried Blueberries, Almonds & Pistachios
(Recipe adapted from BBC Good Food Magazine, 2008)
Ingredients
350g plain flour
2 tsp baking powder
2 tsp mixed spice
250g caster sugar
3 eggs
Zest of 1 orange
85g raisins
50g dried blueberries
50g blanched almonds
50g shelled lightly salted pistachios (80g shell on)

Method
Preheat the oven to 180C and line a large baking tray with greaseproof paper or a silicone sheet.
Put the flour, baking powder, mixed spice and sugar in a large bowl and stir together to mix.
Chop the almonds in half and lightly beat the eggs until broken. Add to the dry mix along with the zest of the orange, fruits and shelled pistachios.
Stir the mixture together with a wooden spoon until it starts to form into clumps, then use your hands to bring it together to form a dough. It may appear quite dry and first but do not be tempted to add any extra liquid as it does come together.
Turn the onto a lightly floured surface and kneed gently until no flour streaks remain. Divide the dough in half and shape each half into a round log shape, about 30cm long. Place the dough logs onto the prepared baking tray, leaving as much room between each one as possible to allow for spreading during baking.
Bake for 35-40 minutes until the dough has turned lightly golden brown and feels relatively firm when lightly pressed in the centre.
Remove from the oven and transfer the biscotti logs to a rack to cool for several minutes before slicing. Dampen two sheets of kitchen paper and lay these over the top of the biscotti logs to keep the top crusts soft – this prevents them from crumbling when you come to slice them.
Meanwhile, reduce the oven temperature to 150C.
After 5 minutes, place a biscotti log onto a chopping board and use a bread knife to cut it into 1cm slices, at a slight diagonal to give long thin biscotti.
Lay the biscotti slices on their side back on the baking tray. Bake for 10 minutes before flipping the slices over and baking for a further 5 minutes. (You will probably only fit one lot of biscotti on the baking tray at once).
Once baked, immediately transfer the biscotti to a wire rack to cool and repeat with the remaining log.
Once cool, store in an airtight container for up to two weeks or package into small boxes or bags to give as gifts.
Makes 40-50 biscotti