Sunday 31 October 2010

Halloween Cupcakes

Woohoo! It's Halloween

I just wanted to share a quick photo of some cupcakes I made for a friends Halloween party this evening. Lemon cupcakes with orange and black icing - not gluten free, but I had a lot of fun making them!
Hope everyone is having a spook-tacula day!

Wednesday 27 October 2010

Daring Bakers October 2010 Challenge: Buttermilk Doughnuts - Gluten Free!!

The October 2010 Daring Bakers challenge was hosted by Lori of Butter Me Up. Lori chose to challenge DBers to make doughnuts. She used several sources for her recipes including Alton Brown, Nancy Silverton, Kate Neumann and Epicurious.

I was more than a little daunted when I saw this months challenge. It was not the prospect of making doughnuts that made me nervous, we had done these before. It was the prospect of making them gluten free that I was worried about.

We were provided with an assortment of different doughnut recipes to chose from for this challenge, including a vegan gluten free recipe, however, as it was vegan this recipe didn’t include any milk or eggs in the recipe and I wanted to use these for my own doughnuts and so I decided to combine two different recipes together. I used the basic quantities from the vegan gluten free version and the ingredients and method from the non gf version. This worked well although my recipe was still a little hit and miss with the quantity of flour. Gluten free flours generally result in thicker batters as they absorb more liquid than wheat flours. My dough started off a little wet so I ended up just adding more flour until I got the right consistency but this seemed to work fine.

The dough was still quite sticky but we had been warned that this was expected so I didn’t worry. I also used a mix of yeast and baking agents in the dough as I wanted my doughnuts to be as light and puffy as possible. It produced a very smooth and puffy dough that was easy to work with.

I decided to make a few different varieties of doughnut – ring doughnuts, doughnut holes (the middle cut outs of the ring doughnuts) and chocolate stuffed round doughnuts. I filled the rounds of doughnut dough with chocolate chips before frying them, which meant a glorious molten chocolate centre when they were eaten hot from the pan – just watch out as they’ll be hot!

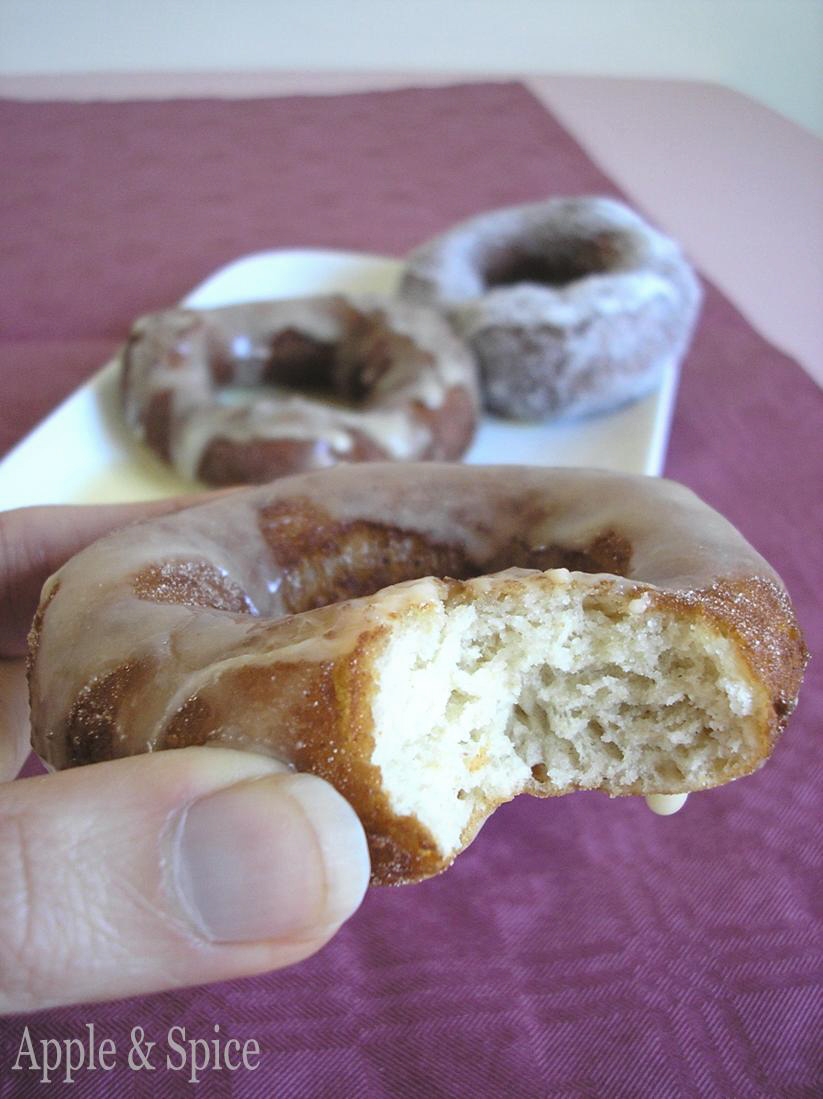
The doughnuts seemed to brown and cook incredibly quickly, more so than standard doughnuts I have done in the past. I’m not sure why this was but they were still cooked all the way through so it didn’t really matter. The ring doughnuts were coated in a maple sugar glaze, the doughnut holes were tossed in cinnamon sugar and the chocolate stuffed doughnuts were dusted with regular caster sugar.

When eaten warm the doughnuts were light, puffy and full of air holes. They had a crisp golden outer crust and a soft springy middle – success! I think the chocolate stuffed ones were my favourite, there is something so indulgent about biting into a hot gooey chocolate centre.

A word to the wise though, gluten free doughnuts do not keep well. They are fine for a couple of hours but after this time they start to turn a bit hard and dense. So if you want gluten free doughnuts – make and fry them to order!

Either way I was really pleased with my doughnuts and ate far too many of them – I had to take photos of them all you see. Thanks Lori for such a great challenge. Click to see the Daring Bakers blogroll for more doughnut delights.

Gluten Free Buttermilk Yeasted Cake Doughnuts
(My adapted combination of Nancy Silverton’s cake doughnuts and Whole Living Daily’s vegan gluten free doughnut recipe)
Ingredients
60 ml warm water
150g maize flour
100g rice flour
50g tapioca flour
50g buckwheat flour
¾ tsp xanthan gum
100g caster sugar
½ tsp bicarbonate of soda
1 tsp baking powder
1&1/8 tsp dried fast action yeast
200ml buttermilk
1 egg
1 egg yolk
2 tsp vanilla extract
Sunflower oil for frying

Extras
Decorations of your choice – I used cinnamon sugar, caster sugar and maple icing glaze
Fillings of your choice – I used chocolate chips

Method
Scatter two large baking trays with extra flour and set aside for later.
In a large mixing bowl, sift together the flours, sugar, bicarbonate of soda, xanthan gum and baking powder. Make a large well in the center, add the yeast and pour over the warm water and leave for 3 minutes before mixing briefly.
Add the buttermilk, whole egg, egg yolk and vanilla extract and mix together well using a round bladed butter knife. Switch to your fingers once the mixture starts to come together – it will be very sticky, but shouldn’t be wet.
Flour a work surface well with flour and turn out your dough. Scatter over a little more flour and gently roll or press the dough out until it is around 2cm thick.
Have the cutter of your choice to hand and cut out large round discs of doughnut dough. Use a smaller cut to cut away the centre if you want to make ring doughnuts. Keep any centre cut outs as these make great mini doughnut holes. Place the cut out doughnuts on the pre-prepared floured baking trays.
Gather up any scraps of dough and roll out again until all the dough is used up.
Leave the trays of doughnuts to prove for an hour in a warm place. They should puff up slightly but will not double in size.
Heat 1½ inches deep of oil in a fairly large saucepan until a small scrap of dough dropped into it turns golden brown within 20seconds (around 190C).
Carefully drop the doughnuts, 1 – 2 large ones at a time, into the hot oil. Once they start to look golden brown around the edges, flip them over and cook for a further 20 seconds. Remove from the oil with a slotted fish slice and drain briefly on kitchen paper before tossing in sugar or drizzling with a glaze.
Best served and eaten whilst still warm.

To make Filled Doughnuts
Method 1: Fill a piping bag with smooth seedless jam, custard or filling of your choice. Once the doughnuts are cooked, insert the tip of the piping bag in the side of the doughnut and squeeze out a generous amount of filling.
Method 2: (For more solid fillings) Place a teaspoon full of chocolate chips into the centre of the raw round of doughnut dough. Gather up the sides and squish together in the centre, encasing the chocolate in the dough. Turn the dough over and pat into a round flat disc. Fry as normal and leave to cool slightly before taking a bite. The chocolate middle should be all gooey and melted!
I made 12 assorted large ring & round doughnuts and 12 doughnut holes

Wednesday 20 October 2010

The Cake Slice October 2010: Pumpkin (Sweet Potato) Chocolate Chip Pound Cake (GF)

I’m so excited to be able to reveal that the new cake book that The Cake Slice bakers will be baking from for the next year is…. Cake Keeper Cakes by Lauren Chattman! It’s a fantastic looking book and absolutely full of all sorts of different types and styles of cakes – not just layer cakes, but loaf cakes, bundt cakes and snacking cakes to name but a few. If they are half as good as this months debut cake then we are going to be in for a treat!

The winning cake from our new cake book was a pumpkin chocolate chip loaf cake, which I was delighted about considering how seasonal it is. The recipe calls for canned pumpkin puree, but it is near impossible to find pumpkin puree in this country and so I substituted this with some pureed sweet potato. This worked really well and resulted in a deliciously moist and tender cake that had a faint pleasing orange colour.

I actually made this cake just a few days after discovering I had to go gluten free and so it was my very first attempt at baking. I decided to substitute the flour for Buckwheat flour, which despite its name is gluten free. This has a subtle nutty grassy flavour to it, similar to rye flour, and a natural sweetness that I thought would go well with the chocolate chips and sweet potato elements of the cake.

The recipe made a lot of cake mix and I was worried there would be too much for the tin but it baked up fine, tall and puffy with a long crack down one side which I actually think improved the appearance as it gave a tempting insight into the melty chocolate chips hidden within.

I absolutely loved the results and would never have guessed it was gluten free. It was light, soft and springy and wonderfully moist. I loved the dark chocolate chips studded throughout the cake which seemed to stay permanently soft and slightly gooey after baking. I couldn’t stop eating it and bizarrely it tasted really good when dipped into hot strong coffee.

Unfortunately the rest of my family had mixed results to this cake. My mum ate it and said it was ok, but she didn’t like the grassy note from the buckwheat. My dad was not a fan but he likes more traditional flavours and was highly confused by the combination of spices, sweet potato and chocolate chips in a cake. However, my lovely grandmother (who shares/shared my tastes for rye breads and other assorted grains) adored the cake as much as I did. She even said that if that’s what gluten free cake tasted like then she wouldn’t mind binning wheat altogether – I love you grandma!

I know that other members of the group loved this cake too, so gluten free or not, this autumnal cake is perfect for this time of year and definitely worth making. Click to see the Cake Slice blogroll.


Pumpkin (Sweet Potato) Chocolate Chip Pound Cake (GF)(Recipe from Cake Keeper Cakes by Lauren Chattman)
Ingredients
210g plain flour (I used Doves buckwheat flour)
1 tsp baking soda
1 tsp baking powder
1 tsp ground cinnamon
½ tsp salt
¼ tsp ground cloves
Pinch nutmeg
100g unsalted butter, softened
280g caster sugar
3 eggs
200g pumpkin puree (I used pureed sweet potato*)
1 tsp vanilla extract
75ml milk
75g dark chocolate chips
75g chopped walnuts (I’d run out of these)

MethodHeat the oven to 180C. Coat the inside of a 9 x 5 inch loaf pan with nonstick cooking spray and dust with flour.
Combine the flour, baking powder, baking soda, cinnamon, salt, cloves and nutmeg in a medium mixing bowl.
Combine the butter and sugar in a large mixing bowl and cream with an electric mixer on medium high speed until fluffy, about 3 minutes, scraping down the sides of the bowl once or twice as necessary.
With the mixer on medium low speed, add the eggs, one at a time, scraping down the sides of the bowl after each addition. Stir in the pumpkin puree (see note below) and vanilla. Stir in the milk.
Turn the mixer to low speed and add the flour mixture, a third at a time, scraping down the sides of the bowl after each addition. Stir in the chocolate chips and walnuts.
Scrape the batter into the prepared pan and smooth the top with a rubber spatula. Bake the cake until it is firm to the touch and a toothpick inserted in the centre comes out clean, 55 minutes to 1 hour. Let the cake cool in the pan for 5 minutes, invert it onto a wire rack and then turn it right side up on a rack to cool completely.
Store uneaten cake in a cake keeper at room temperature for up to 3 days or in the refrigerator, wrapped in plastic for up to 1 week.
Makes one 9 by 5 inch loaf cake

Note* It’s very hard to find pumpkin puree in the UK, so I substituted this with homemade sweet potato puree. Simply cut a large sweet potato in half, place in a bowl and add 2tbsp water. Cover the top with clingfilm and microwave on high for 7 minutes until the flesh is soft. Scoop out the flesh and mash with a potato masher (you won’t need to add any liquid or butter) and use as above.

Sunday 17 October 2010

Chocolate & Cherry Mud Fudge Brownies (GF)

It is the last day of National Chocolate Week today and I was determined to bake a chocolate recipe to celebrate. These chocolate brownies are incredibly chocolaty – just the thing! I found the recipe online and believe it originally came from Gourmet magazine, however, I have put my own stamp on it by adapting it to be gluten free and to include some cherry brandy soaked dried cherries for extra indulgence.

It was the photo of the brownies that drew me to the recipe, they looked so moist and squishy that I couldn’t resist trying them out. The brownies were called Chocolate Crack Brownies, which I assume means they are so addictive they are like drugs! I admit that the resulting brownies were insanely good but I have renamed them Mud Fudge Brownies which I think sounds much more inviting. They are soft, squishy, fudgy and intensely chocolaty with that just-cooked tenderness of a chocolate mud cake all encased under a delicate crisp sugar topping.

I was a little worried that making them gluten free would result in a drier brownie as gluten free flours have a tendency to absorb the excess moisture out of foods but brownies are actually one of the best baked goods to make gluten free as the proportion of flour called for is usually very low compared to the vast amounts of butter and chocolate, meaning soft and tender brownies are almost guaranteed. Just look at the slice – so good!

I decided to add some dried Morello cherries to the batter as I love the combination of cherries and chocolate together and I found a small snack pack of them lurking near the back of the cupboard. They were a little too dried to add straight in, but a short soak in some cherry brandy plumped them back up and added a fantastic fruit boozy hit every time you unexpectedly bit into one.

Using a good quality, high cocoa content dark chocolate is what makes these brownies so satisfyingly chocolaty. I used a 70% Sainsbury’s Taste the Difference dark chocolate which was described as having ‘fruity red berry notes.’ I was generously sent a free sample to try after the re-launch of the Taste the Difference range (along with a hazelnut Swiss milk chocolate, also delicious) and was pleasantly surprised at how well it seemed to enhance the flavour of the brownies.

So whether you are making the brownies gluten free or not, I urge you to give them a go and bet you won’t be able to stop at just one!

Chocolate & Cherry Mud Fudge Brownies (GF)
Ingredients
135g butter
135g 70% dark chocolate
240g caster sugar
½ tsp vanilla extract
¼ tsp salt
3 eggs
50g gluten free flour (mix of rice, potato & tapioca flours)
OR 50g plain flour
20g cocoa powder
30g dried Morello cherries
1 tbsp cherry brandy

Method
Pour the cherry brandy over the dried cherries, cover with clingfilm and leave for 3-4 hours to plump up.
Preheat the oven to 180C. Grease a 7-8inch square baking tin and line the base with baking paper.
Gently melt the butter and chocolate together in a pan set over a low heat, stirring occasionally. Once melted, remove from the heat and beat in the vanilla, salt and sugar (it will go grainy – but this is normal)
Beat in the eggs, one at a time, until well incorporated. The mix should go thick, glossy and smooth.
Scatter over the flour and cocoa powder and mix until combined. Finally, beat in the soaked cherries and any remaining liquid.
Pour into the prepared pan and bake for 25 minutes. They will look slightly puffed with a dry sugary topping and be soft and moist underneath (not raw or molten though!)
Allow to cool in the tin for at least an hour before turning out and slicing. Delicious eaten at any temperature and with anything!

Monday 11 October 2010

Gluten Free Apple & Blackberry Buckwheat Crumble

I want to start by thanking everyone for all their kind comments and words of encouragement during the past week. All the blogs, recipes, hints and tips you have given me will be enough to keep me busy in the kitchen for a very long time and I’ve got lots of new ideas and ingredients to experiment with.

A couple of nights ago a good friend of mine invited me and a group of our friends round for dinner. We all get together about once a month for an informal dinner and chat which is a great way of keeping up to date with everyone’s latest news. This was going to be the first time I had seen any of them since being diagnosed as coeliac and I was a little unsure how they would take it. The meal had been planned for some time I felt rather bad about having to phone the host up and explain I wouldn’t be able to eat the pasta dish she was planning. However, she was really supportive and didn’t mind in the slightest and quickly changed the menu to a delicious vegetable curry with rice. As a thank you I told her I’d bring a dessert choice.

We had a small pile of cooking apples sitting on the counter from my grandmothers garden as well as some late blackberries so an apple and blackberry themed dessert was the obvious choice. I decided to turn them into a crumble as I felt sure I would be able to make a suitable crumble topping using my new range of gluten free flours. I decided to use primarily buckwheat (my new favourite) as I thought its natural sweetness and nutty flavour would go well with the fruit and a little potato and rice flour for their crumbliness. I also added some ground almonds for flavour and to help mask any strange flavours that I thought the flours might produce – I’m happy to say there were no strange flavours.

I decided to puree the blackberries and use just their juice in the base of the crumble, rather than add the whole berries. I love the flavour and colour blackberries give but I know some people don’t enjoy their seeds so I though this would be a good compromise. I also stewed most of the apple beforehand and then stirred through some raw apple at the end for texture. The blackberry puree bubbled up through the apple during cooking and dyed all the fruit a gorgeous bright shade of purple which made it look so inviting when you broke through the golden crumble topping.

I’m please to say that everyone loved the crumble and said if they hadn’t been told, they wouldn’t have known it was gluten free – hurrah! If you really thought about it there was a slightly sandy texture from the rice flour but when mixed with the fruit this was not noticeable. In fact I enjoyed it so much that I used the rest of the fruit to make another crumble the following day which I enjoyed with my family after Sunday dinner last night.

Gluten Free Apple & Blackberry Buckwheat Crumble
Ingredients
450g cooking apples
150g eating apples
150g blackberries
50g caster sugar

Buckwheat Crumble
100g buckwheat flour
30g potato flour
20g rice or maize flour
40g ground almonds
70g butter
50g caster sugar
1 tbsp water

Method – Crumble Topping
Measure out the flours, ground almonds and sugar into a bowl. Cut the butter into small cubes, add to the flour and rub it through the flour using the tips of your fingers. Lift the flour up as you rub the butter in, letting it fall back into the bowl. Continue until you have no large lumps of butter left and the mix resembles fine bread crumbs. Sprinkle over the water and squeeze the mix together so you get a few bigger clumps. Set aside for later.

Fruit
Preheat the oven to 190C.
Peel, core and roughly dice the cooking apples. Place into a large pan, cover the base of the pan with 1cm of water and heat until the mixture begins to bubble. Allow to simmer for 15-20 minutes until the apple is mushy and soft. Peel, core and roughly dice the eating apple and stir through the stewed apple. Set aside.
Meanwhile, place the blackberries into a separate small pan and add enough water to cover the base of the pan. Bring to a simmer and cook for 5 minutes until the berries are beginning to break down and release their juices. Remove from the heat and transfer the blackberries into a sieve set over a small bowl to catch the juices. Crush the blackberries with the back of a spoon, pressing all the juice through the sieve and into the bowl below. Continue until you have only the seeds left behind. Discard these.

Assemble
Pour the blackberry puree into the base of a pie or pudding dish. Spoon the apple mixture over the top and scatter over the crumble topping.
Bake in the preheated oven (190C) for 25-30 minutes until the top is golden in colour and crisp.
Allow to cool for 10-15 minutes before serving. The blackberry puree should have bubbled up through the apple and stained it all a gorgeous shade of purple.
Serve with custard, cream or ice cream if desired. Also tastes great cold.

Tuesday 5 October 2010

A Dramatic Change of Lifestyle: Getting to the Grain of the Problem

I have some news so share with you all. At the end of September 2010 I was diagnosed with Coeliac disease. When I was told I was completely flabbergasted – I think I almost laughed in disbelief and my first words were ‘Oh my word!’ Then my brain started to kick in with what this meant – no wheat flours, no bread, cereals, pasta or cakes. My second thought that flashed through my mind was ‘but… I was planning a trip to Paris to eat my way around all the patisseries!’ Hmm guess that’s out the window.

However, despite feeling a little overwhelmed I also felt incredibly thankful. For the past year I have been loosing weight for no apparent reason with the last 9 months resulting in quite a dramatic and alarming weight loss. At first I was not too bothered and put it down to stress of finishing uni and searching for work but when it got to the stage where friends and family began making comments and I got dangerously thin I became very scared. I went to the Dr’s and had a range of blood tests done for various things – thyroid, diabetes and they all came back normal. I was told just to try and eat more. I had already tried this myself and so my mum had helped me to devise some high calorie meals, I was eating enormous breakfasts, cooked meals at lunchtimes and I knew I already ate plenty of cakes, bread and desserts (just look at my blog contents) – but still the weight was falling off.

The person who I feel has suffered the most through all this was my mum. She had the worry over seeing me loose weight while trying to fend off comments from people insisting to her that I was anorexic and why didn’t she do something about it. I felt like screaming at them all – I eat people – it’s not my fault!!

In the end I sought out our old family doctor and within minutes of seeing me he suggested I be tested for coeliac disease. Having done a 4 year food & nutrition degree at university I was well aware of this disease but had discounted it as a possibility as I didn’t fit all the symptoms – sure I had a fair few of them, bloating after eating, stomach cramps, weight loss and fatigue, but I had accepted this as being just the way I am. I hadn’t been sick or suffered chronic abdominal pain (turns out the disease can present itself in three different ways). However, I was just so greatful he was taking me seriously and so went off to get tested, if not a little skeptically. So when I went to get my results I was astounded to be told it had come back positive, but also immensely greatful and relieved that finally there was an explanation and something that could be done about it. I also felt a little foolish I hadn’t picked it up myself. It just goes to show we all suffer with the delusion of ‘it won’t happen to me.’ You get tested for coeliac disease with a blood test which is usually followed by a biopsy of the gut. They test the blood to see if you have any antibodies, know as TGI’s that try and attack foods containing gluten. These in turn damage the lining of the gut which stops you absorbing all the nutrients from foods – hence the weight loss. A normal person can register between 0-6, my reading was over 120 – yikes!! I guess that’s pretty positive then!

After a brief moment of panic I am actually feeling very positive and even a little excited by the prospect of a gluten free diet. Yes I am going to miss some foods terribly, especially sourdough and rye breads, breakfast cereals and cakes – some of my all time favourite foods – and the t.v. seemed to suddenly be full of baking programmes or adverts for bread which is just cruel… but I also feel lucky that I have such a great interest in food and knowledge gained from my uni course. I am actually looking forward to experimenting with recipes and finding out about new flours and ingredients – I already know and love buckwheat scones and pancakes and have used maize meal to make vegetable fritters but it’s the others – tapioca starch, rice flour, gram flour and the exotic sounding xantham gum which have me daunted.

It’s going to take ages to go food shopping now, reading all the ingredients lists. Aside from the obvious ones, wheat, rye, barley, couscous, semolina, bulgar, spelt and malt, manufacturers seem to have a knack for hiding gluten in the most unlikeliest of foods – soy sauce (made from fermented wheat), rusks in sausages (vegetarian ones too), thickers in soups, sauces and stews, coatings on potato wedges, malt vinegar in chutneys and dressings, its even hidden in some chocolates and ice creams and in the coating added to the skin of fruit to make it shiny.

This of course means that some gluten free recipes will probably start to creep into the blog too. It’s almost ironic that a blog dedicated to cakes, breads and desserts turn out to be the foods I’m not allowed to eat. I am not going to stop baking some ‘normal’ cakes and desserts for my family as they can still enjoy eating them and I still enjoy making them and seeing them devoured, but I have no doubt that future Daring Bakers challenges or The Cake Slice cakes might often make appearances as gluten free varieties. I have a few backdated recipes to post about but after this if things get a little quiet in the next few weeks I hope you’ll bear with me. I already have a great gluten free cake recipe but if anyone’s got any T&T recipes for breads, breakfast ideas, pastry or crackers etc I’d love to hear from you. My first attempt at bread has turned out with a crumb rather like a gummy wallpaper paste. Thankfully I’m not a lover of fluffy white breads, but I had to toast it to make it edible. I get the feeling I’m going to need all the hints and tips I can get.

I know its going to be hard and I’m sure at some point in the next few weeks it will truly hit me what this diagnosis means but for now with the wonderful support from my family I’m just focused on dealing with it and getting back to being healthy again. I’ve only been gluten free for a week and already I’m starting to feel a bit better in myself which is a great incentive to carry on.

If anyone wants any more info the Coeliac UK website is a great place to start.

Saturday 2 October 2010

Blackberry & Lime Cake with Walnut Streusel Topping

I made this cake a couple of weeks ago for my grandads birthday. I had just been blackberrying and so was primed with lots of fresh berries to use. I decided to pair them with some lime zest as I think this helps bring out the berries natural zing and sweetness. The amount of lime zest stated in the recipe may seem small, but it’s amazing how much flavour this small amount provides, it really was quite apparent in the finished cake.

It’s an unusual cake in that when it comes to mixing in the flour you are actually after a slightly lumpy batter as over mixing it will result in a dense heavy cake. In this respect it’s more like a muffin mix where the little lumps of flour help give the crumb its airy texture and springiness. My grandad is also diabetic (diet controlled) so I liked the fact that the recipe didn’t contain too much sugar and that it made use of a nutty streusel topping instead of a buttercream or frosting.

The streusel topping bakes into a delicious crispy crumbly topping and the added nuts get a gentle toasting making them even more flavoursome and nutty. The cake itself was studded with the blackberries which were full of flavour and added little pockets of bright purple juiciness. It was delicious when served slightly warm – we even reheated slices the next day in the microwave, the perfect accompaniment to a cup of afternoon tea.

Blackberry & Lime Cake with Walnut Streusel Topping
(Recipe adapted from Delia Smith)
Cake
250g blackberries
Zest of ½ lime
275g plain flour
1 tsp baking powder
½ tsp salt
2 eggs
75g caster sugar
170ml milk
110g butter

Streusel
75g plain flour
½ tsp baking powder
25g butter
50g Demerara sugar
50g walnuts
1 tbsp water

Method – Streusel Topping
Place the flour, baking powder and butter into a bowl. Use the tips of your fingers to rub the butter into the flour, lifting it up and letting the mix fall back into the bowl. Continue until you have no large lumps of butter left and the flour is starting to look like crumbs.
Chop the walnuts into small chunks and mix through the flour mixture along with the sugar. Add the water and rub briefly so the mix forms little into little clumps. Set aside until required.

Blackberry Lime Cake
Preheat the oven to 190C. Grease a deep 8inch springform tin and line the base with baking paper.
Whisk the eggs, sugar and milk together until combined and just starting to look foamy. Melt the butter until liquid, then pour into the egg mix and briefly whisk again.
Sift the flour and baking powder over the top and add the salt and lime zest. Mix with a spatula or wooden spoon in a folding motion until no flour streaks remain – it should look lumpy – this is ok – don’t try and beat them out!
Add the blackberries and gently fold them in, don’t mix too much or they will break down, but a few purple streaks are quite pretty.
Pour the cake batter into the tin and scatter over the streusel topping.
Bake in the oven for 1 hour until the top is deep golden brown and a skewer inserted in the middle comes out clean.
Allow to cool in the tin for 30 minutes before removing from the tin and leaving to cool to room temperature.
Delicious served still warm with cream or crème fraiche
Serves 8-10